NOTE:
• When setting the seconds, press [ CH/+ ] or [ MEM/- ] button to set its value to 00.
SETTING THE ALARM TIME
• In normal time mode, press [ ALARM SET ] button to enter alarm time mode. Press and hold
[ ALARM SET ] button for 3 seconds until the Hour digit flashes.
• Press [ CH/+ ] or [ MEM/- ] button to set its value.
• Press [ ALARM SET ] button again to advance to the Minute setting.
Press [ CH/+ ] or [ MEM/- ] button to set its value.
• Press [ ALARM SET ] button to save and exit the setup mode, or the clock will automatically
exit the setup mode after 30 seconds if no buttons are pressed.
NOTE:
After pressing [ CH/+ ] or [ MEM/- ] button, the alarm function is automatically turned on
(icon “ ” displayed).
USING THE ALARM AND SNOOZE
• In normal time mode, press [ ALARM SET ] button to enter alarm time mode. Press
[ ALARM SET ] button again to turn on the alarm (icon “ ” displayed) or turn off the alarm
function.
• If no button is pressed, the alarm will automatically stop after 2 minutes.
• Press [ SNOOZE ] button to stop the current alarm and enter snooze mode. Alarm icon will be
flashing continuously. The alarm will sound again in 5 minutes. Snooze can be operated
continuously for 24 hours.
• Press [ ALARM SET ] button to turn off alarm function.
TEMPERATURE AND HUMIDITY
To Select Temperature Unit
Slide [ °C / °F ] switch on main unit to <°C> or <°F> position.
To Read Outdoor Temperature and Humidity
The default displayed channel is channel 1.
1. In normal mode, press [ CH/+ ] button repeatedly to view readings of channel 1, 2 and 3.
2. Press and hold [ CH/+ ] button for 5 seconds to enter channel auto-change. The clock will
automatically rotate through each channel, switching every 4 seconds.
3. Press [ CH/+ ] again to return to normal time mode.
NOTE:
1. Once the channel is assigned to one sensor, you can only change it by removing the batteries
or resetting the unit.
2. If no signals are received or the transmission is interfered, “---” will appear on the LCD.
3. When relocating the main unit or sensors, ensure the transmission is within the effective
range; approximately 160 feet.
VIEWING MAXIMUM AND MINIMUM RECORDS
1. Press [ MEM/- ] button to view minimum and maximum, indoor and outdoor, temperature
and humidity records.
2. While viewing the minimum and maximum records, press and hold [ MEM/- ] button for 3
seconds to clear both min and max records.
NOTE:
1. Record value will be updated by new high or low record.
2. Once you re-insert batteries to the main unit, all of the values will be defaulted.
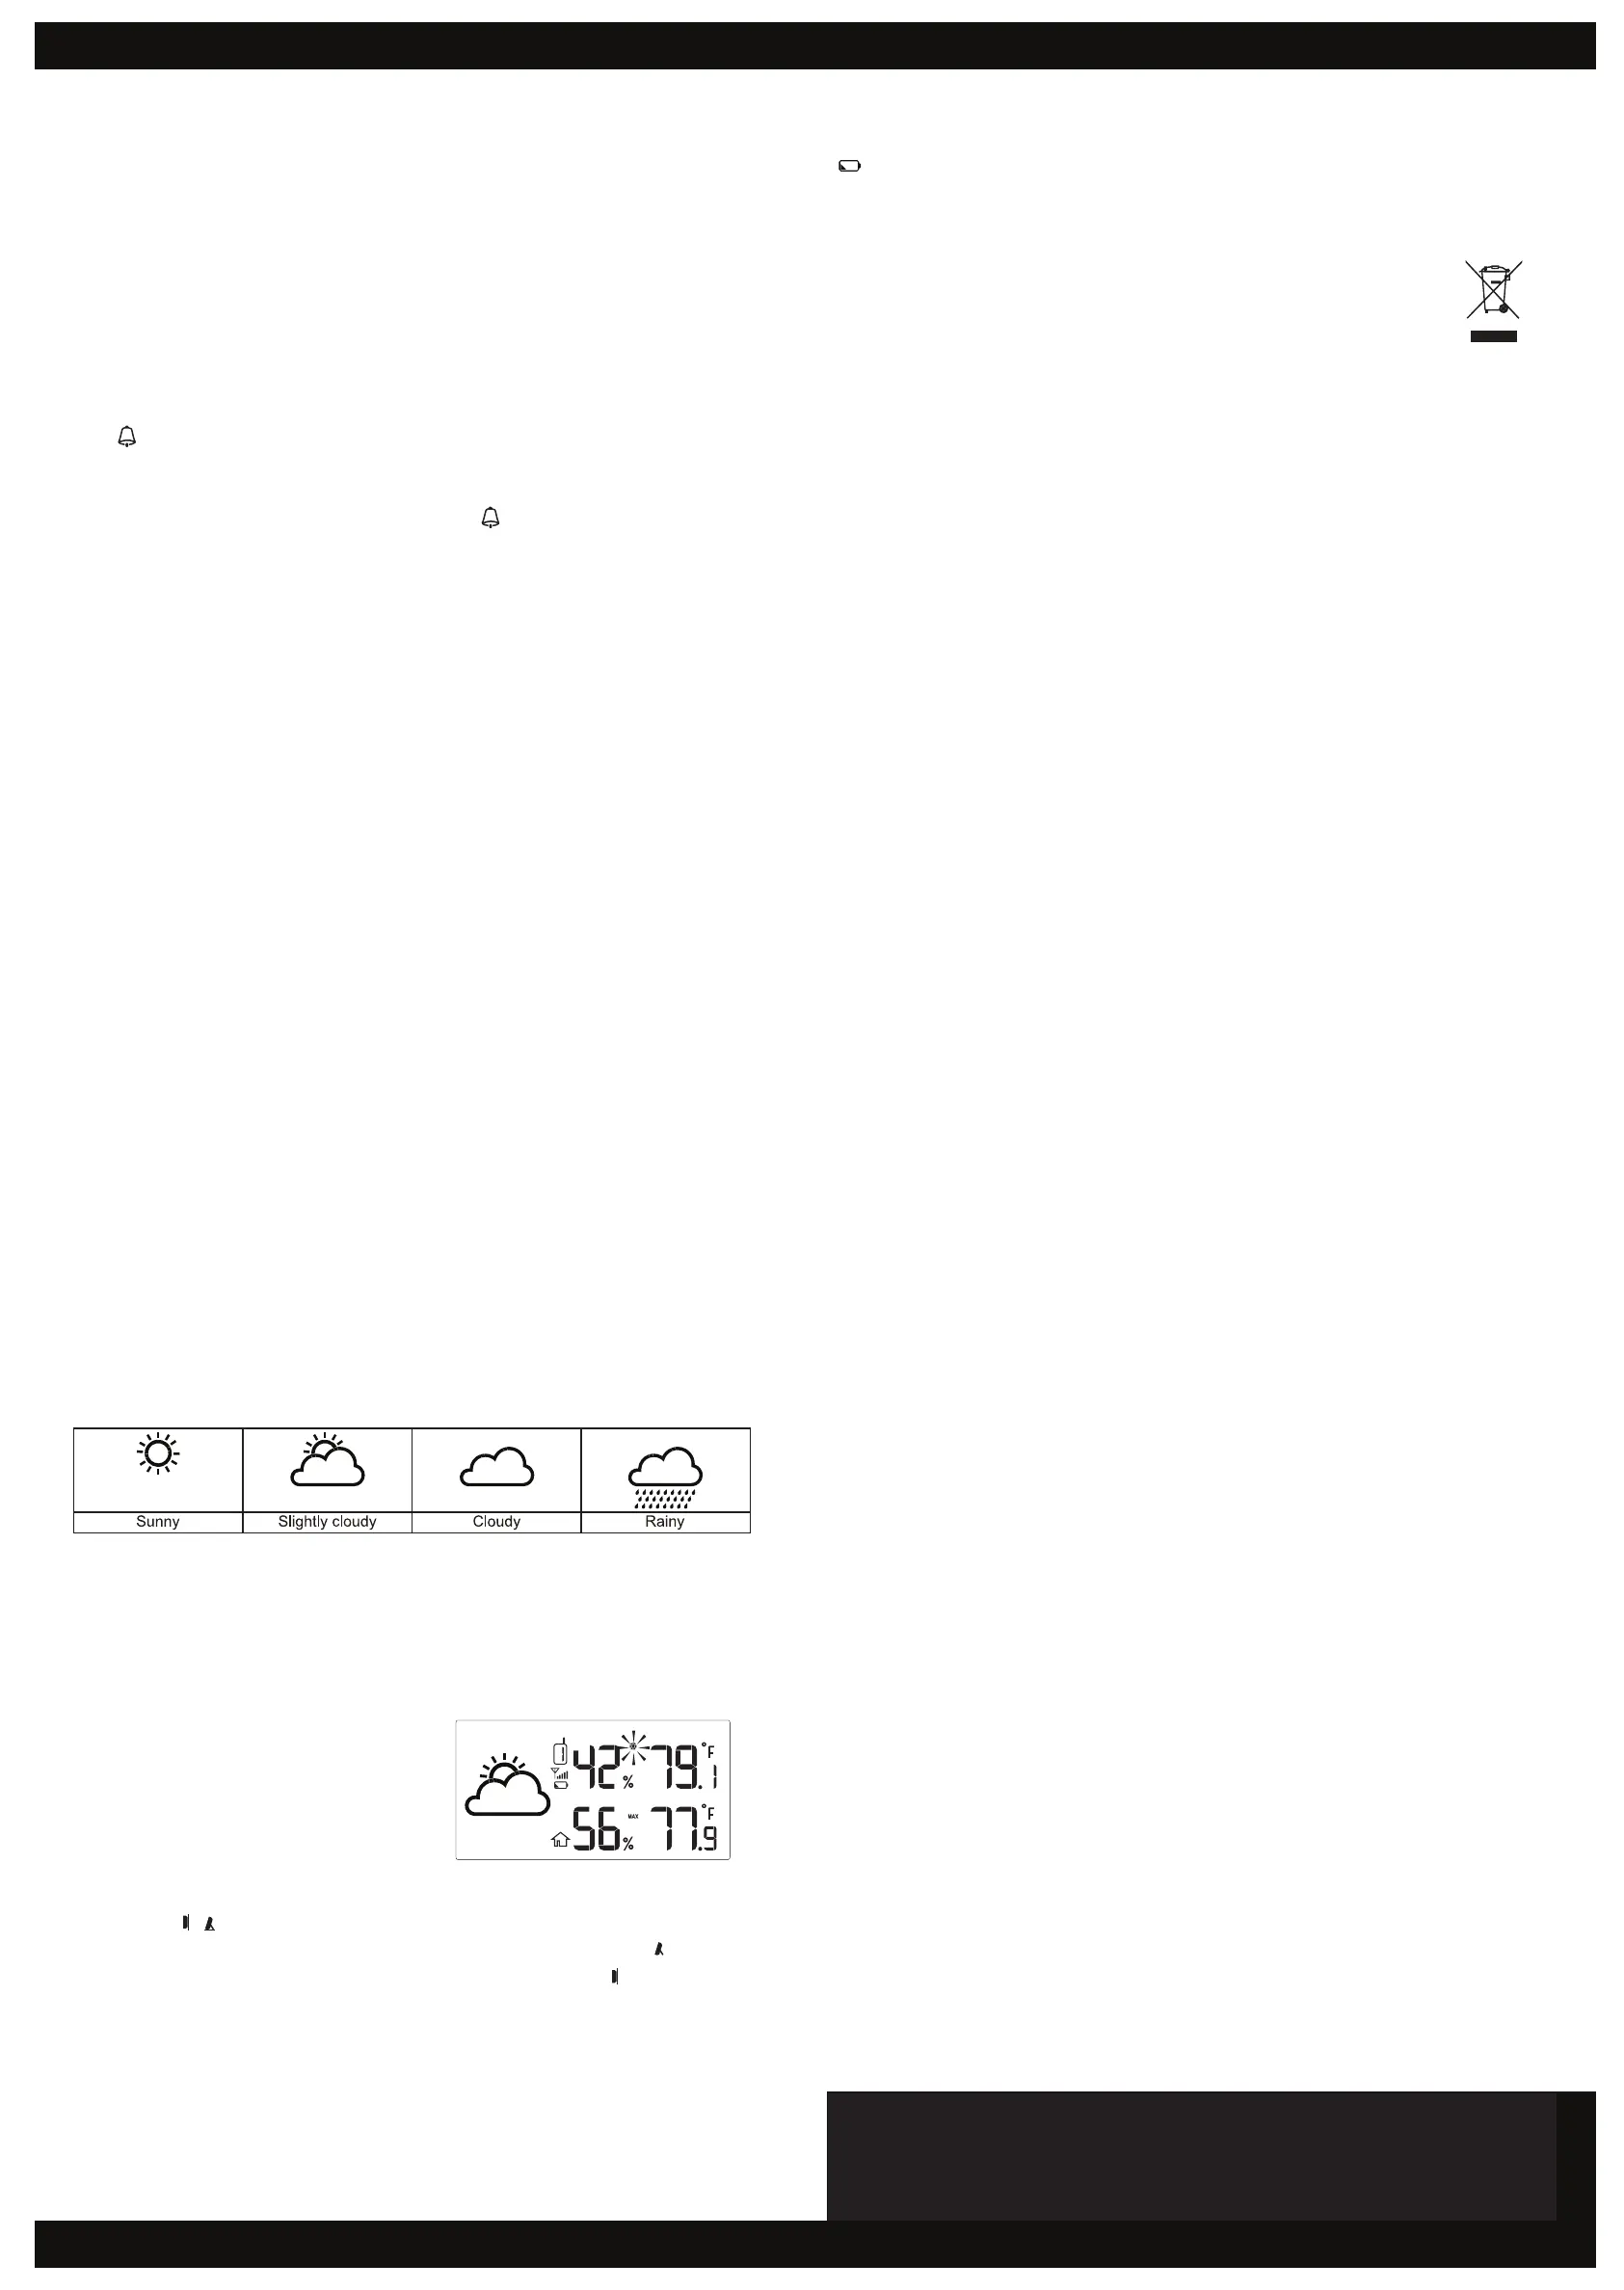
WEATHER FORECAST
The main unit contains a built-in sensitive pressure sensor to predict the weather forecast for
the next 12 to 24 hours.
NOTE:
1. The accuracy of a general pressure-based weather forecast is about 70% to 75%.
2. The weather forecast is meant for the next 12 ~ 24 hours, it may not necessarily reflect
the current conditions.
ICE ALERT
When the outdoor temperature falls between
-2°C to 3°C (28°F to 37°F), the ice alert icon
will display on the LCD and flash
continuously. It will disappear once the
temperature is out of this range.
TO SET THE VISUAL ANGLE
User can use < / > slide switch to set visual angle:
If the clock is placed directly on a flat surface with the table stand, choose the < > position.
If the clock is hung on the wall with the wall mounting hole, choose the < > position.
BATTERY REPLACEMENT
When the LCD becomes dim, replace with 4 new AA size batteries. If the low battery indicator
“ ” is displayed in the outdoor window, replace the 2 AA size batteries in the sensor.
NOTE:
• If the clock is not used for a long period of time, please remove the batteries.
• Attention! Batteries should not be exposed to excessive heat such as direct sunlight, fire or the
like. Please dispose of used unit or batteries in an ecologically safe manner.
FCC STATEMENT
This device complies with Part 15 of the FCC Rules. Operation is subject to the following two
conditions: (1) this device may not cause harmful interference, and (2) this device must accept any
interference received, including interference that may cause undesired operation.
Warning: Changes or modifications to this unit not expressly approved by the party responsible for
compliance could void the user’s authority to operate the equipment.
NOTE: This equipment has been tested and found to comply with the limits for a Class B digital
device, pursuant to Part 15 of the FCC Rules. These limits are designed to provide reasonable
protection against harmful interference in a residential installation. This equipment generates,
uses and can radiate radio frequency energy and, if not installed and used in accordance with the
instructions, may cause harmful interference to radio communications.
However, there is no guarantee that interference will not occur in a particular installation. If this
equipment does cause harmful interference to radio or television reception, which can be determined
by turning the equipment off and on, the user is encouraged to try to correct the interference by one
or more of the following measures:
- Reorient or relocate the receiving antenna.
- Increase the separation between the equipment and receiver.
- Connect the equipment into an outlet on a circuit different from that to which the receiver is needed.
- Consult the dealer or an experienced radio/TV technician for help.
SPECIFICATIONS
Radio Controlled signal: WWVB version
RF transmission frequency: 433 MHz
RF transmission range: Maximum 50 meters
Number of remote sensors: Up to 3 units
Temperature sensing cycle: Around 60-64 seconds
INDOOR TEMPERATURE
Displayed range: -40°F ~ 158°F ( -40°C ~ 70°C )
Operating range: 32°F ~ 113°F ( 0°C ~ 45°C )
Accuracy: 0°C ~ 40°C: +/- 1°C (+/- 2.0°F)
40°C ~ 45°C: +/- 2°C (+/- 4.0°F)
INDOOR HUMIDITY
Displayed range: 20% ~ 90%
Operating range: 20% ~ 90%
Resolution: 1%
Accuracy: 20% ~ 39%: +/- 8% @ 25°C
40% ~ 70%: +/- 5% @ 25°C
71% ~ 90%: +/- 8% @ 25°C
OUTDOOR TEMPERATURE
Displayed range: -40°F ~ 158°F ( -40°C ~ 70°C )
Operating range: -4°F ~ 140°F ( -20°C ~ 60°C )
Accuracy: -20°C ~ 0°C: +/- 2°C (+/- 4.0°F)
0°C ~ 40°C: +/- 1°C (+/- 2.0°F)
40°C ~ 60°C: +/- 2°C (+/- 4.0°F)
OUTDOOR HUMIDITY
Displayed range: 1% ~ 99%
Operating range: 20% ~ 90%
Resolution: 1%
Accuracy: 20% ~ 39%: +/- 8% @ 25°C
40% ~ 70%: +/- 5% @ 25°C
71% ~ 90%: +/- 8% @ 25°C
POWER
Main unit: 4 x AA size 1.5V batteries
Remote sensor: 2 x AA size 1.5V batteries
DIMENSIONS
Main unit: 224(L) x 224(H) x 23(D) mm
Remote sensors (3): 65(L) x 100(H) x 35(D) mm
● Repeat the above operations to set the time and calendar in this sequence: 12/24Hr
Hour
Minute Second Time Zone
● Press [ TIME SET ] button to save the setting and exit setup mode, or the clock will
automatically exit after 30 seconds if no buttons are pressed.
NOTE:
● When setting the seconds, press [ CH/+ ] or [ MEM/- ] button to set its
value to 00.
SETTING THE ALARM TIME
● In normal time mode, press [ ALARM SET ] button to enter alarm time mode. Press and hold
[ ALARM SET ] button for 3 seconds until the Hour digit ashes.
● Press [ CH/+ ] or [ MEM/- ] button to set its value.
● Press [ ALARM SET ] button again to advance to the Minute setting.
Press [ CH/+ ] or [ MEM/- ] button to set its value.
● Press [ ALARM SET ] button to save and exit the setup mode, or the clock will automatically
exit the setup mode after 30 seconds if no buttons are pressed.
NOTE:
After pressing [ CH/+ ] or [ MEM/- ] button, the alarm function is automatically turned on
(icon “ ” displayed).
USING THE ALARM AND SNOOZE
● In normal time mode, press [ ALARM SET ] button to enter alarm time mode. Press
[ ALARM SET ] button again to turn on the alarm (icon “ ” displayed) or turn off the alarm
function.
● If no button is pressed, the alarm will automatically stop after 2 minutes.
● Press [ SNOOZE ] button to stop the current alarm and enter snooze mode. Alarm icon will be
ashing continuously. The alarm will sound again in 5 minutes. Snooze can be operated
continuously for 24 hours.
● Press [ ALARM SET ] button to turn off alarm function.
TEMPERATURE AND HUMIDITY
To Select Temperature Unit
Slide [ °C / °F ] switch on main unit to <°C> or <°F> position.
To Read Outdoor Temperature and Humidity
The default displayed channel is channel 1.
1. In normal mode, press [ CH/+ ] button repeatedly to view readings of channel 1, 2 and 3.
2. Press and hold [ CH/+ ] button for 5 seconds to enter channel auto-change. The clock will
automatically rotate through each channel, switching every 4 seconds.
3. Press [ CH/+ ] again to return to normal time mode.
NOTE:
1. Once the channel is assigned to one sensor, you can only change it by removing the batteries
or resetting the unit.
2. If no signals are received or the transmission is interfered, “---” will appear on the LCD.
3. When relocating the main unit or sensors, ensure the transmission is within the effective
range; approximately 160 feet.
VIEWING MAXIMUM AND MINIMUM RECORDS
1. Press [ MEM/- ] button to view minimum and maximum, indoor and outdoor, temperature
and humidity records.
2. While viewing the minimum and maximum records, press and hold [ MEM/- ] button for 3
seconds to clear both min and max records.
NOTE:
1. Record value will be updated by new high or low record.
2. Once you re-insert batteries to the main unit, all of the values will be defaulted.
WEATHER FORECAST
The main unit contains a built-in sensitive pressure sensor to predict weather forecast in the next 12
to 24 hours.
NOTE:
1. The accuracy of a general pressure-based weather forecast is about 70% to 75%.
2. The weather forecast is meant for the next 12 ~ 24 hours, it may not necessarily re ect
the current conditions.
ICE ALERT
When the outdoor temperature falls between
-2°C to 3°C (28°F to 37°F), the ice alert icon
will display on the LCD and ash
continuously. It will disappear once the
temperature is out of this range.
TO SET THE VISUAL ANGLE
User can use < / > slide switch to set visual angle:
If the clock is placed directly on a flat surface with the table stand, choose the < > position.
If the clock is hung on the wall with the wall mounting hole, choose the < > position.
BATTERAY REPLACEMENT
When the LCD becomes dim, replace with 4 new AA size batteries. If the low battery indicator
“
” is displayed in the outdoor window, replace the 2 AA size batteries in the sensor.
NOTE:
● If the clock is not used for a long period of time, please remove the batteries.
● Attention! Batteries should not be exposed to excessive heat such as direct sunlight, fire or the
like. Please dispose of used unit or batteries in an ecologically safe manner.
FCC STATEMENT
This device complies with Part 15 of the FCC Rules. Operation is subject to the following two
conditions: (1) this device may not cause harmful interference, and (2) this device must accept any
interference received, including interference that may cause undesired operation.
Warning: Changes or modi cations to this unit not expressly approved by the party responsible for
compliance could void the user's authority to operate the equipment.
NOTE: This equipment has been tested and found to comply with the limits for a Class B digital
device, pursuant to Part 15 of the FCC Rules. These limits are designed to provide reasonable
protection against harmful interference in a residential installation. This equipment generates,
uses and can radiate radio frequency energy and, if not installed and used in accordance with the
instructions, may cause harmful interference to radio communications.
However, there is no guarantee that interference will not occur in a particular installation. If this
equipment does cause harmful interference to radio or television reception, which can be determined
by turning the equipment off and on, the user is encouraged to try to correct the interference by one
or more of the following measures:
- Reorient or relocate the receiving antenna.
- Increase the separation between the equipment and receiver.
- Connect the equipment into an outlet on a circuit different from that to which the receiver is needed.
- Consult the dealer or an experienced radio/TV technician for help.
The Responsible party:
Company Name: Marathon Watch Company Ltd.
Address: 10-30 Mural Street, Richmond Hill, Ontario, L4B 1B5, Canada
Phone : 905-764-9420
SPECIFICATIONS
Radio Controlled signal: WWVB version
RF transmission frequency: 433 MHz
RF transmission range: Maximum 50 meters
No. of remote sensor: Up to 3 units
Temperature sensing cycle: Around 60~64seconds
INDOOR TEMPERATURE
Displayed range: -40°F ~ 158°F ( -40°C ~ 70°C )
Operating range: 32°F ~ 113°F ( 0°C ~ 45°C )
Accuracy: 0°C ~ 40°C: +/- 1°C (+/- 2.0°F)
40°C ~ 45°C: +/- 2°C (+/- 4.0°F)
INDOOR HUMIDITY
Displayed range: 20% ~ 90%
Operating range: 20% ~ 90%
Resolution: 1%
Accuracy: 20% ~ 39%: +/- 8% @ 25°C
40% ~ 70%: +/- 5% @ 25°C
71% ~ 90%: +/- 8% @ 25°C
OUTDOOR TEMPERATURE
Displayed range: -40°F ~ 158°F ( -40°C ~ 70°C )
Operating range: -4°F ~ 140°F ( -20°C ~ 60°C )
Accuracy: -20°C ~ 0°C: +/- 2°C (+/- 4.0°F)
0°C ~ 40°C: +/- 1°C (+/- 2.0°F)
40°C ~ 60°C: +/- 2°C (+/- 4.0°F)
OUTDOOR HUMIDITY
Displayed range: 1% ~ 99%
Operating range: 20% ~ 90%
Resolution: 1%
Accuracy: 20% ~ 39%: +/- 8% @ 25°C
40% ~ 70%: +/- 5% @ 25°C
71% ~ 90%: +/- 8% @ 25°C
POWER
Main unit: 4 x AA size 1.5V batteries
Remote sensor: 2 x AA size 1.5V batteries
DIMENSION
Main unit: 224(L) x 224(H) x 23(D) mm
Remote sensor: 65(L) x 100(H) x 35(D) mm
C8458A-PD16055M Marathon 2016.5.18 indd.indd 2 2016/5/18 11:22:05
Alarm beeping can be stopped by:
Marathon Watch Company Ltd.
30 Mural Street, Unit #10, Richmond Hill, Ontario, Canada L4B 1B5
www.MarathonWatch.com
Marathon Watch Company Ltd.
www.MarathonWatch.com
Customer Service: 1-800-822-4329
 Loading...