1 2
Flyer Sheet required: 24S_RC_R0000-4B70_4LB_Battery-Flyer (Product)
EU DoC (for Europe)
3 4
AAA (LR03) 1.5V
x2
AA (LR6) 1.5V
x3
I 0
1
2
x
10
2
3
1
x5 x5
1. Slide the power switch to ON (I) on the figure.
2. Push the remote controller's joystick forward or backward after switching on the figure.
3. Pairing is complete when the LED changes from flashing red to solid red on the remote controller.
NOTE: If the figure does not respond to the remote controller after pairing, switch the figure off then
back on to try pairing again or replace the batteries in the figure and remote controller if the batteries
are drained.
1. Pon el botón para encender de la figura en ENCENDIDO (I).
2. Empuja la palanca del control remoto hacia delante o hacia atrás después de encender la figura.
3. El emparejamiento estará listo cuando la luz LED roja deje de parpadear y quede fija en el
control remoto.
ADVERTENCIA: Si la figura no responde al control remoto después del emparejamiento, apágala y
vuelve a encenderla para intentar emparejarla de nuevo o reemplaza las pilas de la figura y del control
remoto si están gastadas.
1. Glisser l’interrupteur Marche/Arrêt de la figurine en position MARCHE (I).
2. Pousser la manette de la télécommande vers l’avant ou vers l’arrière après avoir mis en marche
la figurine.
3. Le jumelage est terminé quand le voyant à DEL rouge de la télécommande cesse de clignoter et
reste allumé.
REMARQUE : Si la figurine ne répond pas à la télécommande après le jumelage, éteindre la figurine,
puis la rallumer pour réessayer le jumelage ou remplacer les piles de la figurine et de la télécommande
si elles sont déchargées.
1. Deslize o interruptor de energia para a posição LIGADA (I) na figura.
2. Depois de ligar a figura, empurre o joystick do controle remoto para frente ou para trás.
3. O emparelhamento estará concluído quando o LED mudar de vermelho piscante para vermelho
contínuo no controle remoto.
OBSERVAÇÃO: Se a figura não responder ao controle remoto após o emparelhamento, desligue a
figura e ligue-a novamente para tentar emparelhar novamente ou substitua as pilhas da figura e do
controle remoto se estiverem gastas.
HRR48-4B70_4LB
Are the remote controller and figure equipped with fresh batteries?
Is the remote controller paired with the figure?
¿El control remoto y la figura están equipados con pilas nuevas?
¿El control remoto está emparejado con la figura?
La télécommande et la figurine sont-elles équipées de piles neuves?
La télécommande et la figurine sont-elles jumelées?
O controle remoto e a figura estão equipados com pilhas novas?
O controle remoto está emparelhado com a figura?
CHECKLIST • LISTA DE VERIFICACIÓN • LISTE DE VÉRIFICATION • LISTA DE VERIFICAÇÃO
CONTROLS • CONTROLES • COMMANDES
C. PAIRING THE REMOTE CONTROLLER AND FIGURE • EMPAREJAMIENTO DEL CONTROL REMOTO Y LA FIGURA
JUMELAGE DE LA TÉLÉCOMMANDE ET DE LA FIGURINE
EMPARELHAMENTO DO CONTROLE REMOTO E DA FIGURA
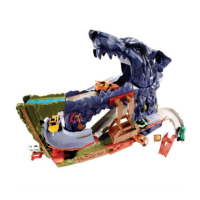
B. LOADING THE EXPLOSION PARTICLES • LCARGA DE LAS PARTÍCULAS DE EXPLOSIÓN
CHARGEMENT DES PARTICULES D’EXPLOSION • COMO COLOCAR AS PARTÍCULAS DE EXPLOSÃO
1. Load the explosion particles into the slots on
the figure.
2. Close the figure's sides.
3. Reattach the figure's head.
1. Pon las partículas de explosión en los espacios de
la figura.
2. Cierra los costados de la figura.
3. Vuelve a colocar la cabeza de la figura.
1. Charger les particules d’explosion dans les fentes de
la figurine.
2. Fermer les côtés de la figurine.
3. Remettre la tête de la figurine en place.
1. Coloque as partículas de explosão nos slots da figura.
2. Feche as laterais da figura.
3. Recoloque a cabeça da figura.
4LB - English / LAAM Spanish / Canadian French / Brazilian Portuguese
A
D
B
C
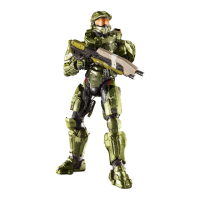
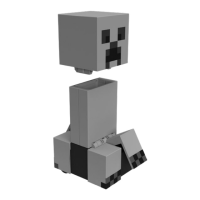
1: CONTENTS • CONTENIDO • CONTENU • CONTEÚDO
4: TO PLAY • PARA JUGAR • PLACE AU JEU • COMO BRINCAR
3: SET UP (CONTD.) • PREPARACIÓN (CONTINUACIÓN)
PRÉPARATION (SUITE) • PREPARAÇÃO (CONT.)
3: SET UP • PREPARACIÓN • PRÉPARATION • PREPARAÇÃO
2: FEATURES • CARACTERÍSTICAS • FONCTIONS • FUNÇÕES
TIPS: • CONSEJOS: • CONSEILS: • DICAS:
• Each storage slot can fit a maximum of 5 explosion
particles.
• Press and hold the action button to open the figure
and detach the head if the figure is already closed
before loading the explosion particles.
• En cada espacio de almacenamiento caben máximo 5
partículas de explosión.
• Mantén presionado el botón de acción para abrir la
figura y sacar la cabeza si la figura ya está cerrada
antes de cargar las partículas de explosión.
• Chaque emplacement de stockage peut contenir un
maximum de 5 particules d’explosion.
• Appuyer sans relâcher sur le bouton Action pour ouvrir
la figurine et retirer la tête si la figurine est déjà
fermée avant de charger les particules d’explosion.
• Cada espaço de armazenamento pode acomodar até 5
partículas de explosão.
• Pressione e segure o botão de ação para abrir a figura
e solta a cabeça, caso a figura esteja fechada antes de
colocar as partículas de explosão.
NOTE: • ADVERTENCIA: • REMARQUE : • OBSERVAÇÃO:
Operating range of the remote controller is up to 30 m (98 ft).
El rango de funcionamiento del control remoto es de hasta 30 m.
La portée de la télécommande est de 30 m (98 pi).
A faixa operacional do controle remoto é de até 30 m.
Press the action button for lights and sounds!
¡Presiona el botón de acción para activar luces y sonidos!
Appuyer sur le bouton Action pour activer des lumières et des sons!
Pressione o botão de ação para ativar as luzes e os sons!
Press and hold the action button to explode!
¡Mantén presionado el botón de acción para hacer
que explote!
Appuyer sans relâcher sur le bouton Action pour
activer l’explosion!
Pressione e segure o botão de ação para explodir!
®
HRR48-4B70_I/S_4LB
Size: 11” x 16.5”
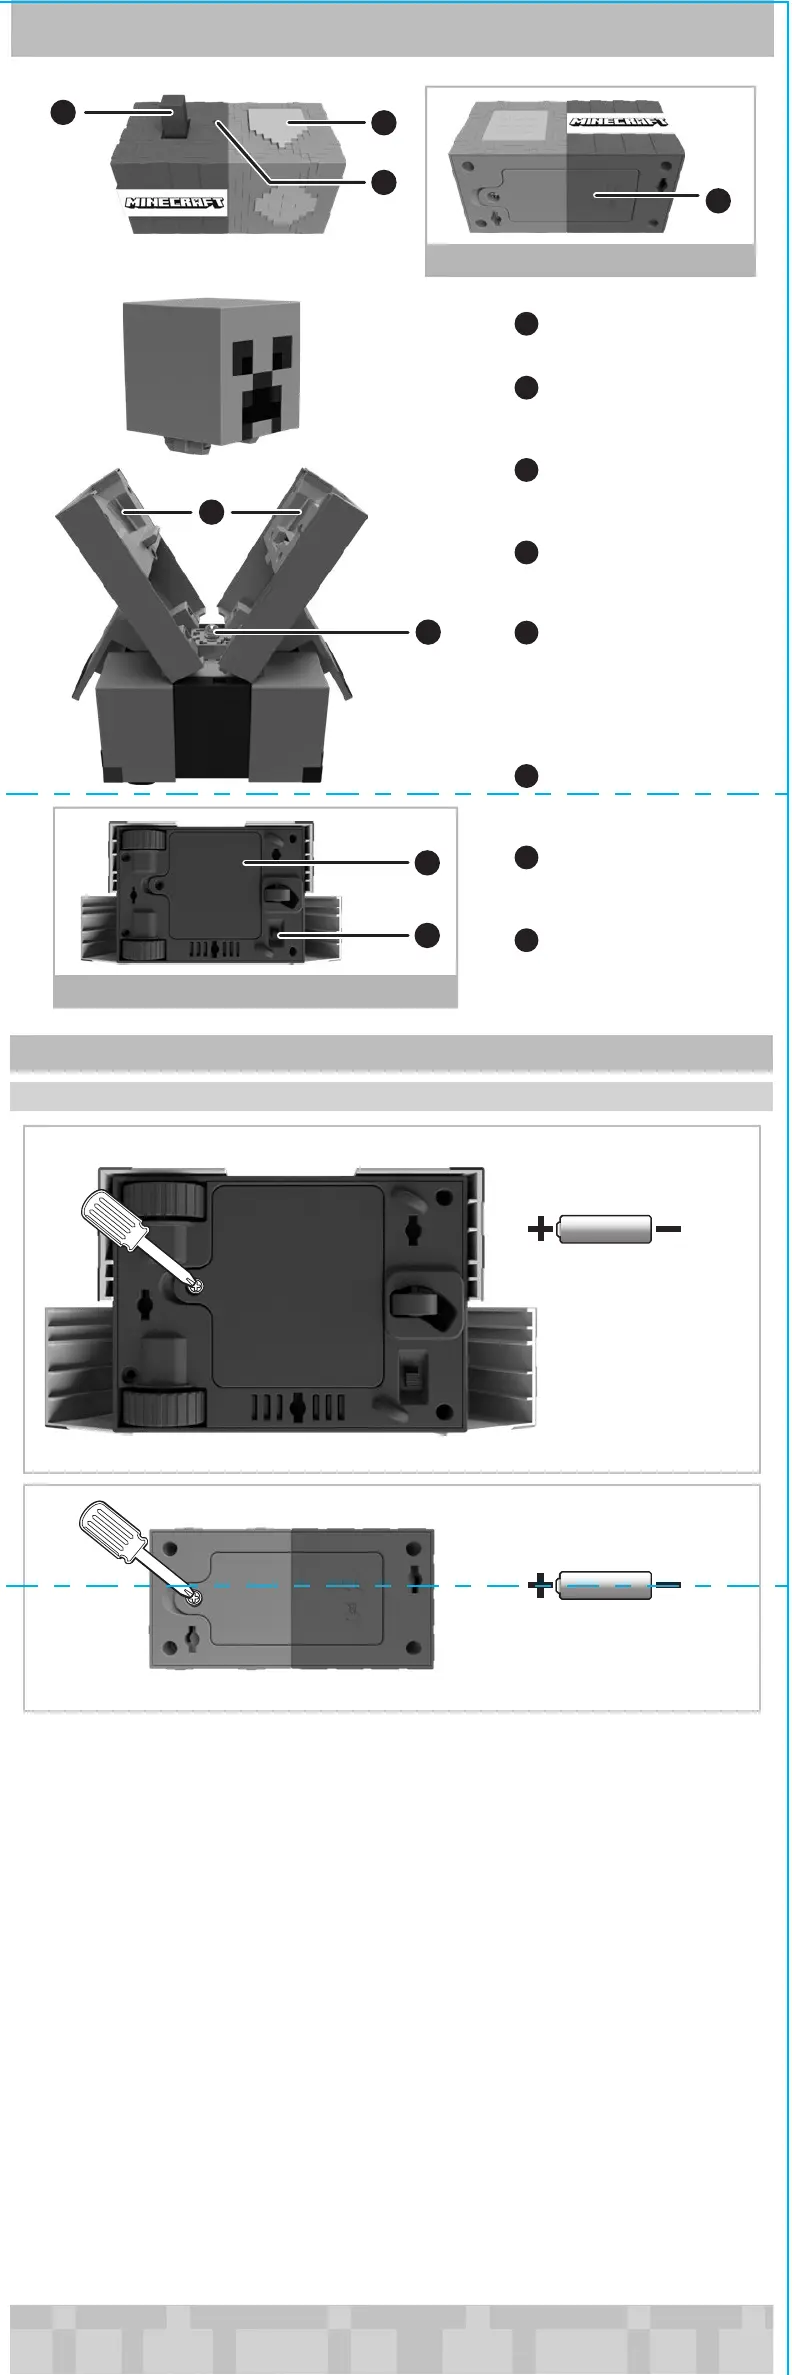
A. BATTERY INSTALLATION • COLOCACIÓN DE LAS PILAS • INSTALLATION DES PILES • INSTALAÇÃO DAS PILHAS
1. Unscrew the battery covers on both the figure and the remote controller with a Phillips head screwdriver (not included).
2. Install 3 AA (LR6) 1.5V alkaline batteries (not included) in the figure's battery box.
3. Install 2 AAA (LR03) 1.5V alkaline batteries (not included) in the remote controller's battery box.
4. For best performance, use alkaline batteries.
5. Replace both battery covers and tighten screws.
6. Replace the batteries in the figure and the remote controller if the figure begins to run slowly or does not respond or if the figure's lights and
sounds dim and distort.
1. Desatornilla las tapas del compartimiento de pilas de la figura y del control remoto con un destornillador de cruz Phillips (no incluido).
2. Instala 3 pilas alcalinas AA (LR6) de 1,5 V (no incluidas) en el compartimiento de pilas de la figura.
3. Instala 2 pilas alcalinas AAA (LR03) de 1,5 V (no incluidas) en el compartimiento de pilas del control remoto.
4. Para mejores resultados, usa solo pilas alcalinas.
5. Cierra ambas tapas de los compartimientos y aprieta los tornillos.
6. Reemplaza las pilas de la figura y el control remoto si la figura comienza a funcionar lentamente o no responde, o si sus luces y sonidos se atenúan
y distorsionan.
1. Dévisser les couvercles des compartiments des piles de la figurine et de la télécommande à l’aide d’un tournevis cruciforme (non fourni), puis retirer
les couvercles.
2. Insérer 3 piles alcalines AA (LR6) de 1,5 V (non fournies) dans le compartiment des piles de la figurine.
3. Insérer 2 piles alcalines AAA (LR03) de 1,5 V (non fournies) dans le compartiment des piles de la télécommande.
4. Pour un rendement optimal, utiliser des piles alcalines.
5. Remettre les couvercles et serrer les vis.
6. Remplacer les piles de la figurine et de la télécommande si la figurine commence à fonctionner lentement ou ne répond pas, ou si les lumières et
les sons de la figurine s’atténuent et se déforment.
1. Desaparafuse as tampas do compartimento de pilhas da figura e do controle remoto com uma chave de fenda Phillips (não incluída).
2. Instale 3 pilha alcalinas AA (LR6) de 1,5 V (não incluídas) no compartimento de pilhas da figura.
3. Instale 2 pilha alcalinas AAA (LR03) de 1,5 V (não incluídas) no compartimento de pilhas do controle remoto.
4. Para um melhor desempenho, use pilhas alcalinas.
5. Recoloque as tampas do compartimento de pilhas e aperte os parafusos.
6. Substitua as pilhas na figura e no controle remoto, se a figura começar a apresentar lentidão ou parar de funcionar ou se as luzes e os sons
enfraquecerem e ficarem distorcidos.
Pairing • Sincronización
Synchronisation • A emparelhar
Pairing is complete
La sincronización se ha completado
La synchronisation est terminée
Emparelhamento concluído
TIP: The figure will go into sleep mode if left idle for approximately 15 minutes to preserve battery life. To resume normal play, slide the figure's
power switch to OFF then ON again, and then push the remote controller's joystick forward or backward to pair the figure and remote controller.
CONSEJO: La figura pasará al modo de suspensión si se deja inactiva durante aproximadamente 15 minutos para que las pilas duren más tiempo.
Para reanudar el funcionamiento normal, pon el botón para encender en APAGADO y, luego, nuevamente en ENCENDIDO y, a continuación,
empuja la palanca del control remoto hacia delante o hacia atrás para emparejar la figura y el control remoto.
CONSEIL : La figurine bascule en mode Veille après environ 15 minutes d’inactivité afin de préserver l’autonomie des piles. Pour la réactiver,
glisser l’interrupteur Marche/Arrêt de la figurine en position ARRÊT, puis en position MARCHE, et pousser la manette de la télécommande vers
l’avant ou l’arrière pour jumeler la figurine et la télécommande.
DICA: A figura entrará no modo de espera se permanecer inativa por 15 minutos para preservar a vida útil da bateria. Para retomar a brincadeira,
deslize o interruptor de energia do controle remoto da figura para a posição DESLIGADA e, depois, LIGADA novamente e, em seguida, empurre o
joystick do controle remoto para frente/para trás para emparelhar a figura e o controle remoto.
©2023 Mattel. ® and ™ designate U.S. trademarks of Mattel, except as noted. ® et ™ désignent des marques de Mattel aux États-Unis, sauf indication contraire. Mattel, Inc., 636 Girard Avenue, East
Aurora, NY 14052, U.S.A. Consumer Services 1-800-524-8697. Mattel Canada Inc., Mississauga, Ontario L5R 3W2. You may call us free at / Composez sans frais le 1-800-524-8697. Mattel Europa B.V.,
Gondel 1, 1186 MJ Amstelveen, Nederland. Mattel U.K. Limited, The Porter Building, 1 Brunel Way, Slough SL1 1FQ, UK. Mattel Australia Pty. Ltd., 658 Church St., Richmond, Victoria, 3121. Consumer
Advisory Service - 1300 135 312. Hong Kong: Kids Kingdom Limited, Room 1908-9, Gala Place, 56 Dundas Street, Mongkok, Kowloon, Hong Kong. Customer Care line: (852)2782-0766. Taiwan:
Chickabiddy Company Limited, 5/F, No. 186, Section 4, Nanjing East Road, Taipei 10595, Taiwan. Customer Care line: (02)2578-1188. Mainland China: Mattel Barbie (Shanghai) Trading Co., Ltd. Units
4701-4711, 47F, 2 Grand Gateway, 3 Hong Qiao Road, Shanghai, 200030, P.R.C. Customer Care line: 400-819-8658. Diimport & Diedarkan Oleh: Mattel Continental Asia Sdn Bhd. Level 19, Tower 3, Avenue
7, No. 8 Jalan Kerinchi, Bangsar South, 59200 Kuala Lumpur, Malaysia. Mattel South Africa (PTY) LTD, Office 102 I3, 30 Melrose Boulevard, Johannesburg 2196. Importado y distribuido por Mattel de
México, S.A. de C.V., Miguel de Cervantes Saavedra No. 193, Pisos 10 y 11, Col. Granada, Alcaldía Miguel Hidalgo, C.P. 11520, México, Ciudad de México. R.F.C. MME-920701-NB3. Tels.: 59-05-51-00 Ext.
5206 ó 01-800-463-59-89. Mattel Chile S.A., Pdte. Riesco 5561, Of. 203-204 PS2, Las Condes, Santiago. Servicio al consumidor Venezuela: Tel.: 0-800-100-9123. Mattel Argentina, S.A., Av. Libertador
1000, Piso 11 – Oficinas 109 y 111, Vicente López – Prov. Buenos Aires. Tel.: 0800-666-3373. Mattel Colombia, S.A., Calle 123#7-07 P.5, Bogotá. Tel.: 01800-710-2069. Mattel Perú, S.A., Av. Juan de Arona
# 151, Centro Empresarial Juan de Arona, Torre C, Piso 7, Oficina 704, San Isidro, Lima 27, Perú. RUC: 20425853865. Reg. Importador: 02350-12-JUE-DIGESA. Tel.: 0800-54744. E-mail Latinoamérica:
Servicio.Clientes@Mattel.com. Distribuído por : Mattel do Brasil Ltda.- CNPJ : 54.558.002/0001-20 - Rua Verbo Divino, 1488 - 2º. Andar - 04719-904 - Chácara Santo Antônio - São Paulo - SP - Brasil.
Serviço de Atendimento ao Consumidor: Contato: https://faleconosco.mattel.com.br/Contato. E-mail: sac.matteldobrazil@mattel.com. Mattel France, Parc de la Cerisaie, 1/3/5 allée des Fleurs, 94260
Fresnes Cedex. N° Cristal 0969 36 99 99 (Numéro non surtaxé) ou www.lesjouetsmattel.fr. Mattel España, S. A, Aribau 200 pl. 9, 08036 Barcelona. cservice.spain@mattel.com Tel.: +34 933 06 79 00
http://www.service.mattel.com/es.
Adult supervision is recommended when the RC figure is being operated.
Please keep these instructions for future reference as they contain important information.
IMPORTANT: Please read all instructions before operating your RC figure.
Se recomienda la supervisión de un adulto mientras la figura a radio control está en uso.
Guarda estas instrucciones para futura referencia, ya que contienen información importante de este producto.
IMPORTANTE: Lee todas las instrucciones antes de usar la figura a radio control.
La surveillance d’un adulte est recommandée lors de l’utilisation de la figurine téléguidée.
Conserver le présent mode d’emploi pour s’y référer en cas de besoin, car il contient des renseignements importants.
IMPORTANT : Lire attentivement toutes les instructions avant d’utiliser la figurine téléguidée.
É recomendada a supervisão de um adulto quando a figura RC estiver sendo operada.
Guarde estas instruções para futura referência, pois contêm informações importantes.
IMPORTANTE: Leia todas as instruções antes de brincar com sua figura RC.
HVIN: HRR48R ( ), HRR48T ( )
6+
© 2023 Mojang AB. All Rights Reserved. Minecraft, the Minecraft logo, the Mojang Studios
logo and the Creeper logo are trademarks of the Microsoft group of companies.
© 2023 Mojang AB. Tous droits réservés. Minecraft, le logo Minecraft, le logo Mojang Studios
et le logo Creeper sont des marques de commerce du groupe d’entreprises Microsoft.
INSTRUCTIONS • INSTRUCCIONES
MODE D'EMPLOI • INSTRUCOES
FORWARD
ADELANTE
MARCHE AVANT
AVANÇAR
E
A
B
C
JOYSTICK
PALANCA
MANETTE
ACTION BUTTON
BOTÓN DE ACCIÓN
BOUTON ACTION
BOTÃO DE AÇÃO
LED INDICATOR
INDICADOR LED
VOYANT À DEL
INDICADOR LED
BATTERY BOX
COMPARTIMIENTO DE PILAS
COMPARTIMENT DES PILES
COMPARTIMENTO DE PILHAS
EXPLOSION PARTICLES STORAGE SLOTS
ESPACIOS DE ALMACENAMIENTO PARA
PARTÍCULAS DE EXPLOSIÓN
FENTES DE STOCKAGE DES PARTICULES
D’EXPLOSION
SLOTS DE ARMAZENAMENTO DE
PARTÍCULAS DE EXPLOSÃO
LED LIGHT
LUZ LED
LUMIÈRE À DEL
LUZ DE LED
BATTERY BOX
COMPARTIMIENTO DE PILAS
COMPARTIMENT DES PILES
COMPARTIMENTO DE PILHAS
POWER SWITCH
BOTÓN PARA ENCENDER
INTERRUPTEUR MARCHE/ARRÊT
BOTÃO LIGA / DESLIGA
D
F
G
H
E
F
G
H
WARNING: Do not aim at eyes or face. Only use projectiles supplied with this toy. Do not fire at point blank range.
ADVERTENCIA: No apuntes a los ojos ni a la cara. Solo usa los proyectiles incluidos en el producto. No dispares a quemarropa.
WARNING: Do not aim at eyes or face. Only use projectiles supplied with this toy. Do not fire at point blank range.
ADVERTENCIA: No apuntes a los ojos ni a la cara. Solo usa los proyectiles incluidos en el producto. No dispares a quemarropa.
AVERTISSEMENT :
NE PAS VISER LES YEUX OU LE VISAGE. N’UTILISER QUE LES PROJECTILES
FOURNIS AVEC CE JOUET. NE PAS TIRER À BOUT PORTANT.
ATENÇÃO!
NÃO APONTAR NA DIREÇÃO DOS OLHOS OU DO ROSTO. NÃO UTILIZAR PROJÉTEIS
DIFERENTES DOS PROVIDOS. NÃO DISPARE EXCESSIVAMENTE PERTO DO ALVO.
REVERSE & TURN
REVERSA Y GIRA
MARCHE ARRIÈRE ET VIRAGE
INVERTA E GIRE
BOTTOM VIEW • VISTA DE ABAJO
VUE DE DESSOUS • VISÃO DA BASE
BOTTOM VIEW • VISTA DE ABAJO
VUE DE DESSOUS • VISÃO DA BASE
 Loading...