1. Open the printer cover.
2. Fold out the first sheet.
The marker should be placed at the bottom.
4. Fold out the first sheet of the pad to the left
and close the cover.
Paper loading
Items Code Unit
Z-fold Paper
A50100-00 1 Pad
Ordering information
Warning: A qualified physician must overread
all interpretation results and computer-generated
tracings. Computerized interpretation is only
significant when used in conjunction with clinical
findings
Screen
a
Displaying ECG waveforms.
ㅣ
m
SD card ready indication.(option)
k
Displaying selected rhythm lead. Rhythm lead selection
is available on Auto or Manual menu of Rhythm Leads.
Displaying heart rate.
Displaying selected report format.
*This indication is enabled when ‘Automatic’ mode.
*This screen is default settng.
Operating
1. Automatic mode
1-1. Turn the device on and attach electrodes.
1-2. Press AUTO button to mode select.
1-3. Wait until the ECG signals on LCD are stabilized.
1-4. Press RUN button to start record.
The report will be printed by the Acquisition,
Analysis, Printing process. Please wait a while.
2-1. Turn the device on and attach electrodes.
2-2. Press MANUAL button to mode select.
2-3. Wait untill the ECG signals on LCD are stabilized.
2-4. Press RUN button to start record.
2-5. Press STOP button to stop record.
2. Manual mode
Automatic mode provides about 10 sec ECG signal
and simple diagnosis report print.
Manual mode provides continuous printing function.
Warning: Shock Hazard
Use only provided by MEDIGATE
cable and accessories.
Other product may cause safety
problems.
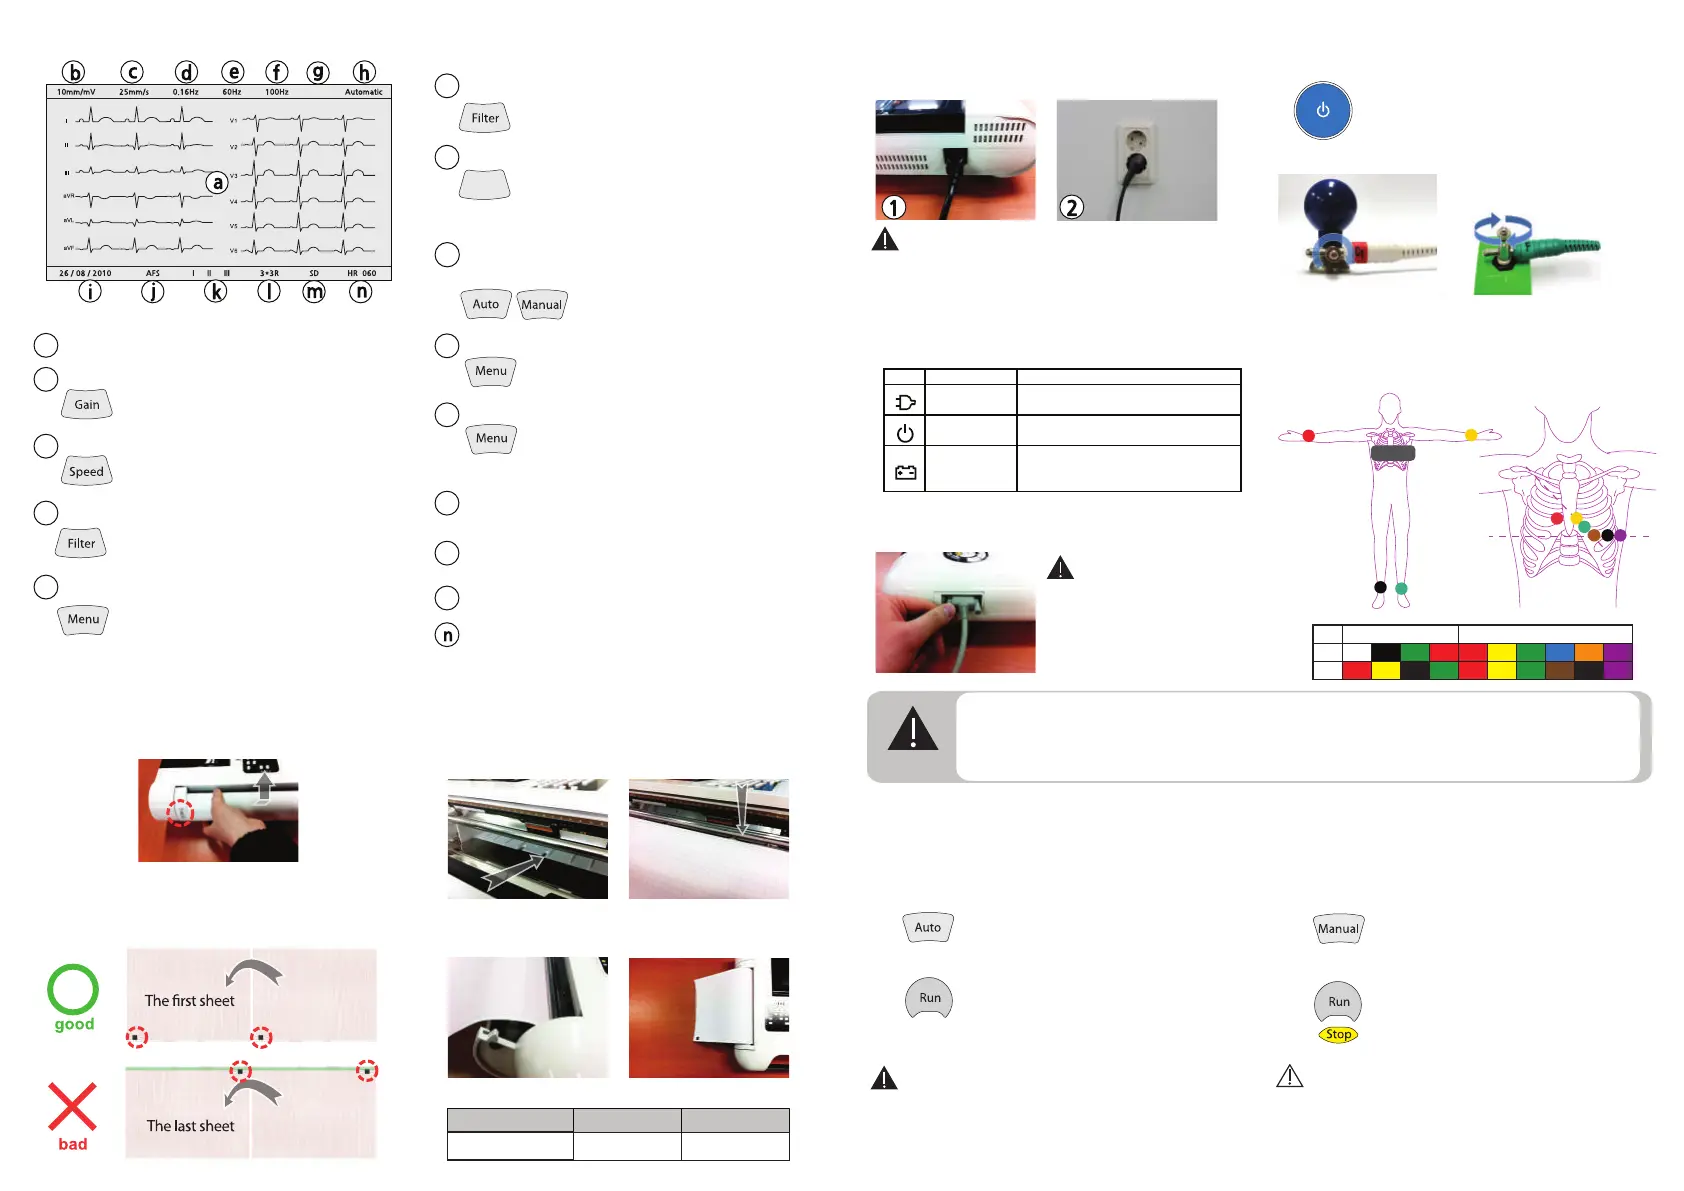
Installing and Connecting
1-1. Connect AC power cord and device.
1-2. Plug the AC power cord to grounded AC outlet.
3. Connect a patient cable to a cable port on MeCA812i
4. Press the power button to turn on.
6. Attach electrodes to the body of patient.
C1
R
L
Chest Lead
N
F
C2
C4
C3
C5 C6
RA V2
C2L
LA
R N
RL LL
F
V1
C1
V3
C4 C5 C6
V4 V5 V6
C3
Limb Lead
AHA
IEC
Chest Lead
Short press to turn on,
long press to turn off.
5. Connect electrodes with leads.
When electrodes connecting, please screw to
clockwise the hold screw of electrode for tight.
Loose contact may cause noise on the ECG signal.
2. AC plugged-in indicator turns on.
Lift up the door to open.
3. Insert the paper into the feeder
The first page should be positioned at under the guide
roller.
Displaying gain of waveforms. The adjustment is
available with ‘Gain’ button.
*5, 10 or 20mm/mV
b
e
Displaying the selected frequency of AC line noise
filter. This parameter setting is available on
the System Setup>AC Line Filter.
Displaying AFS(Anti-Floating System) on or off.
AFS on or off menu is located on the
System Setup>AFS.
*AFS reduces the baseline wandering.
j
i
Displaying current date. The adjustment menu is located
on the System Setup>Date.
*Default date format is ‘dd/mm/yy’.
d
Displaying the selected cut off frequency of low cut
filter. The adjustment menu is available with
‘Filter’ button. *lowcut 0.5, 0.3, 0.16 or 0.05Hz
f
Displaying the selected cut off frequency of high cut filter.
The adjustment menu is available with ‘Filter’
button.
*highcut> 40, 100, 150Hz or Off
g
Displaying the selected EMG(Electromyogram) filter.
This filter reduces EMG noise. The adjustment
menu is available with ‘Filter’ button.
*EMG> On or Off
*EMG on = ‘EMG’ display, off = No display
Filter
h
Displaying current operation mode.
MeCA812i is provide two operation modes.
‘Auto’ or ‘Manual’ button to change
operation mode.
c
Displaying printing speed. The adjustment is
available with ‘Speed’ button.
*5, 10, 25 or 50mm/s
Note: It takes about 6 hours for full-charged.
Off Disconnect AC power line
Solid Green Connect AC power line
Off The device is off
Solid Green The device is on
Off Battery Operation(at device On)
Blinking Orange The battery is charging
Solid Orange The battery is fully charged
Warning:
-For your safety use grounded AC power or use earth
connection.
-Connect equivalent ground when use with other devices.
-When connect the patient with several electrical device,
it may increase electrical shock hazard by leakage current.
Warning
- Operator shall not touch patient and device simultaneously.
- During use of device, avoid contact between the metal part of device and the patient.
- Remove all the metal accessories of patient wears before the perform measurement.
- Do not touch the patient, the patient cable, or the device while defibrillator is operating.
Notice: Don’t print more than 10 minutes.
If the printer is overheated, it may reduce device’s
life time.

 Loading...