EasyManua.ls Logo

Memoq MR-120 - User Manual

Memoq MR-120
2 pages
Go to English
Print Icon
To Next Page IconTo Next Page
Loading...
음성 녹음기 & MP3 플레이어
MR-120 사용설명서
*이기기는 가정용(B급) 전자파적합기기로서 주로 가정에서 사용하는 것을 목적으로 하며, 모든 지역에서 사용할 수 있습니다.
인증번호:R-R-ESO-MR-120
보 증 서
제 품 명
모 델 명
구 입 일
구 입 처
전 화
기 타
보증기간
서 명
주 소
전 화
음성 녹음기(Voice Recorder)
구입일로부터 1년
유상서비스
-사용상의 취급 부주의로 인한 고장.
-사용자의 임의의 내부 개조로 인한 고장.
-화재, 염해, 수해, 지진 등의
천재지변으로 인한 고장.
-제품 보증기간이 지난 제품일 경우
택배A/S : 운임을 선불로 지급하셔야 이용 가능합니다.
(제조자) ㈜이소닉 www.esonic.co.kr
(원산지) 대한민국/MADE IN KOREA
(주소) 경기도 군포시 엘에스로 166번길 10-19,
2층(이소닉)
(전화)
070-4015-7114~5
MR-120
제품규격
녹음저장 시간
재생 시간
구성품
사용환경
배터리
크기(mm), 중량
최대녹음파일수
충전 시간
배터리사용 시간
메모리
모델
약 288시간
약 15시간
약 12시간
약 18시간
약 10시간
약 2시간
9,999 개
(W)18.2 x (H)55.3 x (D)11.8 / 10.2g
3.7V, Li-Polymer 120mAh
온도:0~ 40℃, 습도:20~80%(비응결)
사용설명서, 이어폰, USB젠더, 클립
약 144시간
8GB
약 576시간
약 288시간
16GB
약 1152시간
약 576시간
약 24시간 약 48시간 약 96시간
32GB
MR-120
XHQ
PCM
PCM
HQ
XHQ
HQ
사용 방법
* 소리감지녹음(VOS)은 녹음 시작 후 소리가 감지되지 않으면
녹음이 일시 정지되고, 다시 소리가 감지되면 이어서 녹음이 됩니다.
* 녹음 스위치를 가운데로 이동하면 녹음이 정지되며,
MP3형식으로 VOICE 폴더에 저장됩니다.
* 5시간 이상 녹음할 경우에는 5시간 단위로 분할하여 저장됩니다.
* 녹음 파일이 9,999개를 초과하면 더이상 녹음이 진행되지 않습니다.
불필요한 녹음 파일을 삭제한 뒤 사용하시기 바랍니다.
③ 제품을 PC에서 분리하면 ⓗ동작 표시등이 적색LED가 빠른 속도로 깜빡이다
꺼지면, 시간설정이 완료됩니다.
② “date_time.cfg Creator”창 안에 있는 “Start” 버튼을 클릭하면
제품 내에 “date_time.cfg” 파일이 생성됩니다.
① PC의 USB포트에 연결 후 제품에 저장된 “Time Setup” 프로그램을
더블클릭하여 실행하면, 우측의 “date_time.cfg Creator”창이 나타납니다.
장시간 녹음하기
* 장시간 녹음은 메모리별 녹음저장 시간까지 녹음하실 수 있습니다. (제품규격 참조)
* 이어폰 단자에 이어폰을 연결하고 재생버튼을 3초 이상 길게 누르면, 전원이 켜지면서
동작 표시등에 청색LED가 켜지고 바로 재생이 됩니다.
(이어폰을 연결하지 않고 전원을 켜면 동작 표시등에 녹색LED가 켜지고 대기 상태로 있습니다.)
* 일시 정지 상태에서 재생버튼을 짧게 누르면 전에 듣던 파일을 이어서 재생이 됩니다.
* 재생, 대기 중에 전원을 끄려면 재생버튼을 길게 3초 이상 누르면 전원이 꺼집니다.
* 재생 중에
음량 버튼을 길게 3초 이상 누르면, ⓖ동작 표시등에 청색LED가 깜박거리면서
음량이 커집니다.
* 재생 중에
음량 버튼을 길게 3초 이상 누르면, ⓖ동작 표시등에 청색LED가 깜박거리면서
음량이 작아집니다.
* 전원을 다시 켜면 음량이 기본음량으로 변경 됩니다.
* 재생 중에
음량 버튼을 짧게 누르면 다음 파일로 이동 됩니다.
* 재생 중에
음량 버튼을 짧게 누르면 이전 파일로 이동 됩니다.
* 마지막 파일 재생 중에 다음 파일로 이동을 하면 첫 번째 파일로 이동 됩니다.
날짜 및 시간 설정
녹음 음질(Mode) 설정
소리 감지녹음(VOS) 레벨 설정
* 소리 감지녹음 시 감지 레벨을 설정할수 있습니다.
* 우측 “date_time.cfg Creator”창 안에 있는 VOS Level 에서
“+2, +1, 0, -1, -2” 중 하나를 선택하고 “Start” 버튼을 클릭하면 설정이 완료됩니다.
* VOS Level 설정은 장소와 상황에 맞게 직접 테스트한 뒤 변경하시기 바랍니다.
VOS Level
-2 -1 0 +1 +2
(작은소리에 반응)(큰소리에 반응) (기본설정)
. . . . . .
Time Setup 프로그램은 당사 홈페이지(www.esonic.co.kr)
고객지원 ▶ 프로그램다운로드 ▶ 자동시간설정 프로그램에서 다운로드 받을 수 있습니다.
정지
(OFF)
정지
(OFF)
연속 녹음
(REC)
연속 녹음
(REC)
* 녹음 스위치를 『 방향으로 이동하면 ⓗ동작 표시등에
적색 LED가 5초간 켜지고 연속녹음(REC)이 시작됩니다.
* 녹음 스위치를 『 방향으로 이동하면 ⓗ동작 표시등에
적색 LED가 5초간 깜박거리고 소리 감지녹음(VOS)이 시작됩니다.
* ⓖ녹음 스위치를 『 』 또는 『 』 방향으로 이동하여 녹음을 시작한 이후에, PC 또는 USB 충전어댑터에 연결하면
장시간 녹음을 할 수 있습니다.
ⓗ동작표시등
ⓔ마이크
녹음하기
녹음 기능
설정하기
설정을 하지 않은 상태로도
녹음 할 수 있습니다.
주의 : 소리감지녹음(VOS)은
감지된 소리에 따라 저장된
녹음파일의 시간이 달라집니다.
(시간은 상이할 수 있습니다.)
주의 : 소리 감지녹음(VOS)을
사용하여도 배터리
사용 시간은 늘어나지 않습니다.
소리감지 녹음
(VOS)
소리감지 녹음
(VOS)
주의 : 녹음 중에는
재생기능을 사용 할 수 없습니다.
주의: 녹음 시간이 긴 파일은
PC에서 재생을 권장합니다.
(외부 전원 사용)
* 녹음기를 특정 장소에 설치하고 녹음 시작과 정지 조작이 어려울 때 소리 감지녹음을 권장합니다.
* 일반적으로 녹음기를 휴대하면서 녹음 시작과 정지를 조작할 수 있으면 연속녹음을 권장합니다.
Tip
Tip
재생하기
음량 조절하기
파일 이동하기
*ⓖ녹음 스위치를 정지(가운데) 상태로 두고 PC의 USB포트에 연결하면 “이동식 디스크(MemoQ)”로 인식되며,
파일의 이동, 복사, 삭제, 재생이 가능합니다.
*녹음파일의 재생은 윈도우미디어 플레이어 또는 곰플레이어 등 PC의 음악재생 소프트웨어를 이용합니다.
*녹음파일의 삭제는 PC의 일반적인 파일 삭제 방법으로 삭제합니다.
주의 : 제품을 PC에서 분리하실 때에는 반드시 “하드웨어 안전하게 제거”를 실행하시기 바랍니다.
사용중 PC에서 강제로 제품을 제거하면 제품에 치명적인 오류가 발생 할 수 있습니다.
주의 : 녹음 스위치가 정지(가운데) 상태에서만 USB 연결이 가능합니다.
*충전 중에는
ⓗ동작 표시등이 배터리 잔량에 따라 적색▶청색▶녹색이 깜빡 거리고 충전이 완료되면 녹색이 켜집니다.
동작 표시등
(USB연결 시 LED가 켜집니다.)
* PC에서 MemoQ(이동식디스크)를 포맷하면 제품의 모든 데이터가 삭제됩니다.
주의 : 포맷 유형은 FAT32만 지원하며, 이외 다른 유형으로 변경 시 제품이 정상 동작하지 않을 수 있습니다.
주의 : 한번 삭제된 데이터는 복구가 불가능합니다.
주의 : 포맷을 하면 시간 설정 프로그램도 삭제됩니다.
*PC 또는 USB 충전어댑터에서 제품을 분리하면 ⓗ동작 표시등에
5초간 배터리 잔량에 따라 3단계로 깜박거립니다.
*녹음 또는 대기중에 음량 버튼(ⓑ 또는 )을 길게 3초 이상 누르면,
ⓗ동작 표시등에 5초간 배터리 잔량에 따라 3단계로 깜박 거립니다.
적 색ⓗ 동작 표시등
배터리 잔량
청 색 녹 색
충분
70~100%
보통
30~70%
부족
0~30%
* 본 제품의 오사용, A/S, 기타의 사유로 인한 녹음 내용의 손실은 당사에서 책임지지 않습니다.
* 본 제품의 사용으로 인한 손해 또는 제3 자로부터의 배상 청구에 대하여 당사는 책임을 지지 않습니다.
* 분해, 개조, 충격을 주거나, 저온, 고온, 다습한 곳에서 사용하면 고장의 원인이 됩니다.
* 중요한 녹음 내용은 수시로 PC에 저장하여 두시기 바랍니다.
*본 제품은 배터리가 내장되어 있습니다.
*구입하신 제품은 충전하여 사용하시기 바랍니다.
*
본 제품의
이어폰 단자에 USB젠더를 연결하고 PC의 USB 포트 또는 USB 충전어댑터에 연결하면 충전이 시작 됩니다.
(충전 소요시간: 약 2시간)
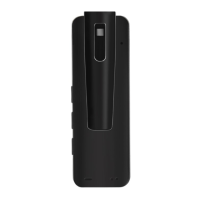
ⓐ본체 ⓑ음량 (이전파일로 이동) ⓒ재생버튼 ⓓ음량 (다음파일로 이동) ⓔ마이크 ⓕ이어폰 단자
ⓖ녹음 스위치 ⓗ동작 표시등
ⓕ이어폰 단자
<본체 후면>
<전면> <측면>
<후면>
PC에 시간 설정 프로그램을 복사하여 사본을 만들어 놓으면, 제품 내부에 시간 설정 파일이 없을 때,
언제든지 복사 하여 편리하게 사용할 수 있습니다.
PC 지원 OS
Windows (XP, Vista, 7, 8, 10)
PC 지원 OS
Windows (XP, Vista, 7, 8, 10)
PC USB 연결하기
전지 잔량 표시
사용상 주의사항
충전하기
각부의 명칭
&
구성품
포맷
Tip
USB 젠더
(Start 버튼을 클릭한 시간으로
제품을 분리한 시점에 설정됩니다.)
주의 : PC에 설정된 날짜와
시간으로 설정됩니다.
주의 : 제품사용 전 구성품을
반드시 확인 하시기 바랍니다.
주의 : 배터리가 방전되면
날짜와 시간이 초기화됩니다.
(충전 후 시간 설정을 다시 실행하고
사용하시기 바랍니다.)
USB 젠더 클립이어폰
구성품
* 재생 중에 재생버튼을 짧게 누르면 일시 정지가 되고 동작 표시등에 녹색LED가 켜지고,
대기 상태로 있습니다.
* 녹음된 파일은 R-00001부터 순차적으로 “R-00001_20(년)/01(월)/01(일)/24(시)/00(분)_녹음모드.MP3” 저장 됩니다.
예시:(연속녹음:R-00001_2001012400_REC.MP3 / 소리감지녹음:R-00001_2001012400_VOS.MP3)
*제품향상을 위해 사전예고 없이 변경될 수 있습니다.
클립 분리하기
본체 후면
2
1
<Time Setup 프로그램>
* 우측 “date_time.cfg Creator”창 안에 있는 Mode(Record Quality) 에서
“PCM(무압축 원음) 또는 XHQ(고음질) 또는 HQ(중음질)”를 선택하고 Start” 버튼을
클릭하면 설정이 완료됩니다.
V101
Version.
date_time.cfg Creator V3.0
V101
PCM
XHQ
HQ
Mode (Record Quality)
VOS Level
+ 2
+ 1
- 1
- 2
0
2020:01:01:13:00:00
Date _Time
Start
(기본설정)
(기본설정)
Question and Answer IconNeed help?

Do you have a question about the Memoq MR-120 and is the answer not in the manual?

Overview

This document describes the MemoQ MR-120 Digital Voice Recorder & MP3 Player, a device designed for recording audio and playing MP3 files. It emphasizes user safety, proper usage, and maintenance to ensure optimal performance and longevity.

Function Description

The MR-120 serves primarily as a digital voice recorder, capable of capturing audio in various settings. It also functions as an MP3 player, allowing users to enjoy their favorite music files. The device supports continuous recording and can be connected to a computer via USB for data transfer and charging.

Important Technical Specifications

  • Model: MR-120
  • Memory: 8GB (actual usable memory may be less due to system files)
  • Recording Time (HQ): Approximately 290 hours
  • Recording Time (SP): Approximately 580 hours
  • Recording Time (LP): Approximately 1160 hours
  • MP3 Playback Time: Approximately 19 hours
  • Battery Type: 3.7V, Li-Polymer (200mAh)
  • PC Interface: USB 2.0
  • Operating System Compatibility: Windows XP, Vista, 7, 8, 10
  • Accessories: Manual, Earphone, USB cable

Usage Features

Setting Date and Time:

To ensure accurate timestamps for recordings, users must set the date and time. This is done by:

  1. Connecting the MR-120 to a PC.
  2. Opening the "Time Setup" program located in the device's root directory.
  3. Double-clicking "Time Setup.exe" to run the program.
  4. Clicking the "Time Setup Creator" button.
  5. Clicking "Create Time.cfg" to generate the configuration file.
  6. Disconnecting the device from the PC. The date and time will be set automatically.

Recording Functionality:

The MR-120 offers various recording modes and settings:

  • Recording Quality: Users can select between HQ (High Quality), SP (Standard Play), and LP (Long Play) modes. HQ provides the best audio fidelity but consumes more memory, while LP offers the longest recording time with lower fidelity.
  • VOS (Voice Operated System) Level Setting: This feature allows the device to automatically start and stop recording based on sound detection. Users can adjust the VOS level from 1 to 5, with 1 being the most sensitive. To set the VOS level:
    1. Connect the MR-120 to a PC.
    2. Open the "Time Setup" program.
    3. Select the desired VOS level from the dropdown menu.
    4. Click "Create Time.cfg."
    5. Disconnect the device.
  • Continuous Recording: To initiate continuous recording, slide the "REC" switch to the "ON" position. The device will start recording immediately.
  • VOS Recording: To use VOS, slide the "REC" switch to the "ON" position. The device will enter VOS standby mode and begin recording only when sound is detected above the set threshold.
  • Recording Indicator: A red LED indicates recording in progress. For discreet recording, the LED can be turned off by pressing the "VOL-" button during recording.
  • File Management: Recordings are saved as WAV files. The device automatically divides recordings into 5-hour segments. If a recording exceeds 5 hours, a new file is created.
  • Monitoring Recordings: During recording, users can connect earphones to monitor the audio being captured.

MP3 Playback:

The MR-120 can play MP3 files stored on its internal memory.

  • Playback Control: Use the "Play/Pause" button to start and stop playback. The "Next/Previous" buttons navigate between tracks.
  • Volume Control: The "VOL+" and "VOL-" buttons adjust the playback volume.
  • Fast Forward/Rewind: During playback, press and hold the "Next/Previous" buttons to fast forward or rewind.

Charging the Unit:

The device is powered by a rechargeable Li-Polymer battery.

  • Charging Method: Connect the MR-120 to a PC via the USB cable or use a USB power adapter.
  • Charging Indicator: A red LED indicates charging. The LED turns blue when charging is complete.
  • Battery Life: The battery indicator on the display shows the remaining battery level. A full charge provides approximately 19 hours of MP3 playback or up to 1160 hours of recording (LP mode).

PC USB Connection:

Connecting the MR-120 to a PC allows for:

  • Data Transfer: Copying recorded files to the PC or transferring MP3 files to the device.
  • Charging: The device charges when connected to a PC.
  • Firmware Updates: If available, firmware updates can be performed via PC connection.
  • Disk Management: The device appears as a removable disk on the PC, allowing users to manage files directly.

Maintenance Features

General Care:

  • Cleaning: Use a soft, dry cloth to clean the device. Avoid using harsh chemicals or solvents.
  • Storage: Store the device in a cool, dry place away from direct sunlight and extreme temperatures.
  • Battery Maintenance: To prolong battery life, avoid fully discharging the battery frequently. Charge the device regularly, even if not in use, especially if stored for extended periods.
  • Data Backup: Regularly back up important recordings to a computer to prevent data loss.
  • Software Updates: Check the manufacturer's website for any available firmware updates to ensure optimal performance and bug fixes.

Troubleshooting:

The manual provides a troubleshooting section to address common issues such as:

  • Device not turning on: Check battery level and charge the device.
  • Recording not working: Ensure sufficient memory, correct recording mode, and proper microphone connection (if external mic is used).
  • No sound during playback: Check volume settings, earphone connection, and file format.
  • PC not recognizing device: Try a different USB port or cable. Ensure the device is properly connected.

Safety Precautions:

  • Avoid dropping or impacting the device: This can damage internal components.
  • Keep away from water and moisture: Water damage can lead to malfunction.
  • Do not disassemble the device: This voids the warranty and can cause electric shock.
  • Use only approved accessories: Using non-approved chargers or cables can damage the device.
  • Avoid prolonged exposure to loud sounds: This can damage hearing, especially when using earphones.
  • Dispose of batteries properly: Follow local regulations for battery disposal.

By adhering to these guidelines, users can maximize the performance and lifespan of their MemoQ MR-120 Digital Voice Recorder & MP3 Player.

Memoq MR-120 Specifications

General IconGeneral
BrandMemoq
ModelMR-120
CategoryMP3 Player
LanguageEnglish