Do you have a question about the Meraki Jenny and is the answer not in the manual?
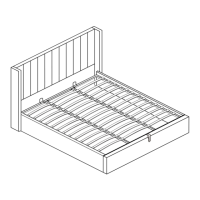
Attach the right and left metal frames (11) to the up and down metal frames (12) using hardware C and G.
Attach the center frame part 14 to both sides of part 12 using hardware A, E, and F.
Attach the support legs (15) to part 14 using hardware A, E, and F.
Attach headboard wings 20 and 21 to the headboard (1) using hardware H, A, and E.
Attach gas lifts (5) to the hydraulics (3 and 4) by screwing the nut back on.
Attach gas lift mechanisms (3 and 4) to side rails (6 and 7) using hardware N, E, and A.
Attach brackets (19) to the footboard (2) using hardware O and E.
Attach side rails (6 and 7) to the footboard (2) using hardware E, D, and A.
Connect side rails (6 and 7) to the footboard (2) using corner bracket (17) and hardware E, O.
Attach side rail connector (13) to side rails (6 and 7) and headboard (1) using hardware B and E.
Attach the second side rail connector (13) to the center of both side rails (6 and 7) using hardware O.
Attach the assembled frame to the gas lift mechanism at a 45° angle using hardware A, E, and F.
Close the lifting mechanism with extra pressure the first time to open piston seals.
Attach slats (8) to clips, clips to bars, and gas lift ribbon (L) to frame (12).
Attach non-woven fabric (18) to the bed and fabric (16) to the headboard.
| Brand | Meraki |
|---|---|
| Model | Jenny |
| Category | Indoor Furnishing |
| Language | English |