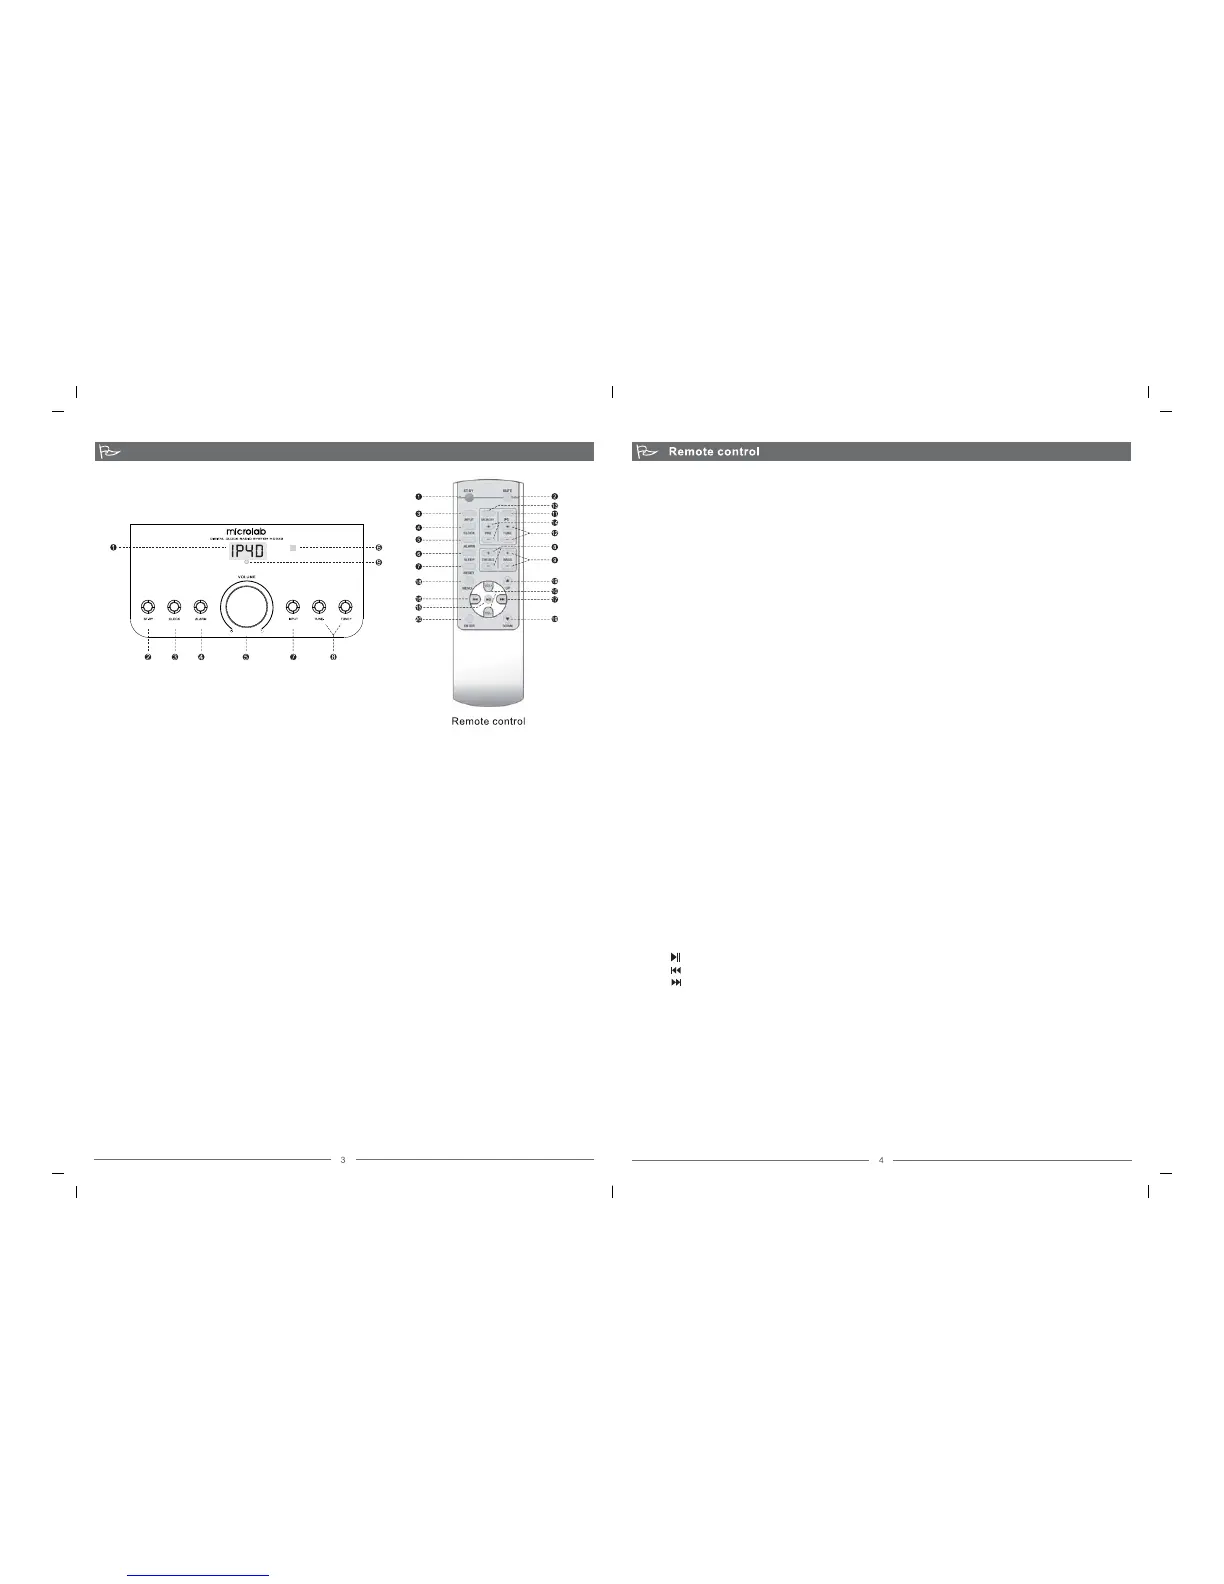
1. Digital Display Screen
With AC power turned ON, the iDock goes to standby mode and the time displayed.
2. ST-BY (Standby Button)
Depress to go to standby mode, and the time is displayed.
3. CLOCK (Adjustment)
In clock mode, to adjust the time, depress the "CLOCK" button to adjust the hour digits. The LED digits will flash
ready for adjustment. Turn the volume dial to set to the desired hour ranging from "00" to "23". Depress the "CLOCK"
button again, and the minute digits will flash ready for adjustment. Once the final adjustments are complete, depress
the "CLOCK" button to exit.
4. ALARM (Setup)
The iDock can be set to alarm with song from the iPod/iPhone music list. If no iPod/iPhone is docked, the iDock's
alarm can be set to alarm with the last tuned radio station.
Setup: Go to standby mode, depress the "ALARM" button to start setup. The 2 hour digits will flash, turn the volume
dial to change the hour value ranging from "00" to "23". Depress the "ALARM" button next to adjust the minute digits.
Once completed, depress "ALARM" again to exit. The display panel will indicate "good" to confirm the alarm setting.
5. VOLUME DIAL
Master volume adjustment. Turn clockwise to increase the volume, and counter clockwise to decrease the volume
level.
6. INFRARED SENSOR
Direct the remote control at this window for wireless function control of the iDock.
7. INPUT SELECTOR
Depress to select playback source between AUX (Auxilliary), FM radio, or iPod/iPhone.
8. TUNE+/-
Scan the FM frequency band for radio stations.
9. STANDBY LED
Standby LED illuminates to indicate standby mode in operation. Standby LED off with main display on, indicates
system is powered on and activated. Standby LED off with main display off, indicates AC power is turned off.
ILLUSTRATIONS
BUTTON FUNCTIONS: iDock
1. ST-BY
Depress this button to standby mode
2. MUTE
Depress the MUTE button to turn off all audio output. The display will flash "00" repeatedly indicating volume at zero
level. Depress MUTE again to return to previous audio level.
3. INPUT selector
Depress to select between different audio sources, AUX, FM radio or iPod.
4. CLOCK adjustment
In Clock mode, depress the "CLOCK" button and the hour digits will flash. Press the VOL to set the correct hour
ranging from "00" to "23". Depress the "CLOCK" button again, and the minute digits will flash. Depress the VOL +/- to
set the minute digits ranging from "00" to "59". Depress the "CLOCK" button again to exit the adjustment mode.
5. ALARM setup
Depress to configure the alarm time setup. With the iPod docked, the setup will activate the alarm with song from the
iPod. Without the iPod, the most recently tuned radio station will be used as the alarm.
Setup: In standby mode, depress the "ALARM" button to set the desired alarm time. The 2 hour digits will flash, press
VOL button to set the desired hour ranging from "00" to "23". Then depress the "ALARM" button again and the
minute digits will flash. Press the VOL button to set the desired minutes. To exit the setup, depress the "ALARM"
button again. The panel will display "good" indicating alarm setup is completed.
6. SLEEP
Set the desired period to shut down the system, ideal for bedtime. Options include 15 minutes, 30 minutes or 45
minutes.
7. RESET
Set the entire system to default factory values. The system volume is set to 20dB, and the TREBLE & BASS at 0dB.
8. TREBLE: Mid to High frequency attenuation, 7dB
9. BASS: Low frequency attenuation, 7dB
10. VOL+/- : volume adjustment from 00 to 60dB
1. FM: Toggle between Frequency modulation
2. TUNE+/-:Scan the radio frequency for radio stations
3. MEMORY: Store radio stations frequency for quick station tuning.
I. Scan the frequency range for your preferred radio station and the depress "MEMORY" button to save the station to
a preset number. For example, "P01" is a format used in the iDock.
ii. Then press "MEMORY" button again, the digital screen will display "good" to indicate a successful stored
frequency.
iii. The iDock allows up to 15 radio stations to be saved.
4. PRE+/- : Depress to select the preset radio stations.
Delete preset radio stations. Press "MEMORY" button, and then the "RESET" button to clear all the preset radio
stations.
1. Play or Pause the playback
2. Skip to previous song
3. Skip to next song
4. MENU: Revert to iPod/iPhone’s previous menu
5. UP/DOWN: Scroll menu options
6. ENTER: Confirm selection
1. For media player or TV, connect it to the RCA audio input connectors at the rear panel of the system.
2. For iPod/iPhone, dock this onto the top interface of the system with the appropriate pin adapter if necessary.
3. For FM radio, please connect the included FM antenna and extend this to provide proper reception. Please change its
position if necessarily for good reception.
1. Switch on the main AC power and turn on the iDock system from the rear power switch.
2. The system will commence to standby mode.
+/-
+/-
+/-
+/-
+/-
RADIO CONTROLS
iPod/iPhone CONTROLS
CONNECTIONS
OPERATIONS
80-MD332- 97-0001-05 2011-03-02 (unrelease)
80-MD332(11)-97-0001-01 2011-06-15
 Loading...