Do you have a question about the Miele S 438i and is the answer not in the manual?
Guidelines for safe and compliant repair, maintenance, and operation of appliances.
Procedures for cleaning vacuum cleaners and accessories, emphasizing safe cleaning solutions.
Identification and description of the main components of Miele S 3xx canister vacuum cleaners.
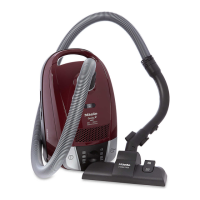
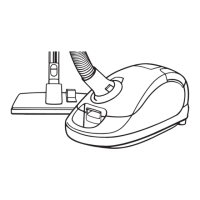
Identification and description of the main components of Miele S 4xx canister vacuum cleaners.
Detailed technical specifications for Miele S 247i-S 256i vacuum cleaners.
Detailed technical specifications for Miele S 269i-S 282i vacuum cleaners.
Technical data for Miele S 3xx vacuum cleaners, including suction power and fuse rating.
Technical data for Miele S 4xx vacuum cleaners, including suction power and fuse rating.
List of standard accessories supplied with Miele vacuum cleaner models.
List of optional accessories available for Miele vacuum cleaner models.
Information on accessories featuring a new locking system for S 2xx models.
Information on the electrobrush plug system for S 3xx and S 4xx models, including socket and cable.
Explanation of the dustbag and optional filter systems, including Active Air Clean and S-class filters.
Details the functionality and filtration efficiency of the Super Air Clean filter.
Details the Active Air Clean filter's ability to absorb odors using active charcoal.
Explains the S-class filter's role as a particulate air filter, often required for specific environments.
Testing and operational checks for the dustbag change indicator on S 27x models.
How the dustbag change indicator functions and is affected by usage on S 3xx models.
Explanation of the dustbag change indicator mechanism and its operation on S 4xx models.
Analysis of suction power related to negative pressure and air throughput, presented graphically.
Mechanism of power control in models with manual settings, using phase chopping.
Operation of automatic models that adjust suction power based on floor conditions.
How the booster function temporarily increases motor power for enhanced cleaning.
Technical explanation of the phase-chopping control method for power regulation.
Guidelines for qualified personnel performing service and repair work.
Procedures for removing and reinstalling the dustbag compartment lid across different Miele models.
Steps for opening, removing, and reassembling the accessory compartment lid.
Instructions for removing and installing the dustbag holder for various Miele vacuum models.
Steps for removing and inserting the dustbag holder on S 3xx models.
Steps for removing the dustbag holder screws and the holder on S 4xx models.
Procedures for removing the dust channel assembly from different Miele vacuum models.
Instructions for removing the dustbag change indicator from the lid.
Procedures for removing the cap assembly from the vacuum cleaner base or casing.
Procedure for removing the cap assembly from the base on S 3xx models.
Procedure for removing the cap assembly from the rear casing on S 4xx models.
Step-by-step guide for removing the rear casing from various Miele vacuum models.
Procedure for removing the rear casing on S 4xx models.
Instructions for removing foot switches from different Miele vacuum cleaner series.
Procedures for removing and replacing the potentiometer or suction power selector.
Notes on replacing the potentiometer assembly and indicator cylinder on S 3xx models.
Procedure for removing rotary and slide potentiometers on S 4xx models.
Instructions for removing the slide potentiometer and foot-operated power selector.
Steps for removing the electronic control unit from S 4xx Miele vacuum cleaners.
Instructions for removing the fault or overheat indicator lamp from the unit.
Procedures for removing the plug housing from various Miele vacuum cleaner models.
Instructions for removing the on/off switch from different Miele vacuum cleaner series.
Methods for accessing the flush socket outlet on Miele vacuum cleaner bases.
Procedure for removing the sensor component from automatic Miele vacuum cleaner models.
Instructions for removing and replacing the cord reel assembly on various Miele models.
Procedure for removing the cord reel on S 27x models.
Procedure for removing the cord reel on S 3xx models, with installation notes.
Procedures for removing and replacing the power cord on Miele vacuum cleaners.
Detailed steps for removing and replacing the motor assembly.
Procedure for removing the motor assembly on S 25x models.
Procedure for removing the motor assembly on S 27x models.
Procedure for removing the motor assembly on S 3xx models, including reinstallation.
Procedure for removing the motor assembly on S 4xx models (with holding bracket or central bearing).
Instructions for removing and replacing the motor electronic speed control board.
Procedures for replacing motor brushes, emphasizing simultaneous replacement.
Instructions for removing the electric brush socket from specific Miele models.
Description of suction hoses with integrated wiring and their associated sockets.
Details the wired hose with slide potentiometer for S 278i models.
Instructions for accessing components of the Turbo Brush for S 2xx models.
Procedures for removing the bumper strip, which also serves as a seal.
Procedure for removing the bumper strip on S 4xx models.
Instructions for removing the grill protecting the HEPA filter on S 3xx models.
Information regarding an upgraded castor design for enhanced floor-running performance.
Analysis of issues arising from dirty dustbag compartments and dustbag fitment problems.
Explains potential causes related to dustbag fitment and sealing rings.
Verification of a modified dustbag holder designed to prevent dustbag slippage.
Troubleshooting steps for diagnosing and rectifying poor suction performance.
Methods to improve blower performance, potentially by installing a blower plate.
Procedure for adjusting the sensitivity of the dustbag change indicator on S 3xx models.
Troubleshooting guide for low suction power, checking various components for issues.
Diagnosis and remedy for the motor not operating, often linked to worn motor brushes.
| Model | S 438i |
|---|---|
| Category | Vacuum Cleaner |
| Type | Canister |
| Dust Bag Capacity | 4.5 l |
| Weight | 7.5 kg |
| Filtration System | Air Clean |
| Special Features | Automatic cord rewind |