2726 27
Get to know your MINOX DTC 1100
Please take a few moments to read these instructions
carefully. We wish you much enjoyment with your
MINOX product!
– Sends images to your cell phone or per e-mail
instantly
– 4G / GSM Cellular Module
– Built in microphone for audio on video mode
– Daily report (total picture/video number get
captured during the past 24 hours, the battery level
and remaining storage space)
– IR-flash with black filter
– Adjustable motion sensor
– High range IR-flash of 59 feet (18 m)
– 8 megapixel resolution
– Convenient 2.0“ color monitor
– Simple and intuitive operation,
6-button control panel
– Short shutter release delay of just 1 second
– Picture series and short videos
– Multilingual menu navigation
– SD/SDHC card up to 32 GB
– Small and discreet
– Low power consumption
– Password protected
– Padlock lockable
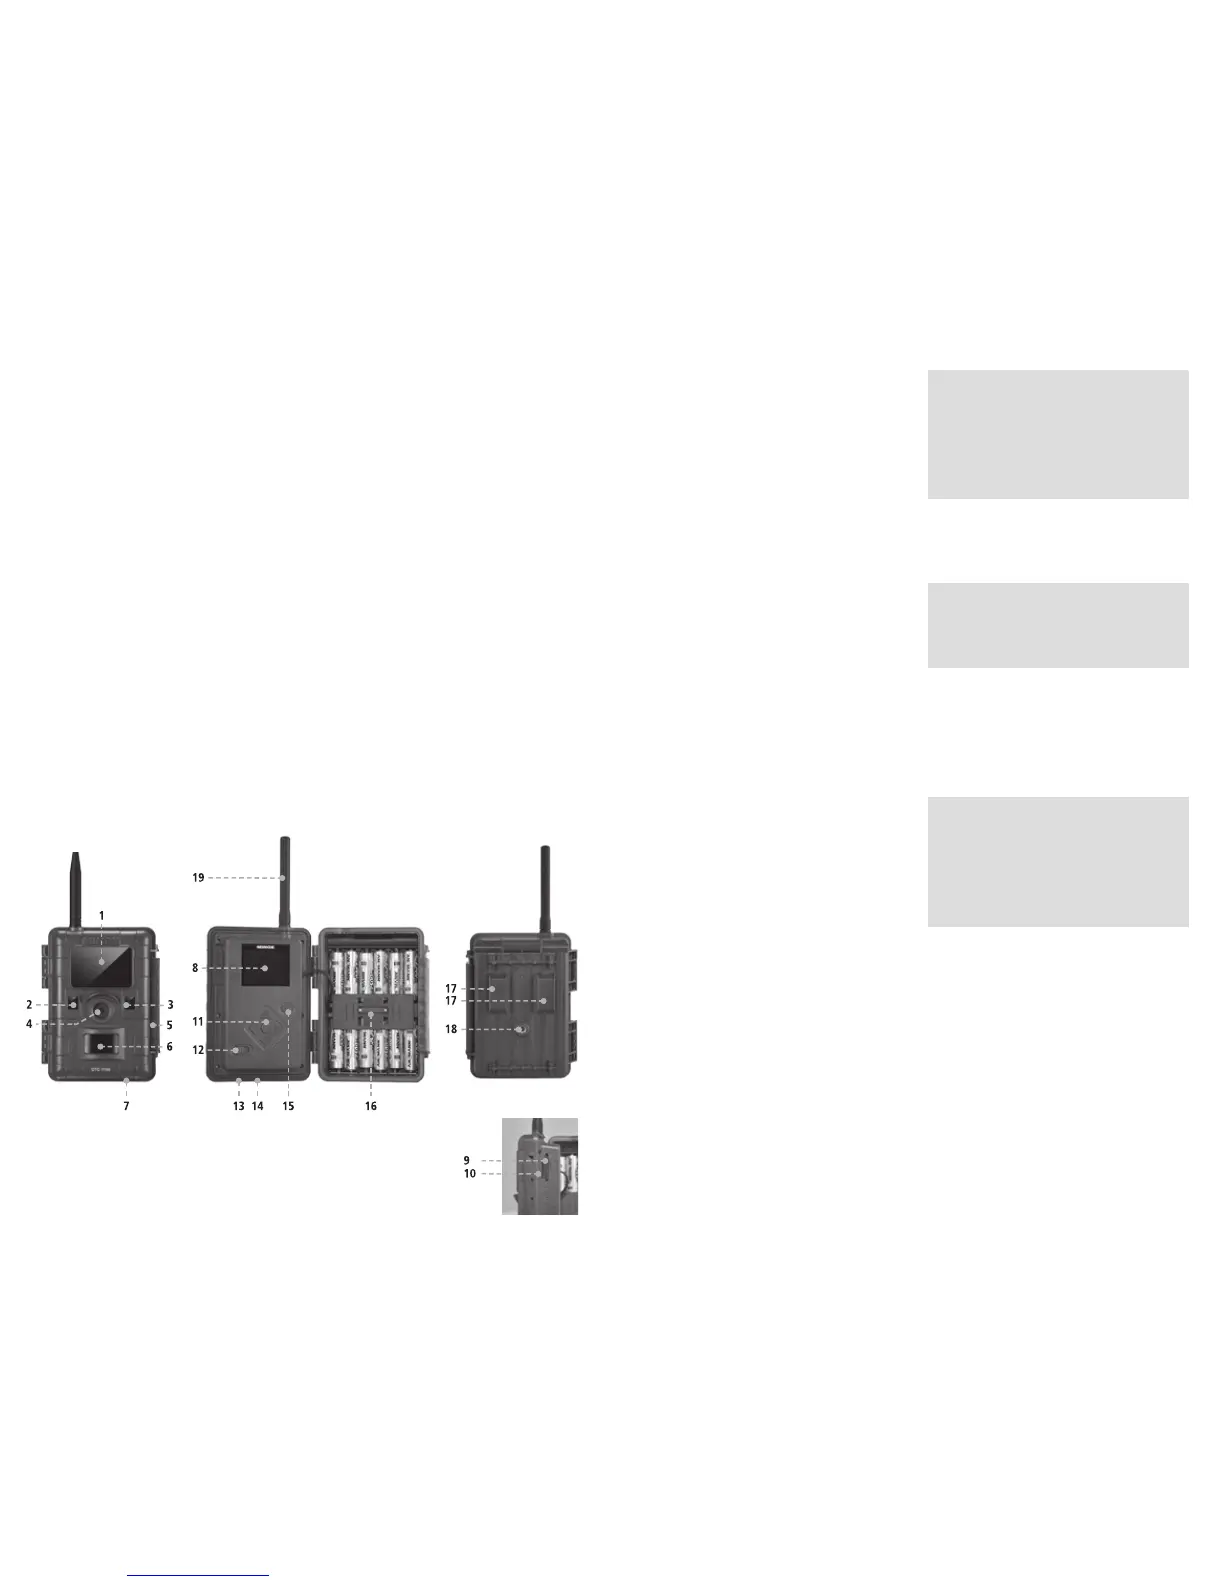
Controls
1. IR LEDs with a black filter for night recordings
2. Twilight sensor
3. Blue activation LED
4. Camera lens
5. Lockable latch
6. Motion sensor
7. Rubber plug for external power supply
8. 2" LCD color display
9. Memory card slot
10. SIM card slot
11. Control buttons, OK button
12. Main switch with three positions:
Off / Setup mode / Operational mode
13. Port for external power supply (6V/9VDC)
14. USB cable port
15. Menu button
16. Battery compartment for 12 x 1.5 Volt AA batteries
17. Mounting brackets
18. ¼" tripod thread
19. Antenna
Preparing Your Camera
Explanation of the Controls
Proceed as follows to prepare the camera for use:
1. Place your DTC 1100 on a flat surface.
2. Push the latch (5) up on the right of the camera
body.
3. Fold the latch (5) over to the right.
4. Open the front of the camera to the left.
On the left of the opened camera body you will see
the controls (11, 12, 15) and on the right the battery
compartment (16). On the left outer edge of the cam-
era body you can find the memory card and SIM card
slots (9/10). At the top of the inner surface is the 2”
LCD display (8). Below the display you will see the
four directional buttons to make selections in the
menu (11). In the center of these buttons you will find
the OK button (11) used to confirm the selected menu
settings; the oval-shaped ENTER button to the upper
right (15) is to switch back to the main menu while in
Setup Mode.
On the bottom left is the main switch (12) with
three positions for the following settings:
1. OFF = main switch to the left
2. SET = Setup Mode; main switch in the middle
3. ON = Operational Mode; main switch to the right
On the bottom of the camera there are additional
ports for:
– external power supply (13)
– USB cable (14) for attaching the camera
to a computer (read more under “Attaching the
camera to a computer”)
To close the camera body, proceed as follows:
1. Place your DTC 1100 on a flat surface in front
of you.
2. Fold the camera body to the right.
3. Fold up the latch (5) on the right.
4. Slide the latch (5) down until firmly in place.
Inserting the Batteries
Inserting the Batteries
Your DTC 1100 camera is designed for AA alkaline,
lithium-ion (Li-Ion) or nickel metal hydride (NiMH) bat-
teries. To insert the batteries, open your camera and
insert twelve 1.5 Volt AA batteries into the battery
compartment (16), making sure that the (+/-) poles
are in the right direction.
Note: The external power source can be accessed
with 6V or 9V. The batteries are bridged when the
camera is connected to an externalpower source.
In other words, the battery cannot be charged inside
the camera, not even using a solar panel. Please do
not use a 12V power source as that would damage
the camera. In such a case, you have no claim under
guarantee.
Checking the Battery Status
Switch the DTC 1100 into SET mode (main switch (12)
to the middle). You can find the battery status symbol
in the bottom left of the LCD display (8).
Note: For best results, we recommend using high
quality batteries. The battery life can be prolonged
by producing shorter video segments, short photo
bursts or longer “quiet times” – see “Quiet Time”
under “Camera Settings”.
Inserting the Memory Card
Your DTC 1100 camera supports (SD/SDHC) memory
cards with a capacity of up to 32 GB. Insert the memo-
ry card into the memory card slot (9) with the brass
colored contacts toward the inside of the camera.
Make sure that the camera is off and that the SD card
is not locked.
Note: Format your SD card using your PC before
every use – we suggest not to format the card with
the DTC 1100 (see also “Format” under “Camera
Setting”). This procedure deletes older data from
the SD card and prepares your card for an error-free
operation in your camera. It is recommended to
record some images directly after inserting the SD
card to verify the camera’s functionality.
Please make sure that the camera is turned off
before inserting or removing the SD card. Switch your
DTC 1100 to SET (12) to continue with your camera
settings.
 Loading...