3534
– Camera Name
Go to “Camera Name” in the menu option “Camera
Data” and press the OK button (11). Here you can
select between “Activate” and “Deactivate”.
Confirm your selection with OK (11). If you select
“Deactivate”, the “Camera name function” is
switched off. If you select “Activate”, this will take
you to the input field. Here you can select the cam-
era name settings using the Up/Down arrow keys
(11). Use the left and right arrow key (11) to access
the option you would like to activate. The camera
name consists of four digits. Confirm with OK (11)
to save the input. You will be brought back to the
previous menu. Select “Deactivate” to deactivate
the camera name function.
Software Updates
If an update is available for your DTC 1100, please
proceed as follows: Make sure your DTC 1100 is
switched off (“OFF” function: Main Switch (12), left).
Copy all the files needed for updating to your PC into
the root list of a formatted SD card. Insert the SD
card into your DTC 1100 as described in the section
“Using the Memory Card”. Bring your camera into the
“SETUP” mode (Main Switch (12), centre). Go to the
Main Menu by pressing the menu button (15) and
select the menu option “Updates”. This is located un-
der the tab “General Settings”. Press the OK button
(11) to access the submenu. Using the Up/Down arrow
keys, you can select “Yes” or “No” and confirm with
OK. (11). Select “No” to retain the existing software
version and the camera will return to the previous
menu selection. If you select “Yes”, your DTC 1100
will begin installing the updates. The update installa-
tion is completed once your camera screen turns
black. Please switch your DTC 1100 now to “OFF”
function: Main Switch, left. When you switch on the
camera the next time in the “SETUP” mode, Main
Switch (12), centre, the new software is ready for use.
Press the left arrow key (11) to return to the previous
menu without installing the updates.
Note: Please note that the process described above
must be followed precisely. Any deviation or infrin-
ge ment may cause the update configuration to fail.
You may not be able to use the camera. In that case,
all warranty claims will be void.
Mobile Service Settings
Mobile Service Settings using the
Download Tool Software
With the Download Tool, you can set your DTC 1100 to
send photos via a mobile phone network. For a quick
and basic configuration, most settings can also be
made directly on the camera (see next point “Mobile
Service Settings (Camera Menu)”).
How to use the Download Tool:
1. To configure the camera via the Download Tool,
insert an SD card and a SIM card into the camera
and use the main switch (12) to select the “Setup
Mode”.
2. In the main menu of the camera, which you can
reach by pressing the menu button (15), select the
third tab “Mobile service settings”. In the tab menu
select “Download Tool” (highlighted) and confirm
with OK (11).
3. As the submenu opens, select “Yes” and confirm
with OK (11). The Download Tool will then be saved
onto the SD card as a ZIP file.
4. Turn the camera off, remove the SD card and read
it on a computer (either by using an SD card reader
or directly in the SD card slot on your computer).
5. Unzip the “DTC_TOOL.zip” file directly from the
SD card and run the “DTC_TOOL.exe” file.
Note: Please make the sure the camera is turned off
before inserting or removing the SD card.
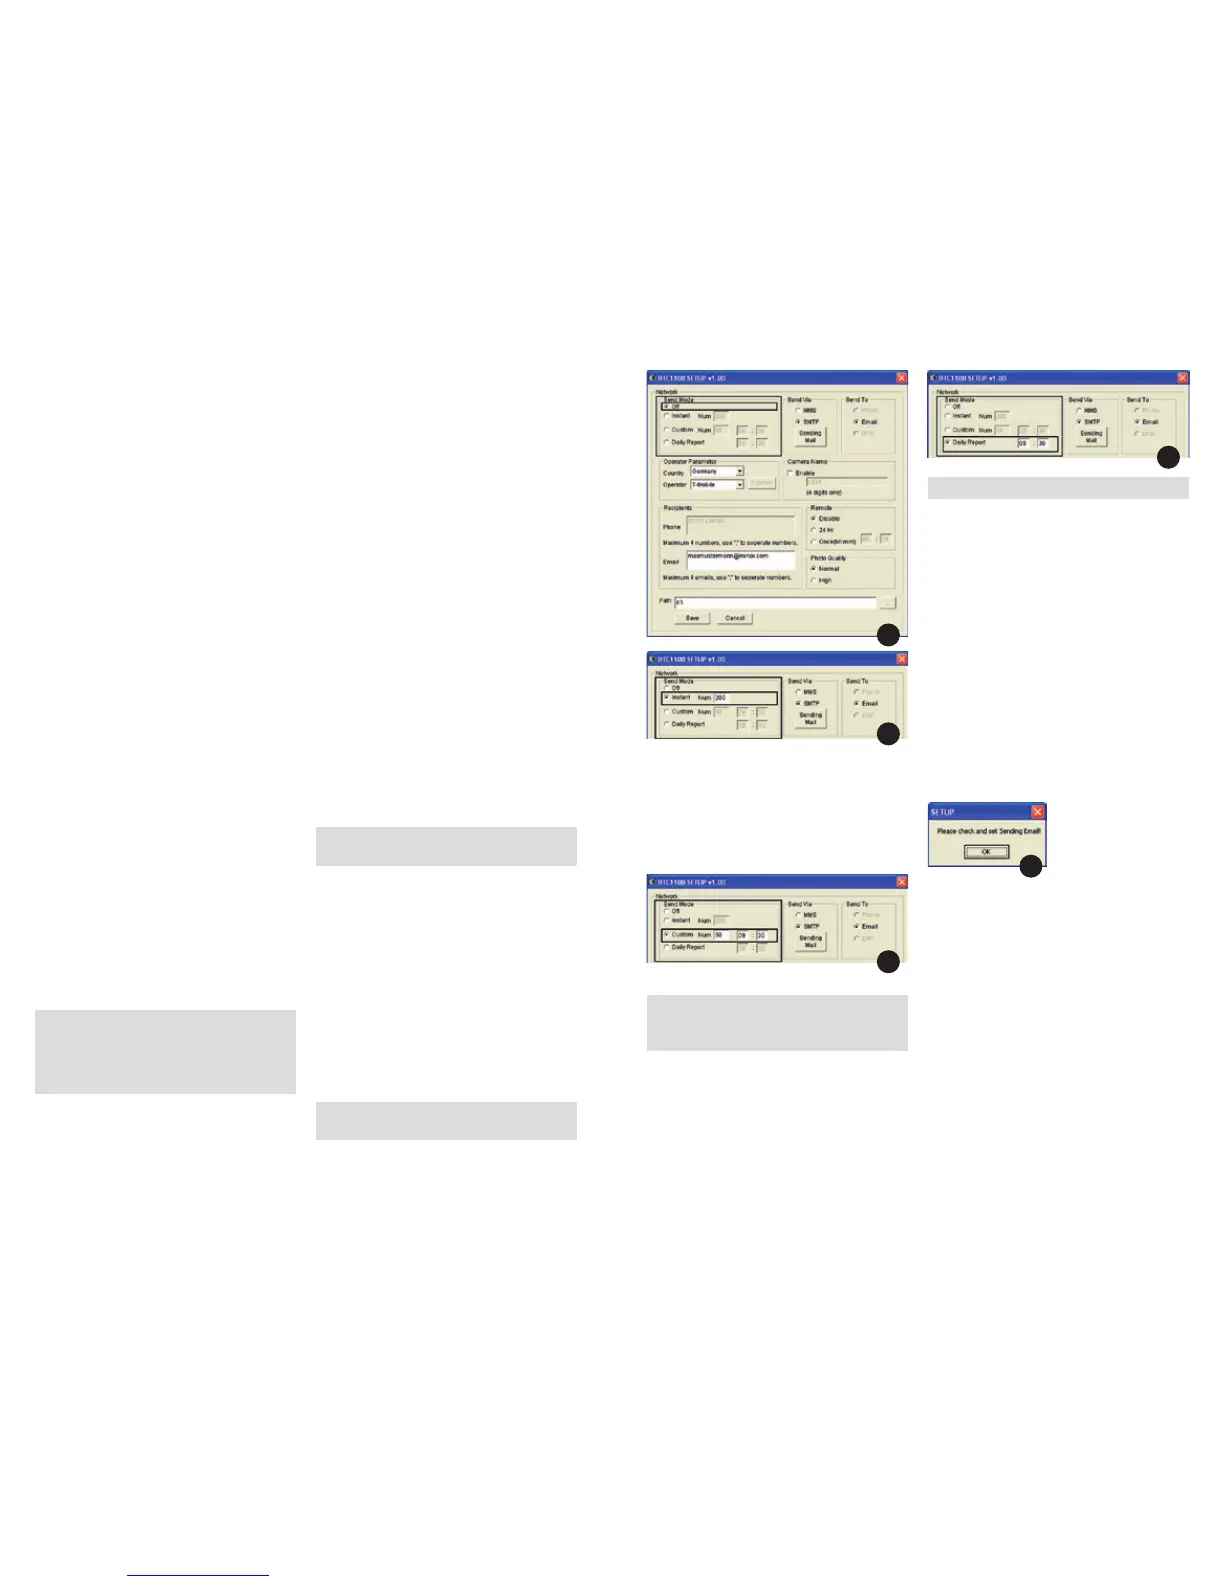
Send Mode
If “Send Mode” is off [Fig. 1], the mobile service func-
tion is deactivated and you cannot send photos via
your mobile phone network card. If “Instant” has been
selected, you can have the photos sent immediately to
predefined telephone numbers or email addresses.
When choosing “Instant” [Fig. 2], you must define the
maximum number of photos that can be sent within
the following 24 hours. If for example you define 10,
the first 10 photos made with the DTC 1100 will be
sent. Photos made in the ensuing 24 hours after the
tenth photo will be saved on the SD card and not be
sent.
Note: It is not possible to send more than
200 photos per 24 hours.
If you have chosen “Custom” [Fig. 3], you can define
a specific time when the photos should be sent. Here
too, you must define the maximum number of photos
that should be sent at the set time. As in this example,
the first 10 photos made with the DTC 1100 will be
sent at 09:30 to the predefined phone numbers or
email addresses.
Note: The time can only be set in the 24 hour
format and the maximum number of photos that
can be sent cannot exceed 50.
With “Daily Report” [Fig. 4], you can have a daily re-
port of the most important data sent to your mobile
phone per text message (SMS) at the predefined time.
The report contains for example the number of photos
that have been made during the previous 24 hours,
battery status and remaining memory space on the
SD card.
Note: The time can only be set in the 24 hour format.
Send Via
Your DTC 1100 offers you two options to send your
photos – either as an MMS or via SMTP. Depending on
the phone card plan and options, each MMS might be
charged to your “normal” phone bill, whereas files
sent via SMTP will require a data plan from your pro-
vider. For both options however, you can specify multi-
ple destinations. If you have chosen to send your pho-
tos per MMS, the images will be sent to the predefined
telephone numbers and/or email addresses. You can
define up to four telephone numbers as well as up to
four email addresses. If you have chosen to send your
files via SMTP, your photos will be sent only to a maxi-
mum of four predefined email addresses – your phone
card must include a data plan before you can use this
option. If you have selected to have your files sent via
SMTP, a reminder will appear requesting you to set up
the sender’s email address (Sending Email) [Fig. 5].
Click on OK and click on “Sending Email”.
Please enter the access data for the sending email
address [Fig. 6]. Please make sure that the correct
SMTP server is entered as these types of servers
require authen tication via a username.
We suggest using the following log-in data:
Email: smtp@minox-dtc.de
Account: smtp@minox-dtc.de
Password: MinoX-DTC
SMTP Server: Smtp.strato.de
SMTP Port: 25
Use SSL: No
1
2
3
4
5
 Loading...