Push Switch
①
Push Switch
Keep holding
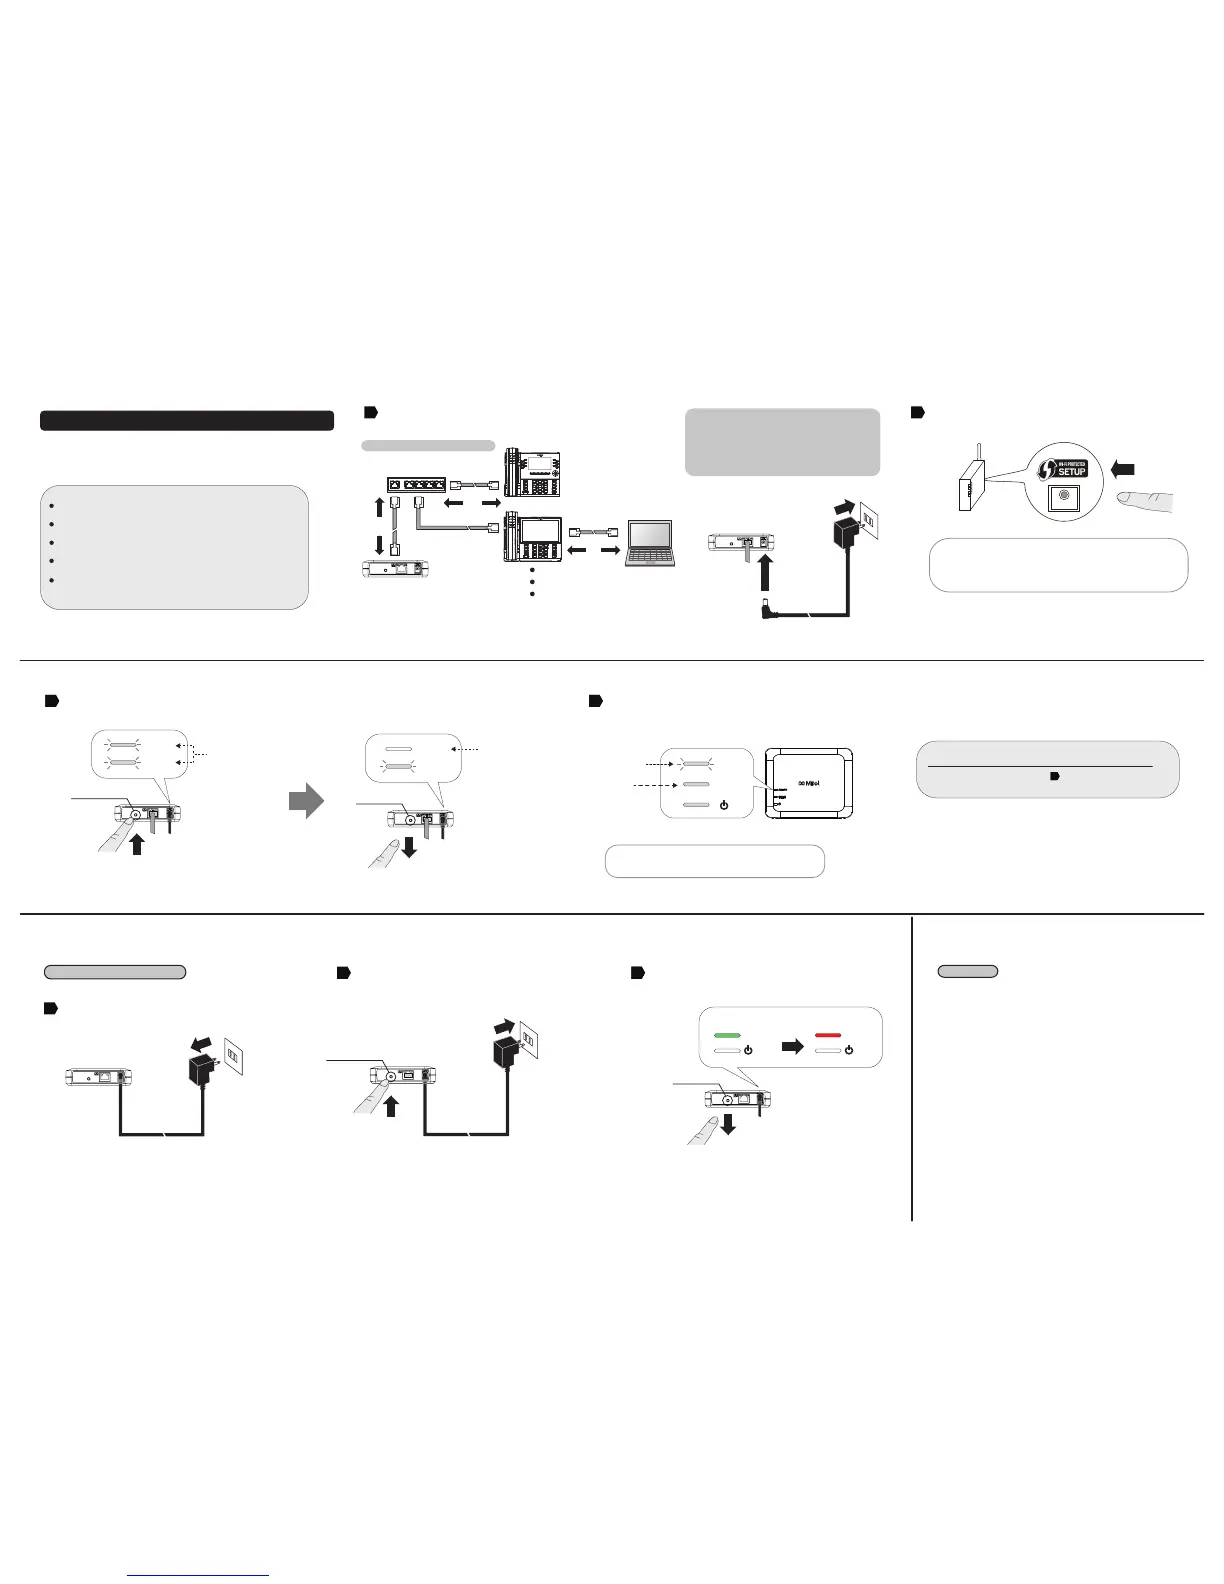
Conguration Method 2 - Easy Conguration Using Smart Wireless Setup
How to reset the MTL-300AN to the factory default settings is explained.
Disconnect the AC plug of the MTL-300AN from the electrical outlet.
②
WPS
1
WLAN
STATUS
③
WLAN
STATUS
To perform wireless conguration using WPS, your wireless router must support WPS.
Please make sure that a wireless router supporting WPS is set up in your environment.
While performing this conguration, please temporarily move the MTL-300AN closer to your
wireless router to make it easier for both devices to communicate.
Depending on your wireless router, WPS may need to be enabled manually. For details, refer to
the operation manual that came with your wireless router.
If a security feature such as MAC Address ltering is enabled on your wireless router, disable it
temporarily so that the MTL-300AN can communicate with your wireless router.
It is recommended to use a router/access point that supports the 5 GHz band. Due to
interference and congestion, using the 2.4 GHz band may cause issues with real time voice
communications.
Factory Default Conguration
The MTL-300AN allows you to congure its wireless settings easily using a
push switch if your wireless router supports WPS (Wi-Fi Protected Setup).
Follow the instructions on this page to congure wireless settings using the
push switch.
- The name, position and shape of the WPS button will dier depending on your
wireless router. For details, refer to the operation manual that came with your
wireless router.
- Please use only one wireless router. If two or more routers are waiting for wireless
connections, the MTL-300AN will not be able to connect properly.
Press the WPS button on your wireless router.
Conrm that your wireless router is ready for a wireless connection to be made.
Wireless Router
Press and hold the push switch at the front of the MTL-300AN. The WLAN LED and STATUS LED will start to blink Green together.
Release the push switch when the STATUS LED turns o while the WLAN LED keeps blinking (it may take 15sec for the STATUS LED to turn o after both LEDs started blinking).
Conrm
STATUS LED
is OFF
Conrm
these LEDs
are blinking
- It may take a while to complete the wireless conguration
depending on your environment (up to 2 min).
*If wireless conguration has failed, the WLAN LED will ash rapidly.
Read the notes above and start from again.
The MTL-300AN will start to communicate with your wireless router.
When the wireless conguration is successfully completed, the WLAN LED turns Green and the STATUS
LED turns/blinks Green.
Connect the IP phones to the Ethernet Switch. Connect the MTL-300AN to the Ethernet
Switch using the network cable that came with the MTL-300AN. Connect the AC adapter
to the MTL-300AN and the AC adapter's plug to an electrical outlet.
Trademarks
Wi-Fi Protected Setup(WPS) is a trademark or registered trademark of Wi-Fi Alliance.
Other company names and product names contained in this document are trademarks or
registered trademarks of their respective companies.
2
33
While reconnecting the AC plug to the outlet, press and hold the push switch at the front of
the MTL-300AN. Keep pressing and the factory default conguration will begin.
When the WLAN LED turns from Green to Red, release the switch. The factory default
conguration is completed. After the factory default conguraton is completed, the
MTL-300AN will restart.
①
1
②
②
AC adaptor
MTL-300AN
Electrical Outlet
AC adaptor
Electrical Outlet
Release the push switch
2
①
WLAN
WLAN
Red
Green
3533
NOTES
MTL-300AN
MTL-300AN
2
Sample connection in Multi-Client Mode
MTL-300AN
Network Cable
Ethernet Switch
IP Phone
IP Phone
②
①
MTL-300AN
Electrical Outlet
* Some IP phones may require additional network settings.
In such cases, refer to the manual that came with the IP phone.
* When turning on the MTL-300AN and the IP phones, be sure to
turn on the MTL-300AN rst. Do not press the push switch
when turning on the MTL-300AN.
Conrm
STATUS LED turns
or blinks Green
WLAN
STATUS
Conrm
WLAN LED
turns Green
Push Switch
Keep holding
Release the push switch
Push Switch
④
MTL-300AN
PC
Optional
 Loading...