This document is an owner's manual for a "Metal Garden Shed," specifically model SD-YF48-H154. It provides instructions for assembly, important notes, and a detailed parts list.
Function Description:
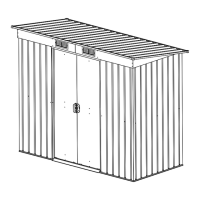
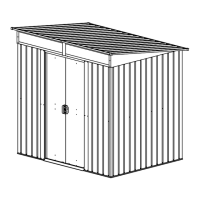
The Metal Garden Shed is a storage structure designed for outdoor use, likely for storing gardening tools, equipment, or other outdoor items. Its primary function is to provide secure and weather-protected storage. The manual emphasizes its "Quick & Easy Assembly" and "Ridge Reinforced Walls," suggesting a design focused on structural integrity and ease of construction.
Important Technical Specifications:
- Model Number: SD-YF48-H154
- Assembly Time: Requires two people and takes 1-2 hours for installation.
- Construction Material: Metal sheets for walls and roof, with ridge-reinforced walls for added strength.
- Structural Components: Includes various frame parts (e.g., 2L, 2R, 3L, 3R, 4L, 4R, 5, 6, 7, 8, 9, 10L, 10R, 11), roof panels (e.g., 15-1, 15-2, 17, 18), corner pieces (e.g., 21L, 21R), and door components (D1, D2).
- Hardware: Fasteners include F1 (screws, 186 pcs), F2 (nuts, 52 pcs), F3 (bolts, 8 pcs), S2 (washers, 110 pcs), and S3 (gaskets, 156 pcs).
- Door Type: Features a double-door design (D1 and D2) with handles (GD) and hinges (GB).
- Roof Design: Appears to be a gable roof with multiple panels (P5, P6) and reinforcing beams (15-1, 15-2, 17).
- Wall Design: Composed of multiple vertical panels (P0, P1, P3, P4).
- Base Requirement: Not designed to be built directly on a lawn; requires a level base constructed from treated timber or concrete. If a concrete pad is used, it should slope towards the edges to prevent water ingress.
Usage Features:
- Outdoor Storage: Intended for use as a garden shed.
- Double Doors: The design includes two doors (D1, D2) for potentially wider access.
- Ridge Reinforced Walls: This feature suggests enhanced durability and resistance to external forces, which is beneficial for an outdoor structure.
- Various Sizes: The manual states it is "Available in Various Sizes," indicating flexibility for different user needs, although this specific manual is for model SD-YF48-H154.
- Easy Assembly: Marketed as "Quick & Easy Assembly," implying a user-friendly construction process.
Maintenance Features:
- Site Selection: Recommends avoiding overhanging trees to prevent the need for regular cleaning from leaves and to mitigate the hazard of broken branches.
- Wind Break: Suggests that small trees, bushes, or fences nearby can act as a helpful wind break, which could reduce wear and tear on the shed during windy conditions.
- Base Preparation: Emphasizes the need for a level and appropriate base (treated timber or concrete) to prevent moisture ingress and muddy conditions, which are crucial for the long-term integrity and cleanliness of the shed.
- Concrete Pad Slope: If a concrete pad is used, it must slope towards the edges to prevent water ingress, a key factor in preventing rust and water damage.
- Regular Cleaning: Implied by the recommendation to avoid overhanging trees, suggesting that regular cleaning might be necessary depending on the environment.
- Fastener Tightening: The "IMPORTANT NOTES" section advises to "Tighten all nuts carefully,being sure not to miss any," which is a critical maintenance step to ensure structural stability and longevity.
- Frame Checks: Recommends checking that the frame is square and using a spirit level to ensure it is upright, which helps maintain the shed's structural integrity over time.
Assembly Process Overview:
The manual outlines a step-by-step assembly process, starting with the base frame, then adding wall panels, roof supports, roof panels, and finally the doors.
- Base Frame Assembly: Involves connecting parts like 4L, 4R, 2L, 2R, 3L, 3R, 5, 6, 7, 8, 9, 10L, 10R, 11 using F1 fasteners. The manual stresses ensuring the frame is square and level.
- Wall Panel Installation: Vertical panels (P0, P1, P3, P4) are attached to the base frame using S3 gaskets and F2 nuts.
- Roof Support and Panel Installation: Roof supports (15-1, 15-2, 17, 18, 21L, 21R) and roof panels (P5, P6) are installed.
- Door Assembly and Installation: Doors (D1, D2) are assembled with handles (GD) and hinges (GB) and then attached to the main structure.
Safety and Planning:
- Teamwork: Recommends two or more people for assembly.
- Weather Conditions: Advises against assembly in windy, wet, or muddy conditions.
- Gloves: Strongly recommends using heavy-duty gloves when handling steel sheets and flashing.
- Local Regulations: Prior to installation, users should contact their local government authority to determine if building approval is required.
- Part Verification: Users should separate and verify all parts against the parts list before starting assembly.
- Tool Preparation: Ensure all necessary tools are at hand.
- Layout Parts: Ideally, lay out all parts and check for presence before commencing construction, using cloths or plastic sheets to prevent scratching.