Einbaumikrofon
Bitte lesen Sie diese Bedienungsanleitung vor dem
Be trieb gründlich durch und heben Sie sie für ein spä-
teres Nachlesen auf.
1 Einsatzmöglichkeiten
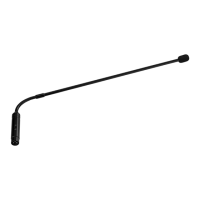
Dieses Einbaumikrofon – Modell ECM-10/SW mit
schwarzer Kapselabdeckung, Modell ECM-10/WS mit
weißer Kapselabdeckung – ist speziell für den Einsatz
in ELA-Anlagen konzipiert und eignet sich optimal für
Sprachaufnahmen (z. B. Durchsagen, Vorträge).
Die zum Betrieb erforderliche Speisespannung er-
hält das Mikrofon über das angeschlossene Audio-
gerät, d. h. der Mikrofoneingang am Au diogerät muss
über eine Phan tom speisung (9 – 48 V ) verfügen.
2 Hinweise für den sicheren Gebrauch
Das Mikrofon entspricht allen relevanten Richtlinien
der EU und ist deshalb mit gekennzeichnet.
G
Setzen Sie das Mikrofon nur im Innenbereich ein
und schützen Sie es vor Tropf- und Spritzwasser,
hoher Luftfeuchtigkeit und Hitze (zu lässiger Ein-
satztemperaturbereich 0 – 40 °C).
G
Verwenden Sie zum Reinigen nur ein trockenes,
weiches Tuch, niemals Chemikalien oder Wasser.
G
Wird das Mikrofon zweckentfremdet, falsch an ge-
schlossen oder nicht fachgerecht repariert, kann
keine Haftung für daraus resultierende Sach- oder
Personenschäden und keine Garantie für das Mi-
krofon übernommen werden.
3 Inbetriebnahme
Zum Einbau des Mikrofons, z. B. in eine Tischplatte,
ein Montageloch mit einem Durchmesser von 24 mm
bohren. Die Gewindemutter und den unteren Gum mi -
ring entfernen und das Mikrofon in das Montageloch
setzen. Um tieffrequente Störgeräusche, her vor ge ru -
fen durch Erschütterungen des Mikrofons, zu mini-
mieren, die zwei Gummiringe so plazieren, dass sie
auf beiden Seiten der Montagefläche auf liegen (siehe
Soll das Mikrofon endgültig aus dem Betrieb
genommen werden, übergeben Sie es zur
umweltgerechten Entsorgung einem örtli-
chen Recyclingbetrieb.
Abb. 2). Zum Schluss das Mikrofon mit der Gewinde-
mutter festschrauben.
Das Mikrofon über ein Anschlusskabel (z. B. ein Ka bel
der MEC-Serie aus dem Programm von „img Stage
Line“) mit einem XLR-Mikrofon eingang am Audiogerät
(z. B. Mischpult, Verstärker) verbinden. Der Mikro -
fon eingang muss mit einer Phantomspeisung von
9 – 48 V aus gestattet sein, anderenfalls ist kein Mi-
krofonbetrieb möglich.
4 Technische Daten
Typ: . . . . . . . . . . . . Elektret-Mikrofon
Richtcharakteristik: Kugelcharakteristik
Frequenzbereich: . 30 – 17 000 Hz
Empfindlichkeit: . . . 2,3 mV/Pa bei 1 kHz
max. Schalldruck: . 110 dB
Stromversorgung: . Phantomspeisung 9 – 48 V
Einsatztemperatur: 0 – 40 °C
Gewicht: . . . . . . . . 90 g
Änderungen vorbehalten.
Microphone to be installed
Please read these operating instructions carefully
prior to operation and keep them for later use.
1 Applications
This microphone to be installed – model ECM-10/SW
with black cartridge cover, model ECM-10/WS with
white cartridge cover – is especially designed for ap-
pli cations in PA systems and is ideally suited for pick-
ing up speech (e. g. announcements, lectures).
The microphone receives the supply voltage re-
quired for the operation via the connected audio unit,
i. e. the microphone input on the audio unit must be
provided with a phantom power (9 – 48 V ).
2 Safety Notes
The microphone corresponds to all relevant directives
of the EU and is therefore marked with .
G
The microphone is suitable for indoor use only. Pro-
tect it against dripping water and splash water, high
air humidity, and heat (admissible ambient temper-
ature range 0 – 40 °C).
G
For cleaning only use a dry, soft cloth, never use
chemicals or water.
G
No guarantee claims for the microphone and no li-
ability for any resulting personal damage or mate -
rial damage will be accepted if it is used for other
purposes than originally intended, if it is not cor-
rectly connected or not repaired in an expert way.
3 Setting into Operation
To install the microphone, e. g. into a table top, drill a
hole with a diameter of 24 mm for mounting. Remove
the thread nut and the lower rubber ring, and place
the microphone into the mounting hole. To minimize
low frequency interfering noise caused by vibrations
of the microphone, place the two rubber rings in such
a way that they lie on both sides of the mounting area
(see fig. 2). Finally screw the microphone tightly with
If the microphone is to be put out of opera-
tion definitively, take it to a local recycling
plant for a disposal which is not harmful to
the environment.
the thread nut.
Connect the microphone via a cable (e. g. a cable of
the MEC series of the “img Stage Line” range) to an
XLR microphone input on the audio unit (e. g. mixer,
amplifier). The microphone input must be provided
with a phantom power of 9 – 48 V , otherwise no mi-
crophone operation will be possible.
4 Specifications
Type: . . . . . . . . . . . electret microphone
Pick-up pattern: . . omnidirectional
Frequency range: . 30 – 17 000 Hz
Sensitivity: . . . . . . . 2,3 mV/Pa at 1 kHz
Max. SPL: . . . . . . . 110 dB
Power supply: . . . . phantom power 9 – 48 V
Ambient temp.: . . . 0 – 40 °C
Weight: . . . . . . . . . 90 g
Subject to technical modification.
ECM-10/SW Best.-Nr. 23.2720
ECM-10/WS Best.-Nr. 23.2730
MONACOR INTERNATIONAL GmbH & Co. KG • Zum Falsch 36 • 28307 Bremen • Germany
Copyright
©
by MONACOR INTERNATIONAL. All rights reserved. A-0983.99.02.09.2011
®
D A CH
GB
Richtcharakteristik
G
Polar pattern
Frequenzgang
G
Frequency response
Abmessungen/Steckerbelegung
G
Dimensions/plug configuration
Montage
G
Mounting
ground
1 Masse
signal +
2 Signal +
signal
-
3 Signal
-
ECM-10/SW