4.Slide a driving wheel onto the rear axle. Ensure the driving wheel fits to the gear box on the vehicle body.
5.Slide a Ø8 washer onto the rear axle.
6.Place a lock nut to the end of the rear axle and tighten it using a wrench. This way you will fix the wheel to the axle.
7.Repeat steps 4-6 for attaching the other driving wheel.
8.Attach the hubcaps to the driving wheels.
B. Attach the Front Wheels & Steering Wheel – Figures B and C:
1.Slide a Ø10 washer onto the front axle.
2.Place one of the front wheel onto the front axle.
3.Slide a Ø8 washer onto the front axle.
4.Place a lock nut to the end of the front axle and tighten it using a wrench in order to fix the front wheel.
5.Repeat step 1 – 4 to fix and the other front wheel.
6.Attach the hubcaps to the front wheels.
7.Fit the steering wheel to the end of the steering column, visible from the dashboard.
8.Line up the holes on the steering wheel with the holes on the steering column, insert the M5x30 machine screw.
9.Attach a nut to the opposite end of the screw and fix it with a screwdriver. Do not overtighten
C. Attach the Exhaust Pipe & Connect the Power – Figures D and E:
1.Fit the exhaust pipe into the hole on the right side of the vehicle body. Push until you hear it click into place.
2.Plug the red connector on the vehicle body into the red connector from the battery.
Warning! NEVER connect red plug to black terminal or black plug to red terminal!
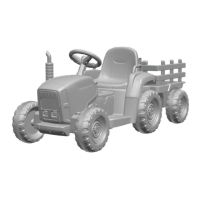
D. Attach the Seat & the Trailer – Figures F and G:
1.Fit the seat to the vehicle body.
2.Insert five Ø4x12 round head screws and tighten them to fix the seat.
3.Turn the trailer base downside up.
4.Fit the trailer support to the trailer base.
5.Insert eight Ø4x12 flat head screws and tighten them in order to fix the support to the trailer.
E. Attach the Rails & Trailer Wheel – Figures H-1, H-2 and H-3:
1.Turn over the trailer body.
2.Fit the side rails to the front rail.
3.Fit the rails assembly to the trailer holes in the base of the trailer.
4.Tighten a locknut to the end of trailer axle.
5.Insert a Ø8 washer onto the trailer axle.
6.Insert the wheel (out side first) on the trailer axle.
7.Insert a Ø10 washer onto the trailer axle.
8.Insert bushing on the trailer axle.
9.Pass the trailer axle through the holes on the one side of the trailer support, and out through the holes on the other side of
the trailer support.
10.Attach a bushing to the trailer axle.
11.Place a Ø10 washer onto the trailer axle.
12.Attach the wheel (out side first) on the trailer axle.
13.Insert a Ø8 washer onto the trailer axle.
14.Tighten using locknut and wrench.
Hint: An extra spanner has been provided to hold the lock nut on one side of the trailer axle while tightening the lock nut on
the other side.
15.Attach the decorative caps.
F. Attach the Trailer to Tractor body – Figure I:
1.Fit the trailer assembly to the trailer linkage on the tractor body.
2.Insert the trailer bolt through the opening in the trailer and the connection and push carefully to “click” it into place.
16
USE
See Figure U:
1. Start button: Turns the tractor on and off.
2. High / Low speed forward & Reverse switch:
•To move the tractor forward in high speed, shift the lever to top position (Forward) and press the foot pedal. If the pedal is
released, then the tractor stops moving.
•To move the vehicle forward in low speed, shift the lever Forward/ Backward to middle position and press the pedal. If the
pedal is released, the tractor stops moving.
•To move the vehicle backward, shift the lever Forward/ Backward to position Backward and press the pedal. If the pedal is
released, the tractor will stop moving.
•HINT: The tractor is designed to operate in low speed only in reverse.
3. Lights switch: Turns the tractor’s lights on and off.
4. Foot pedal:
•To move the tractor, press the pedal down.
•To stop the tractor or slow down, release pressure from the pedal by lifting your foot.
 Loading...