2 3
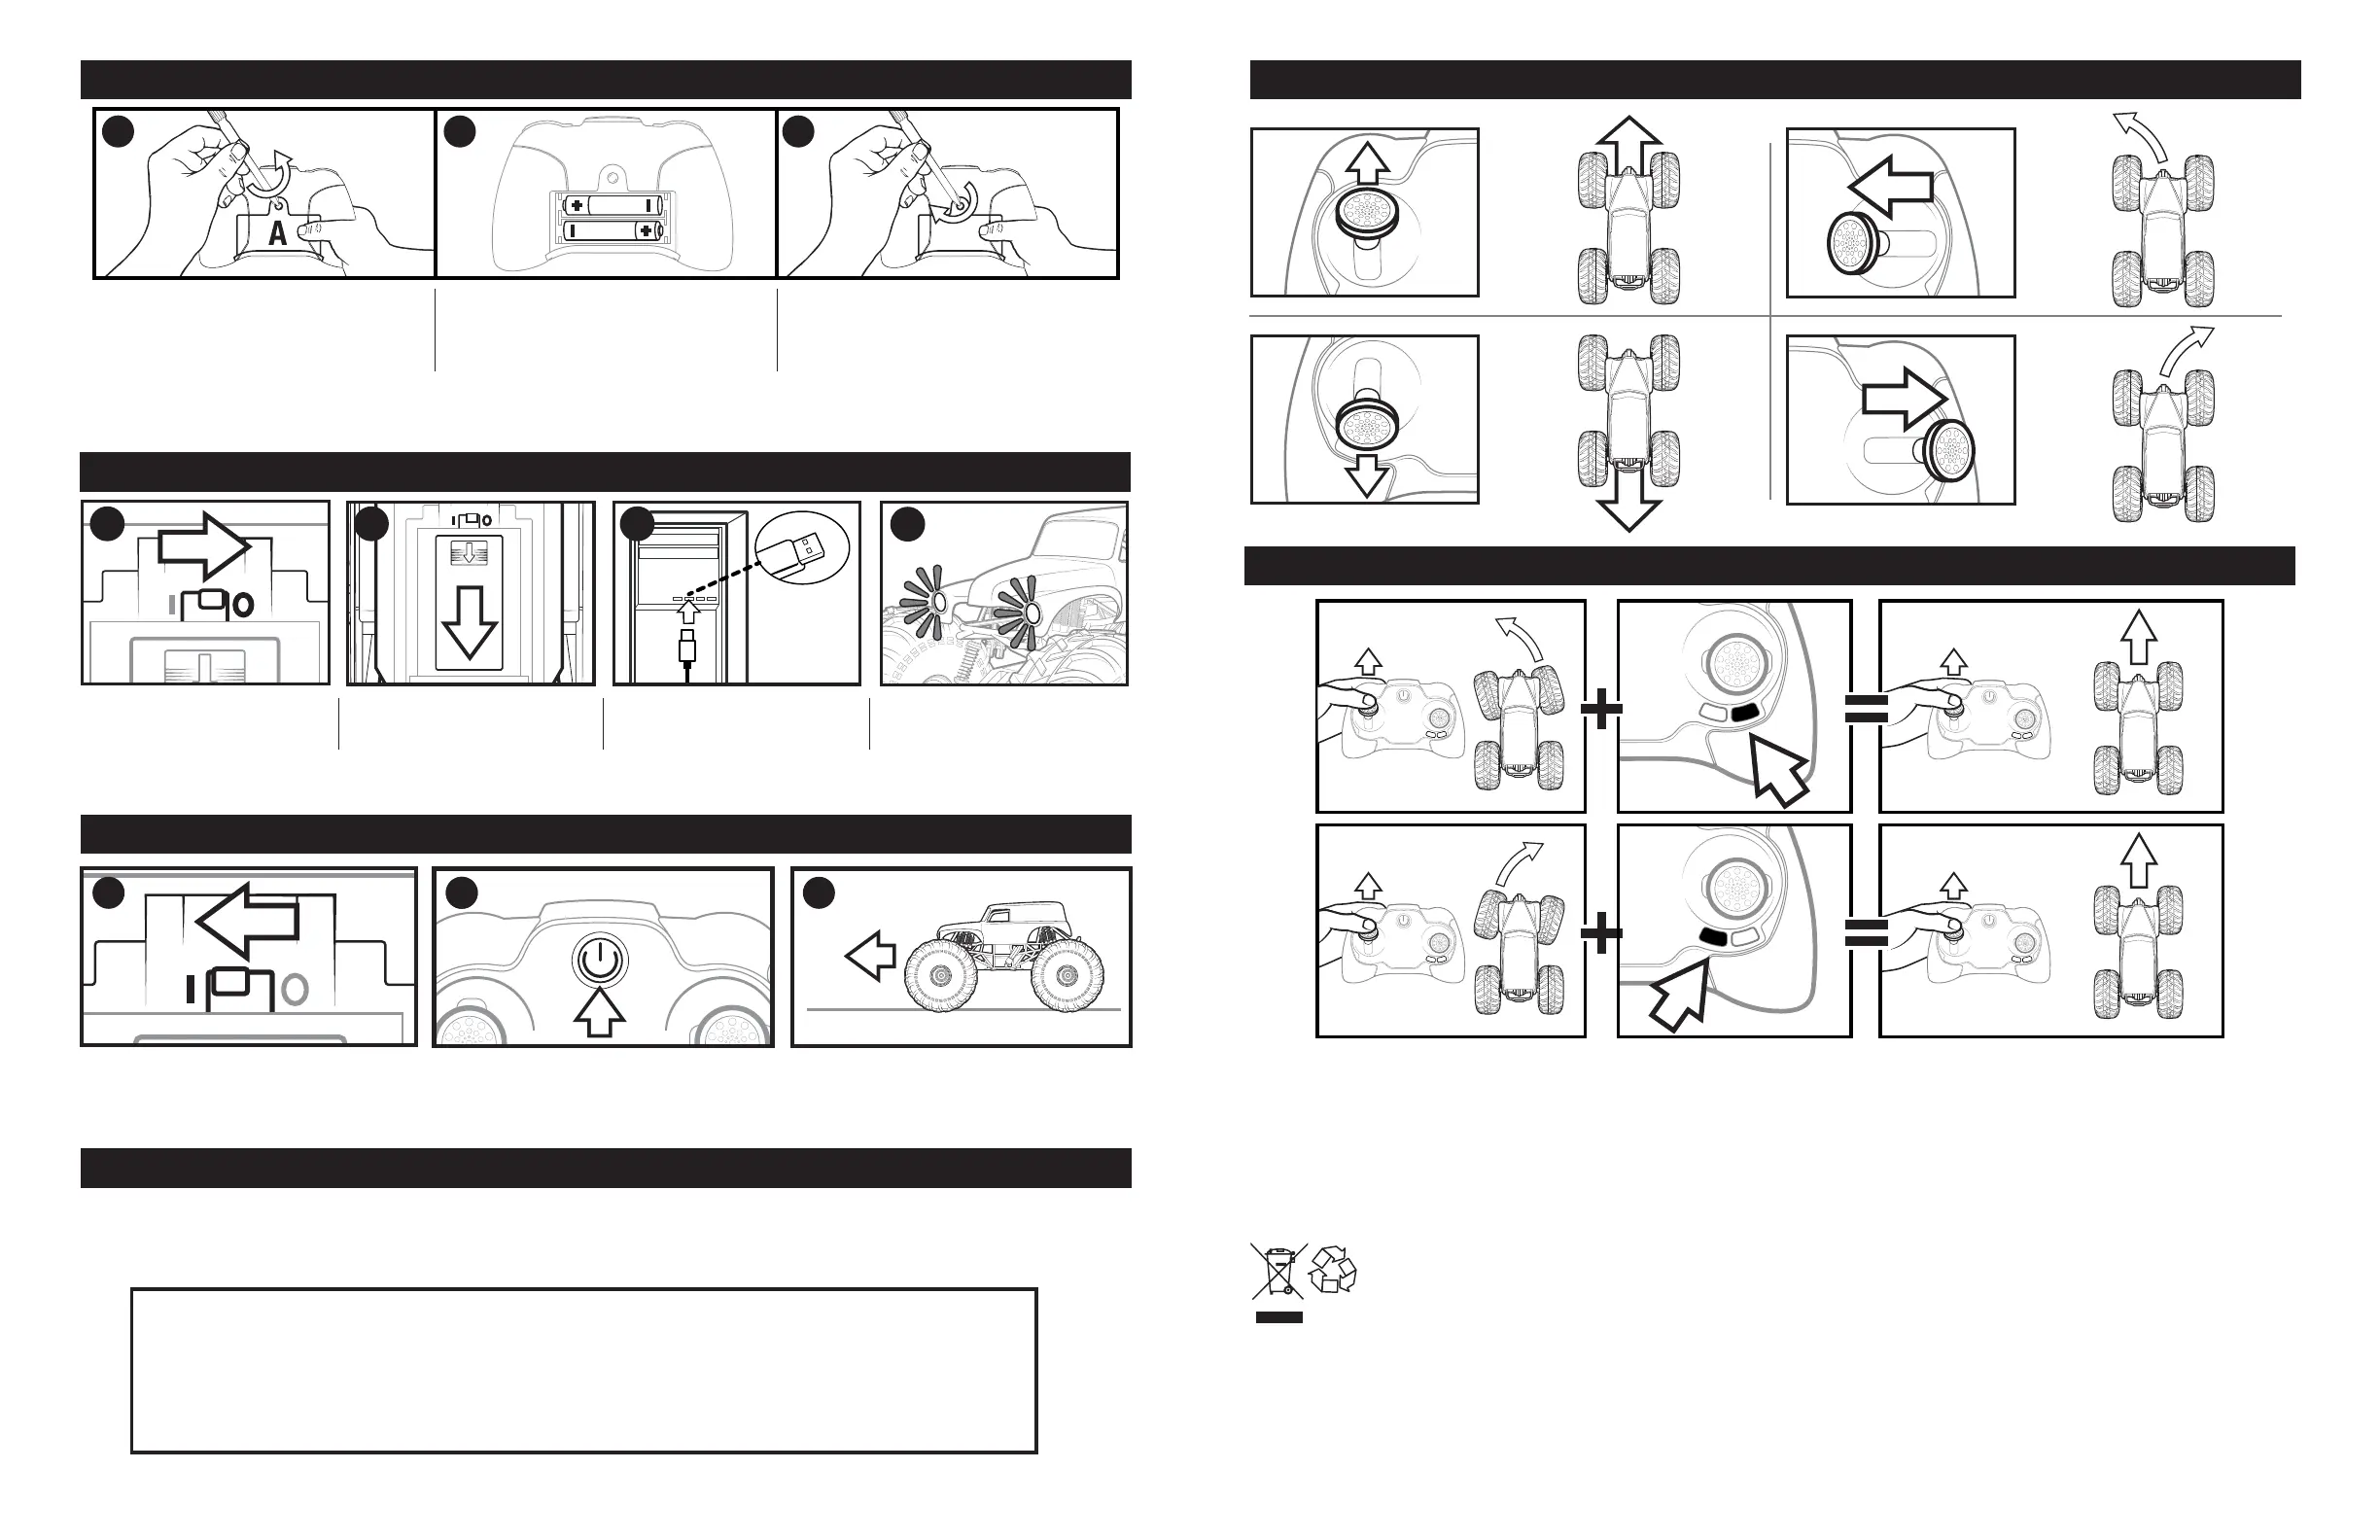
HOW TO INSTALL BATTERIES
HOW TO CHARGE
1 3
DIRECTIONAL CONTROL
e
For TROUBLESHOOTING questions and solutions, please visit our website: MONSTERJAMRC.COM
NOTE: If normal function of the product is disturbed or interrupted, strong electromagnetic interference may be causing the issue. To reset product, turn it completely off, then turn it back on. If normal operation does not resume, move the product to another
location and try again. To ensure normal performance, change the batteries, as low batteries may not allow full function.
Safety Precautions: - Keep hands, hair and loose clothing away from the motor/ wheels when power switch is turned ON. - Remove battery(s) from controller when not in use. - Parental guidance is recommended for the play. - Keep your toy in your sight so
that you can supervise it all the time. - New alkaline batteries are recommended for use in controller to obtain maximum performance. - Users should keep strict accordance with the instruction manual while operating the product.- Your controller/charger is
tailor-made for the LiFeP04 rechargeable battery used in your vehicle. Do not use it to charge any battery other than that in the toy. Note: Parental guidance is recommended when installing or replacing batteries. Under the environment with electrostatic
discharge, the toy may malfunction and require user to reset the toy.
Special note to adults: Regularly examine for damage to the plug, enclosure and other parts. In the event of any damage, the toy must not be used with the charger until the damage has been repaired. This toy is not intended for children under 3 years old. This
toy must only be used with the recommended charger.
CONTAINS 1 X 9.6V LiFe BATTERY PACK AND REQUIRES 2 x 1.5V AAA (LR03) ALKALINE BATTERIES. (Not Included)
Batteries or battery packs must be recycled or disposed of properly. When this product has reached the end of its useful life, it should not be disposed of with other household waste. The Waste Electrical and Electronic Equipment
Regulations require it to be separately collected so that it can be treated using the best available recovery and recycling techniques. This will minimize the impact on the environment and human health from soil and water contamination
by any hazardous substances, decrease the resources required to make new products and avoid using up landfill space. Please do your part by keeping this product out of the municipal waste stream! The “wheelie bin” symbol means
that it should be collected as “waste electrical and electronic equipment”. You can return an old product to your retailer when you buy a similar new one. For other options, please contact your local council.
PRODUCT BATTERY REMOVAL INSTRUCTIONS:
Internal battery is factory installed and non-replaceable. Product disassembly and battery removal must be performed by an adult. Do not puncture, cut, tear, compress or deform product during disassembly. Ensure product is turned off, then use a screw driver
to remove screw. Lift end of battery compartment and slide out battery. Dispose of battery in accordance with your local battery recycling or disposal laws.
NOTE: Opening of product will render product inoperative and voids manufacturer warranties. Dispose of remaining product components in accordance with local laws.
This toy is equipped with a Lithium-ion battery.
SPECIAL LiFe BATTERY INSTRUCTIONS: Never charge battery unattended. - Charge battery in an isolated area. Keep away from flammable materials. - Do not expose to direct sunlight. There is a risk of the batteries exploding, overheating, or igniting. - Do
not disassemble, modify, heat, or short-circuit the batteries. Do not place them in fires or leave them in hot places. - Do not drop or subject to strong impacts. - Do not allow the batteries to get wet. - Only charge the batteries with the specified Spin Master™
battery charger. - Only use the batteries in the device specified by Spin Master™. - Carefully read the instruction guide and use the batteries correctly. - In the unlikely event of leakage or explosion use sand or a chemical fire extinguisher for the battery. -
Batteries must be recycled or disposed of properly.
2 3
1. Open the battery door with a
screwdriver. (A). If used batteries are
present, remove these batteries from
the unit by pulling up on one end of
each battery. DO NOT remove or
install batteries using sharp or metal
tools.
2. Install new batteries as shown in the
polarity diagram (+/-) inside the
battery compartment.
3. Replace battery door securely.
Check your local laws and
regulations for correct recycling
and/or battery disposal.
1. Turn the vehicle off. 2. Remove the cover
from the charging
cable compartment.
3. Plug the charging cable into
a computer or wall adapter.
Only connect USB charging
cable to a computer or other
5VDC rated power source.
4. Headlights indicate
charging. Blinking for
charging and ON when fully
charged.
HOW TO DRIVE
1. Turn on the vehicle and place on a flat
surface.
2. Hold the controller near your truck, press
the power button wait until power light
stops flashing.
3. You are ready to drive.
4. Use the remote control to drive.
NOTE: If your truck does not connect to the controller the first time, turn the truck off, take the batteries out of the
controller and repeat STEP 1.
4
2
HOW TO FIX DRIFTING
Monster Jam Parts Warranty –
1 Year Replacement Parts
Free replacement parts 1 year from the date of purchase. Contact our consumer care
1-800-622-8339 for more information.
1
TROUBLESHOOTING
1 2 3
2
 Loading...