EasyManua.ls Logo

Moonybaby 55812 - User Manual

Moonybaby 55812
11 pages
Print Icon
To Next Page IconTo Next Page
Loading...
INSTRUCTION MANUAL
Question and Answer IconNeed help?

Do you have a question about the Moonybaby 55812 and is the answer not in the manual?

Overview

This document is an instruction manual for a Moonybaby digital video baby monitor.

Function Description:

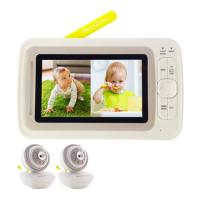
The Moonybaby digital video baby monitor is designed to allow parents to monitor their baby remotely. It consists of a Baby Unit (camera) and a Parent Unit (monitor). The system provides real-time video and audio monitoring, with features such as night vision (indicated by LED lights on the Baby Unit), sound level indication, and the ability to connect multiple cameras.

Important Technical Specifications:

  • Power Adapter: The Baby Unit uses a 5V DC 1000mA adapter, and the Parent Unit uses a 5V DC 2000mA adapter.
  • Battery Life (Parent Unit): The manual mentions extending battery life through constant recharging and optimizing battery life using power saving mode and tune speaker sound level.
  • Camera Placement: The Baby Unit should be placed at least 3.3 ft (1 meter) away from the crib.
  • Wireless Communication: The device uses radio frequency (RF) for communication. It complies with Part 15 of the FCC Rules. The transmitter must not be co-located or operating in conjunction with any other antenna or transmitter. The antennas used for this transmitter must be installed to provide a separation distance of at least 20 cm from all persons.
  • Operating Temperature: The monitor works best in temperature ranges between 0°C and 40°C (32°F and 104°F).

Usage Features:

  • Installation:
    • Baby Unit: Connect the small plug of the power adapter to the Baby Unit and push the Micro USB to the end. Use the enclosed adapter (5V DC 1000mA). Press the "POWER" button to turn on the baby unit; a green LED will turn on. Place the Baby Unit on a flat surface, such as a desk or shelf, or mount the camera on a wall, ensuring it is at least 3.3 ft from the crib.
    • Parent Unit: Connect the small plug of the power adapter to the Parent Unit and push the connector to the end. Use the enclosed adapter (5V DC 2000mA). Recommend charging time of at least 3 hours before first time use.
  • Battery Management (Parent Unit):
    • Low Battery: When the battery level is low, the power on/off LED flashes red, and the battery icon on the LCD display flashes red.
    • Extend Battery Life: Constantly recharge the battery when the battery life indicator is low.
    • Optimize Battery Life: Lower the speaker level, consume more battery power, and shorten battery life. Switch to power saving mode and tune speaker sound level to level 4 to optimize battery life.
  • Troubleshooting:
    • Battery not holding a charge/Monitor cannot turn on: Remove the battery from the battery compartment and reinstall it.
    • Monitor cannot hold camera connection: Check whether the monitor is set to CAMERA SCAN mode. Monitor switches between paired cameras every 10 seconds. If the monitor is not powered on, display Lost Link. If the camera is not powered on, display an icon with a camera and an "X" through it. To select the camera you want to watch, use the SPLIT VIEW button.
  • Sound Bar: This feature is designed for deaf parents to reflect the sound level picked up from the camera. It can be disabled in the menu.
  • ECO Mode (Power Saving):
    • The POWER SAVING button switches off the screen and keeps audio on (default setting "SCREEN OFF").
    • You have another choice of switching off both screen and audio by using the ECO mode option.
    • In ECO mode, both sound and screen are shut off when the monitor detects no camera activity. The monitor will be activated when the camera detects sound that exceeds the activation sound level you selected (Default level is medium). You can select activation sound levels between loud, medium, and quiet.
  • Screen Tips: The manual explains how to turn off "On screen tips" in the menu if you are familiar with the monitor's status and functions.
  • Pairing Camera:
    • To pair cameras, go to the Menu. You will see a pairing message on the screen.
    • During the pairing message on the screen, press the camera pairing button for 1 second.
    • When the camera and monitor are paired, video will be displayed on the screen automatically.
    • The menu allows you to Scan Mode, View Camera, Camera Volume, Add Camera, and Delete Camera.

Maintenance Features:

  • Battery Care:
    • Use only the original rechargeable battery provided.
    • Do not short-circuit battery terminals.
    • Remove the battery when the product is stored for long periods or when the battery is exhausted.
    • Dispose of exhausted batteries properly.
    • Keep all batteries away from children.
    • The apparatus should not be exposed to dripping or splashing, and no objects filled with liquids, such as vases, should be placed on the apparatus.
    • Danger of explosion if the battery is incorrectly replaced. Replace only with the same or equivalent type.
    • Batteries (battery pack or batteries installed) should not be exposed to excessive heat such as sunshine, fire, or the like.
  • General Precautions:
    • Do not overload wall outlets, extension cords, or integral convenience receptacles as this can result in a risk of fire or electric shock.
    • Never expose the baby monitor for long periods to direct sun and never place it next to a source of heat, in a damp or very dusty room.
    • Never push objects of any kind into this product through openings as they may touch dangerous voltage points or short-out parts that could result in a fire or electric shock. Never spill liquid of any kind on the product.
    • Do not attempt to service this product yourself as opening or removing covers may expose you to dangerous voltage or other hazards. Refer all servicing to qualified service personnel.
    • The product should be mounted to a wall or ceiling only as recommended by the manufacturer.
  • Cleaning: The manual does not explicitly state cleaning instructions but implies general care.
  • Warranty: Moonybaby offers a repair or replacement warranty for 12 months from the date of purchase if the unit is defective in workmanship or materials. To claim repair/replacement, the product must be returned to Moonybaby together with a copy of the purchase receipt. The warranty does not apply to normal wear or damage from misuse, abuse, improper storage and handling, installation, accident, unauthorized repair or alteration. Contact customer service via Facebook Moonybaby or email for details.

Safety Warnings:

  • STRANGULATION HAZARD: Children have STRANGLED in cords. Keep this cord out of reach of children (more than 3 feet/1 meter away from the crib). Never use extension cords with AC adapters. Only use the AC Adapters provided.
  • Adult assembly required. Keep small parts away from children when assembling.
  • THIS PRODUCT CANNOT REPLACE RESPONSIBLE ADULT SUPERVISION.
  • When an AC Adapter is plugged into an electrical outlet, do not the exposed end.
  • Test the baby monitor before first use, periodically, and when changing the location of the baby unit (Camera).
  • Do not use the monitor near water (Such as bathtub, Sink, etc).
  • Keep the parent unit away from heat sources (Such as stoves, radiators, etc).
  • Make sure there is proper ventilation around the baby unit and parent unit.
  • This product is not a toy. Do not allow children to play with it.
  • The mains plug or an appliance coupler is used as the disconnect device, the disconnect device shall remain readily operable.
  • The baby monitor should not be considered as a medical device. While using the baby monitor, it is strongly recommended to have an adult directly checking on your baby. Premature babies or children considered at risk must be supervised by your pediatrician or other medical staff.

Moonybaby 55812 Specifications

General IconGeneral
BrandMoonybaby
Model55812
CategoryBaby Monitor
LanguageEnglish