42 Motorcycle Installation
Figure 45 Transceiver Trunnion Mounting
Transceiver Connections
1. Connect the transceiver-to-junction box cable to the accessory connector.
2. After mounting the antenna (see page 45), run the antenna coaxial cable to the
transceiver mounting location. If necessary, cut off the excess cable.
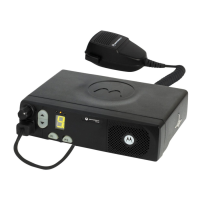
3. Connect the antenna cable connector to the Antenna BNC connector at the rear of the
transceiver (see Figure 46). Ensure that the antenna’s cable connector is fully
tightened. DO NOT use an adaptor between the antenna cable connector and the
transceiver.
4. Install the power cable as explained on page 45. Cut the power supply cable to the
desired length and plug the power cable into the transceiver Power Connector (see
Figure 46).
Figure 46 Connections to Radio
Control Head Mounting Trunnion Installation
1. Using the control head trunnion as a template, mark the positions of the holes on the
mounting surface.
2. Centerpunch the spots you have marked and drill a 4 mm Ø (0.16 inch) hole at each
mark.
Thread Hole for
Wing Screw
Groove
Mounting Surface
Wing Screw
Ta b s
Wing Screw
Trunnion
Plastic Guides
Antenna
Connector (BNC)
To B a tt er y +
via Fuse (F1)
(Red)
Power Connector
Vehicle Chassis Ground
(Black)
Accessory
Connector (not visible)
 Loading...