Do you have a question about the Mould King 16040 and is the answer not in the manual?
Guidelines on cable placement, routing, and correct socket connection for lighting kits.
Instructions for installing light strips within Step 82 of the building process.
Instructions for installing a dual connector cable and light socket in Step 156.
Instructions for installing a warm light strip in Step 490 of the building process.
Instructions for installing light strips and linking cables to sockets in Step 493.
Instructions for placing the battery box and connecting cables in the roof in Step 565.
This document provides installation instructions for the Mould King 16040 Magic Book Store lighting kits. It guides users through the process of integrating lighting elements into their brick model, ensuring proper placement and connection of the various components.
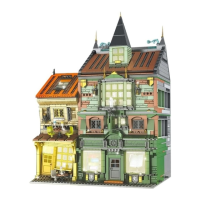
The Mould King 16040 lighting kits are designed to illuminate the Mould King 16040 Magic Book Store brick model, enhancing its aesthetic appeal and bringing the intricate details of the building to life. The kits consist of various light strips, cables, and a battery box, all intended to be seamlessly integrated into the model during or after the construction process. The primary function is to provide internal and external illumination, creating a more dynamic and realistic display of the book store. The lighting system is designed to be user-friendly, with clear instructions for placement and connection, allowing even novice builders to add a professional touch to their model. The use of warm light strips suggests an intention to create a cozy and inviting atmosphere, consistent with the theme of a book store.
The installation process is broken down into several steps, corresponding to different stages of the model's construction. This modular approach ensures that the lighting components are installed at optimal points, preventing the need for extensive deconstruction later.
Cable Placement: A crucial aspect highlighted in the instructions is the proper placement of cables. Users are advised to place cables "between or under bricks" and to "set them around the studs." This technique is essential for concealing the wiring, maintaining the model's clean appearance, and preventing damage to the cables. Incorrect cable placement could lead to visible wires, an untidy look, or even pinched and broken wires.
Wire Socket Direction: The instructions emphasize paying close attention to the direction of the wire socket. Specifically, "the side of the socket with exposed wires should face the welded '=' symbol." This detail is critical for ensuring correct electrical connection. Forcing a plug in the wrong direction can bend the pins, damage the socket, or cause overheating, potentially rendering the lighting kit inoperable. This highlights the importance of careful and precise handling during installation.
Warm Light Strips: The kit primarily utilizes "warm light strips." These strips are applied to various sections of the model, including the interior of the book store. For instance, in Step 82, a warm light strip is installed on the ground floor, likely illuminating the interior of the shop. The instructions guide users to "paste the warm light strip" in specific locations, often indicated by red boxes in the accompanying images. After pasting, the cable needs to be "pulled out" to connect to other components.
Dual Connector Cables and Sockets: The kit includes components like a "350mm dual connector cable and a warm light socket." These are used to extend connections and provide multiple points for attaching light strips or other lighting elements. In Step 156, the socket is to be "fixed on the bottom plate," indicating a central point for power distribution or connection within a specific section of the model.
Roof Integration: The installation process extends to the roof of the model. In Step 490, another warm light strip is installed, likely for the upper floors or the exterior of the building. Later, in Step 565, the instructions detail how to "put the sockets and the cables into the roof" and "place the battery box here." This suggests that the roof serves as a housing for some of the main power components, including the battery box, which powers the entire lighting system. The battery box is connected to a "6-port socket," allowing multiple lighting elements to be linked.
Cable Arrangement: After installing light strips and connecting components, users are instructed to "arrange the cables." This step is crucial for managing the wiring, ensuring that cables are neatly tucked away and do not interfere with the assembly of subsequent bricks. Proper cable arrangement also prevents tangling and potential damage.
Covering Bricks: Once a section of lighting is installed and cables are arranged, the instructions often conclude with "cover the bricks." This signifies the completion of a lighting installation stage, where the added lighting components are then integrated and hidden by the next layer of bricks, maintaining the structural integrity and aesthetic of the model.
While the document primarily focuses on installation, some implicit maintenance considerations can be inferred:
Gentle Handling: The warning against forcefully inserting plugs ("If the plug is hard to insert, do not insert it forcefully, otherwise the pins of the socket will be bent or the socket will be overheated and damaged") is a key maintenance instruction. It emphasizes the need for gentle and precise handling of the delicate electrical components to prevent damage. This suggests that if a connection feels forced, the user should re-evaluate the alignment rather than applying excessive pressure, which could lead to irreversible damage and necessitate replacement of parts.
Cable Protection: The instruction to place cables "between or under bricks" and "around the studs" serves a dual purpose: aesthetics and protection. By embedding the cables within the brick structure, they are shielded from external forces that could pinch, cut, or fray them. This proactive measure helps in maintaining the longevity and functionality of the lighting system. Regular inspection during assembly for any visible or exposed cables that might be vulnerable to damage would be a good practice.
Battery Box Access: The placement of the battery box within the roof, as indicated in Step 565, implies that it is designed to be accessible for battery replacement. While not explicitly stated, the roof cover likely allows for easy opening to change batteries when they run out, ensuring continuous operation of the lighting system. This design choice suggests a user-friendly approach to power management.
Modular Design for Troubleshooting: The modular nature of the lighting kit, with individual light strips and connector cables, could facilitate troubleshooting. If a specific section of lights fails, it might be possible to isolate the problem to a particular light strip or connection point, rather than having to dismantle the entire system. Although not explicitly detailed, this inherent design feature could simplify future repairs or replacements.
In summary, the Mould King 16040 lighting kits are designed for seamless integration into the Magic Book Store model, providing an illuminated display. The instructions prioritize careful cable management, correct component orientation, and gentle handling to ensure both aesthetic appeal and the longevity of the lighting system.
| Product Type | Building Blocks |
|---|---|
| Model Number | 16040 |
| Brand | Mould King |
| Category | Toy |
| Material | Plastic |
| Age Range | 8+ |
| Recommended Age | 14+ |