EasyManua.ls Logo

MPEX MARCY PLATINUM MP-PWR 10.0 User Manual

MPEX MARCY PLATINUM MP-PWR 10.0
22 pages
To Next Page IconTo Next Page
Page #1 background imageLoading...
Page #1 background image
NOTE:
Please read all instructions
carefully before using this
product
Table of Contents
Safety Notice
Hardware Identifier
Assembly Instruction
Parts List
Warranty
Ordering Parts
Model
MP-PWR10.0
Retain This
Manual for
Reference
04-08-05
OWNER'S
MANUAL
MARCY PLATINUM
MP-PWR 10.0
IMPEX FITNESS PRODUCTS
14777 DON JULIAN RD., CITY OF INDUSTRY, CA 91746
Tel: (800) 999-8899 Fax: (626) 961-9966
www.impex-fitness.com
info@impex-fitness.com
Question and Answer IconNeed help?

Do you have a question about the MPEX MARCY PLATINUM MP-PWR 10.0 and is the answer not in the manual?

MPEX MARCY PLATINUM MP-PWR 10.0 Specifications

General IconGeneral
TypePower Rack
Maximum User Weight300 lbs
MaterialSteel
ColorBlack
Included AccessoriesDip Bars

Summary

Before You Begin

Assembly Instructions Introduction

Introduction to the step-by-step assembly guide.

Safety Precautions

General Safety Precautions

Detailed safety precautions and warnings for equipment use.

Health and Physician Consultation

Critical health warning advising consultation with a physician before use.

Assembly Instructions: Step 1

Main Frame and Stabilizers Attachment

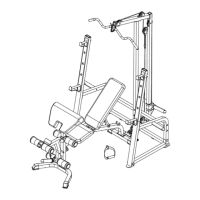
Attaching main frame to stabilizers and end caps.

Assembly Instructions: Step 2

Backrest and Seat Assembly

Attaching backrest supports, incline support, and seat pad.

Assembly Instructions: Step 3

Leg Developer and Accessories Assembly

Assembling the leg developer, foam tubes, and curl bar holder.

Assembly Instructions: Step 4

Arm Curl Attachment Assembly

Attaching the arm curl pad and stand to the main frame.

Assembly Instructions: Step 5

Assembly Instructions: Frame Connections

Connecting Supports and Cross Braces

Connecting upright beams, supports, and cross braces.

Assembly Instructions: Step 6

Assembly Instructions: Cable Diagram

Assembly Instructions: Step 7

Assembly Instructions: Step 8

Assembly Instructions: Step 9

Assembly Instructions: Diagram 9