11
GB
16. Complete double-sided vegetable and
fruit slicing and grinding disc
17. Complete potato grinding disc
18. Discs pin
19. Container with a lid for grinding and
chopping - 400 ml
20. Grinding and chopping knife with
stainless steel blade
21. Attachment for whipping eggs, light
cream and sauces
22. Container with a lid - 600 ml
23. Dough hook for mixing dough
24. Operating status indicator
25. Holder for hanging
ATTENTION! Cutting edges of blades are sharp. Danger of injury! Use them carefully!
ATTENTION! Clean all attachments and containers before using the appliance for the first time.
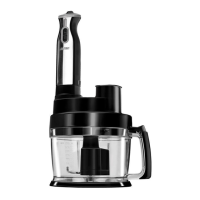
ASSEMBLY OF THE DICING ATTACHMENT
The attachment is destined for dicing food products, such as carrot, potato (fresh or boiled),
cucumber, paprika, onion, eggs, cheese, cold cut, apple etc.
ATTENTION! Foodstuffs should not have stones or any other hard pieces. Foodstuffs should not be frozen.
Failure to comply with these instructions may result in damage of the dicing attachment, ro-
tating knife and dicing grid.
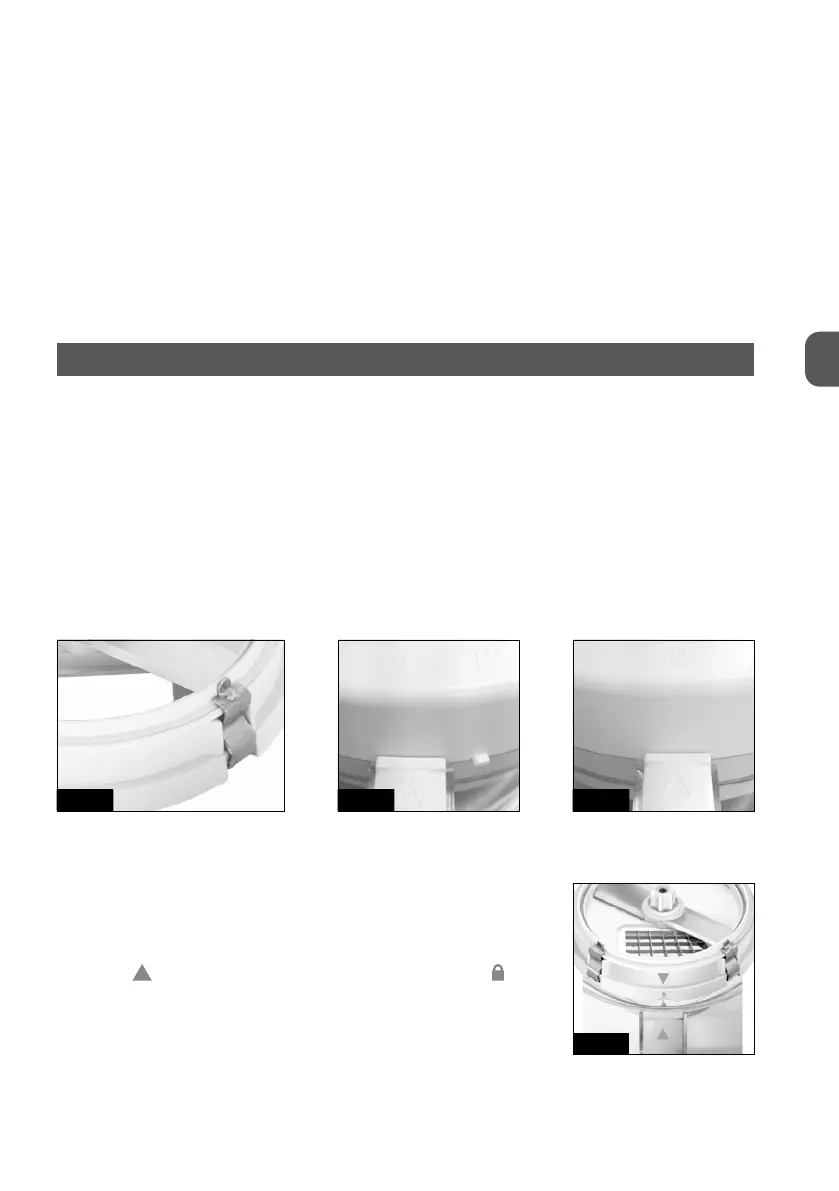
Paying attention to the cuts, put the insert of choice (9a, 9b) into the attachment (7). Then
hold the rotating cogged handle, put the stainless steel knives (8) on the attachment (7) and
block it with 4 clamps (10).
Place the container (11) on a dry and firm surface.
fig. 1 fig. 2 fig. 3
Put the attachment with the chosen insert and rotating knife into the container (11), so that
sockets in the attachment are properly fixed on the insets on the inside of the container. Pay
atten tion to the marks on the appliance (fig. 4). Before replacing the
lid make sure the clamps (10) are in the closed position (fig. 1). Put
the lid (13) on the container paying attention to the marks on it and
on the handle (fig. 2). Then turn it fully clockwise so that the sign of
“triangle”
is directed towards the sign of “closed lock” (fig. 3).
You will hear a click.
Make sure every part is correctly fixed and replace the blender hous-
ing (1). It gets blocked the moment it is pushed into the mounting
socket (15) in the container lid.
Insert the plug into the power outlet.
fig. 4