Easy Viewer
- Quick User’s Guide -
MSI Easy Viewer, an amazing application developed for
photo browsing by MSI, comes with intuitive and visualize
icons for your easy and convenient operations. With the
touch screen, you can one touch to the digital life.
What is in the tool bar?
Where is MSI Easy Viewer?
Double-touch or click on the icon to activate the
MSI Easy Viewer.
Zoom In
Rotate to the Left
Smart Highlight
Slide Show
Full Screen
Browse By
Zoom Out
Rotate to the Right
■ Browsing for Photos
Select Browse By to browse for photos by folder.
NOTE: MSI Easy Viewer allows you to view your photos in
JPG format.
■ Viewing Photos
After importing the photos you want to view, select Full
Screen to view your photos in full screen mode.
Select Slide Show to view your photos in slide
show mode.
NOTE: All the photos in the selected folder will be included
in the slide show by default.
■ Adjusting Photos
Use the Zoom Tools to change the size of the
photos.
Use the Rotate Tools to change the direction of
the photos.
■ Fixing Photos
Select Smart Highlight to x your overly dark pho-
tos automatically.
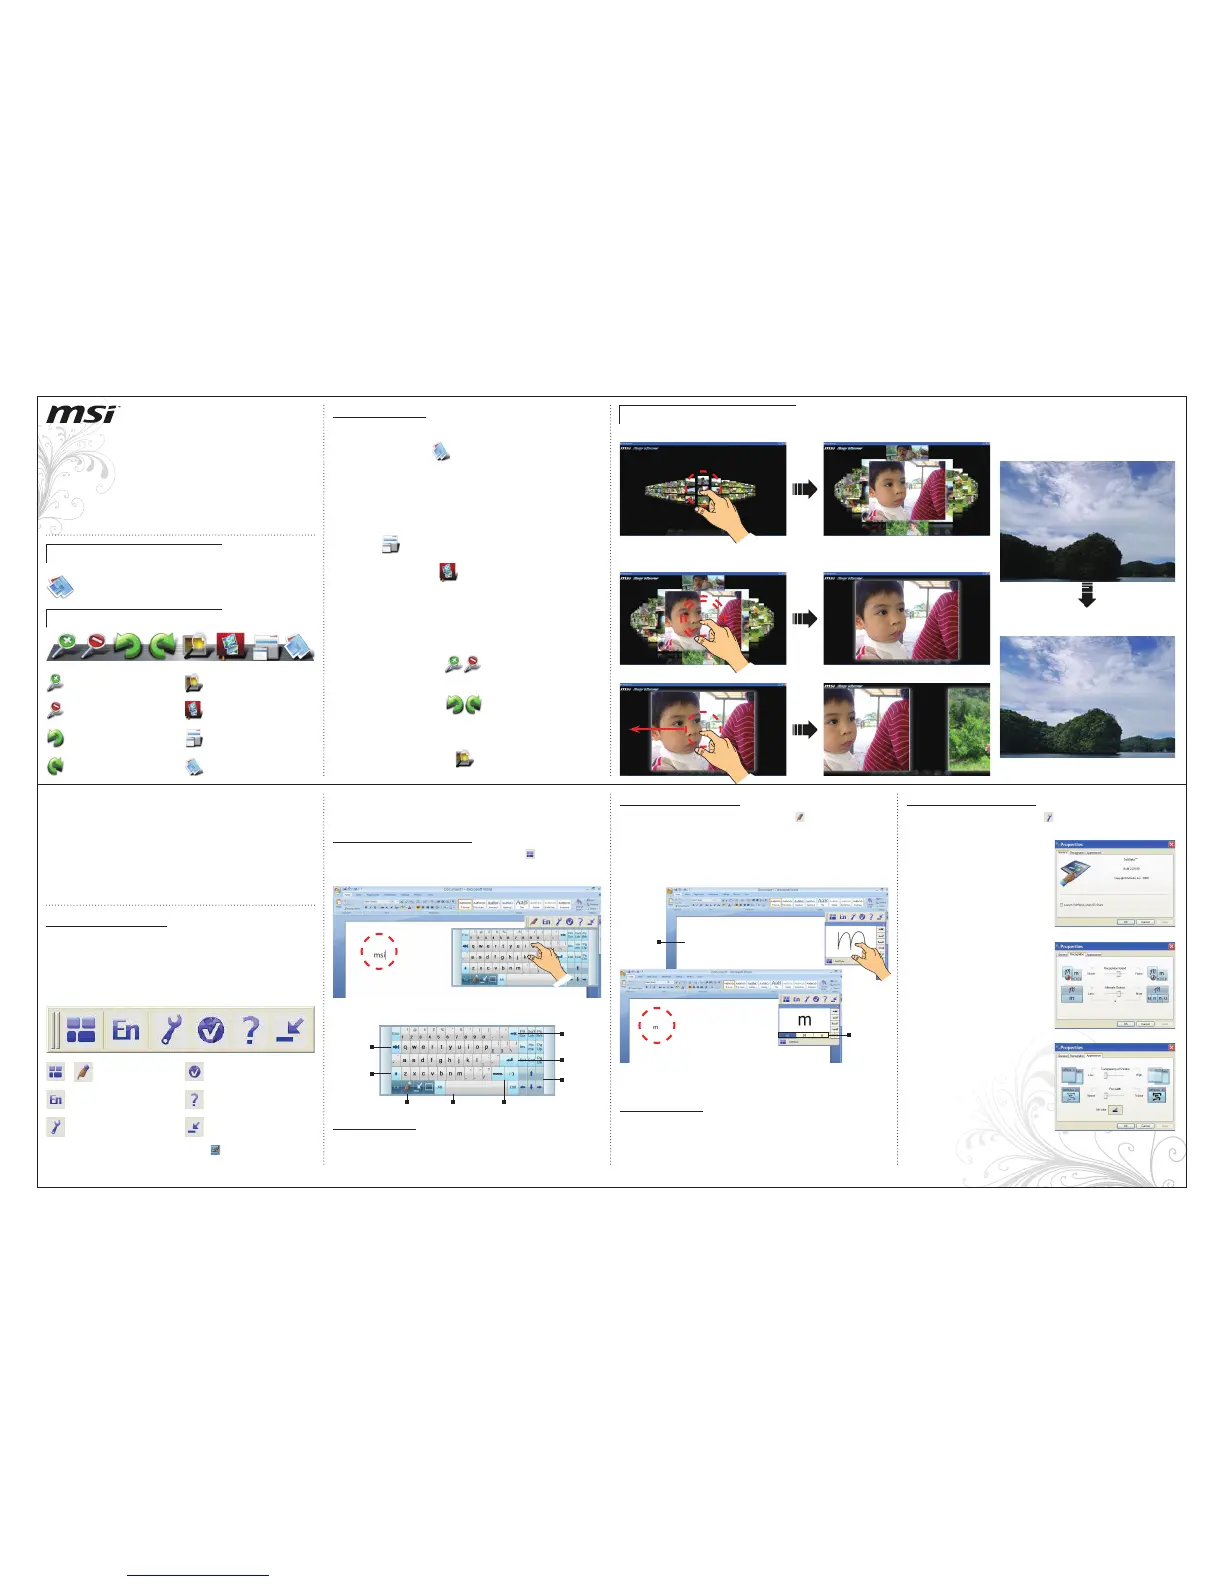
Special Features
How to play MSI Easy Viewer?
■ Touch the photo ■ Zoom in the photo
■ View the next photo
■ Before xing the photo with Smart
Highlight.
■ After xing the photo with Smart
Highlight.
*
Smart Highlight is MSI’s newly developed technology, which
stands for High-Dynamic-Range Intelligent Image Processing
Technology (HDIP).
*
SoftStylus™
SoftStylus™ is a convenient application that allows you to
write instant messages, e-mails, letters and other notes with
your nger or the stylus pen on the touchpad or touchscreen
in your own language. A virtual keyboard is also provided.
*The illustrations of this quick user’s guide are for reference only and may slightly vary with territories. All contents are subject to change without notice. All trademarks are the properties of their respective owners.
Starting Applications
Step 1. Click on the Start Finger Writing icon on the toolbar to start
the nger writing recognition.
Step 2. Now simply draw characters with your nger or the stylus pen on
the touchpad or touchscreen, you will see your character being
drawn in the recognition window. Your character will be recog-
nized and sent to the active application.
Using Virtual Keyboard
Using Finger Writing
Step 1. Open the application you are going to write into. For example:
Microsoft® Ofce Word
.
Step 2. Open SoftStylus by clicking Start > All Programs > SoftStylus
> SoftStylus (You can also open it by clicking from MSI Wind
Touch > Tool > SoftStylus.) and then the SoftStylus toolbar ap-
pears on the dektop as below.
Click to register the soft-
ware
Click to show virtual
keyboard/ Click to
start nger writing
Click to congure proper-
ties
Click to shift recognition
languagea
Click to select help/ tuto-
rial
Click to minimize the tool-
bar
Step 3. Click in the
Microsoft® Ofce Word
window in which you wish
to write, making it the active application. Characters written with
SoftStylus are only input to the active application.
Step 1. Click on the Show Virtual Keyboard icon on the toolbar to
start the virtual keyboard and begin entering text with your nger
or the stylus pen.
Step 2. Learn and know more about the virtual keyboard as following.
Hold to display more
Lowercase/
Up perca se
Tab
BackSpace
Enter
Lowercase/
Up perca se
SpaceFinger writing mode
NOTE: If the interpreted character is incorrect, SoftStylus offers a number
of alternative characters at the bottom of the nger writing window.
SoftStylus supports an easy to use on-screen Virtual Keyboard for times when a physical
keyboard is not desired. By simply using a touch screen, mouse, trackball or other pointing
device, the Virtual Keyboard allows users to quickly send keystrokes to virtually any applica-
tion. SoftStylus Virtual Keyboard is designed to make character inputs fast and simple.
Special Features
NOTE: Double-click the SoftStylus tray icon on the taskbar to restore
the toolbar if you minimize it. Right-click the tray icon and select Exit to
close the entire application.
The recognition engine adaptation mode is enabled as default in the software. “Adaptation” is
an interactive mode - when you write a symbol and the original predicted symbol is incorrect,
you then select a symbol from the alternatives list. Then the next time you attempt to write the
same symbol, the recognition engine “remembers” the previously selected alternative and se-
lects this one as a predicted symbol. In other words, SoftStylus “learns” your way of writing.
Special Features
Alt ern ati ve
Characters
Active
Application
Configuring Properties
Step 1. Click on the Properties icon on the toolbar to congure prop-
erties.
General
The General tab describes the software title, build
number and copyright information. Through this
tab you can also enable or disable the feature
Launch SoftStylus when OS Starts. If this fea-
ture is checked, the SoftStylus will be automatically
launched when the OS starts.
Recognition
Through this tab you may modify the following ap-
plication settings:
Recognition Speed - The slider control has Faster
and Slower options. This slider allows you to modify
the delay interval between the moment when you
nish drawing and the moment when input data is
sent to the recognition engine. Experienced users
may decrease this delay to minimum.
Alternate Choices - The slider control sets the
maximum number of places for alternative charac-
ters to be shown in the main window. By default it
is set to ve.
Appearance
There are three appearance elements available on
this tab:
Transparency of Window - Using this setting you
may modify the application’s main window trans-
parency from not transparent to invisible.
NOTE: For text editors with a single-color back-
ground, we would recommend increasing trans-
parency; for showy backgrounds it is better to de-
crease the transparency level.
Pen Width - The slider control located under the
“Transparency of Window” element with “Thinner”
and “Thicker” options. This slider allows you to
modify the ink’s thickness when displaying input
data in the main window.
Ink Color - Color selection dialog to modify the
color of the drawing pen.
■ Double-touch the photo ■ View the photo
■ Touch and slide
NOTE: You can view the photos with your nger touching and sliding on the black background area.
尺寸 A3 (297 X 210 MM) 以銅版紙 128 磅 彩色雙面印刷 等份四摺(M形摺)再對摺 有料號面朝上
 Loading...