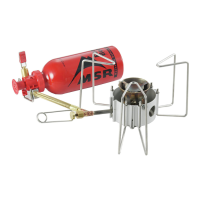
The MSR Dragonfly stove is a portable liquid fuel stove designed for outdoor use, offering robust performance and versatility across a range of liquid fuels. It is engineered for boiling water and cooking food in outdoor environments, emphasizing safety and reliability through its design and operational instructions.
Function Description:
The MSR Dragonfly stove functions by converting liquid fuel into a vapor, which is then ignited to produce a flame for cooking. This process requires a priming or preheating step to ensure proper operation. The stove is equipped with interchangeable jets, allowing it to burn various types of fuel, including white gas, unleaded auto gas, kerosene, diesel, and jet fuel. The DG Jet is preinstalled for white gas and unleaded auto gas, while the DK Jet is provided for kerosene, diesel, and jet fuel. The stove's design includes a fuel bottle, pump, fuel line, burner, pot supports/legs, windscreen, and a heat reflector, all working in conjunction to provide a stable and efficient cooking platform. The flame adjuster valve assembly allows for precise control over the flame intensity, making it suitable for simmering as well as rapid boiling.
Usage Features:
The operation of the MSR Dragonfly stove involves several key steps, each designed to ensure safe and efficient use.
Fuel Bottle Preparation:
- The fuel bottle should be filled only to the designated fill line, leaving air space for fuel expansion.
- The pump is then inserted and firmly tightened into the fuel bottle.
- Before pressurizing, the fuel bottle must be checked for leaks.
- The pump control valve is closed, and the plunger is stroked 20-30 times (or more for less fuel) until firm resistance is felt, indicating adequate pressure.
- It is crucial to use only MSR fuel bottles to prevent leaks and ensure safety.
Stove Setup:
- The three sets of pot supports/legs are opened to provide a stable base.
- The burner and fuel line assembly are rotated into position.
- The flame adjuster valve assembly is unfolded and closed.
- The stove is then placed on the center of the heat reflector.
- A minimum distance of 4 feet (1.2 meters) from combustible materials and 25 feet (7.6 meters) from flammable liquids/vapors must be maintained.
- The stove is designed for outdoor use only and should never be used in enclosed spaces like tents, cars, or homes due to the risk of carbon monoxide poisoning and fire.
- It must always be used on a solid, stable, and even surface to prevent tipping and spills.
Connecting Stove and Pump:
- The brass end of the fuel line is lubricated with saliva or oil.
- The brass end of the fuel line is fully inserted into the pump.
- The fuel bottle is placed on its side with the pump control valve pointing up.
- The catch arm is secured on the fuel pump groove.
- The fuel line should be gently bent straight for safety, and the fuel bottle kept as far away from the stove as possible.
- Before each use, the fuel bottle, pump, fuel line, burner, and surrounding area must be inspected for fuel leaks. The stove should not be lit if fuel is observed or smelled.
- The fuel line, pump, or fuel bottle must never be disconnected when the stove is burning, hot, or near an open flame, or when the control valve is in an open position, as this can lead to spilled fuel and fire.
Preheating the Stove:
- The pump control valve on the fuel bottle is turned fully open.
- Only about 1/2 spoonful of fuel is released by opening the flame adjuster valve briefly, allowing fuel to flow through the jet.
- The flame adjuster valve is then closed.
- The priming fuel on the wick is lit. A brief, soccer ball-sized flame is normal during this stage.
- Users must never place their head or body above the stove while priming, lighting, or cooking.
- Using excess fuel for preheating is warned against, as it can lead to leaks or spills and cause fire.
Turning the Stove On:
- After lighting, the preheat flame is allowed to reduce in size for approximately 2 minutes. If the flame goes out, the stove must cool for 5 minutes before relighting.
- The flame adjuster valve is opened 1/2 turn, and the user waits for a steady blue flame.
- The flame adjuster valve is then slowly opened further to increase fuel flow and heat.
- Relighting a heated stove is prohibited; it must cool for at least 5 minutes to prevent large flames and burns.
- The stove should never be moved while burning or hot.
- An unattended burning or hot stove is dangerous and can lead to fire, burns, or injury.
Using the Stove for Cooking:
- The windscreen is set up, with ends folded together, leaving a 1-inch (2.5 cm) gap between the windscreen and the pot for optimal performance.
- The windscreen ensures proper combustion flow and ventilation.
- The pot is placed on the stove.
- To maintain fuel bottle pressure, approximately 10 strokes are added to the pump every 10 minutes. The fuel bottle should be held firmly while pumping.
- The fuel bottle must be kept away from the stove burner and other heat sources.
- The windscreen should not be placed around the fuel bottle.
- Cookware with a diameter greater than 10 inches (25 centimeters) should not be used.
- Operating two or more stoves together, using empty or dry cookware, or using non-MSR reflectors or diffusers is prohibited, as these actions can cause the fuel bottle to explode.
- Cookware that is ill-suited or inappropriate for the stove, such as those with convex or concave bottoms or some enameled cookware, should not be used, as it can lead to instability, spills, fire, and injury.
Turning the Stove Off:
- The pump control valve on the fuel bottle is closed. Residual fuel will continue to burn with a small flame for several minutes.
- The flame adjuster valve on the stove is closed.
- After the flames are out, the stove must cool for 5 minutes.
- The catch arm is unlocked, and the fuel line is removed from the pump.
- To depressurize the fuel bottle, it is held upright, away from the face and any heat/ignition sources, and the pump is slowly unscrewed.
- For transport, the pump can be left inside a depressurized fuel bottle or removed and replaced with the fuel bottle cap.
- Fuel bottles must always be stored with the cap securely tightened, out of reach of children, and in a well-ventilated location away from heat or ignition sources to prevent poisoning, injury, or explosion.
Maintenance Features:
Regular maintenance is essential for the MSR Dragonfly stove to ensure its longevity and optimal performance.
Pump Maintenance:
- O-ring Inspection and Replacement: O-rings can dry, crack, or tear over time due to dirt, debris, temperature, friction, and frequency of use. They should be inspected before every trip and replaced immediately if damaged. All O-rings should be replaced annually. Replacement O-rings and pump seals are available in the Annual Maintenance Kit or Expedition Service Kit.
- Replacing Fuel Tube O-ring:
- The plunger is removed by aligning, twisting, and pulling it.
- The fuel tube bushing and O-ring are removed using the jet and cable tool. The O-ring can be removed with the end of the fuel line or a safety pin.
- The O-ring is inspected and replaced if damaged; a spare green fuel tube O-ring is provided.
- The pump cup is lubricated with a drop of pump cup oil or any mineral-based oil.
- The plunger is reinserted by holding the thumb and forefinger firmly around arrow 1, aligning the plunger bushing tabs with holes in the pump body, and pushing the plunger/bushing into the pump body until it snaps into place.
- Replacing Control Valve O-ring and Poppet O-ring:
- The stop nut is unscrewed 2 turns.
- The pump control valve is unscrewed 6 turns.
- The stop nut is completely unscrewed, and the control valve assembly is removed.
- The O-rings are inspected and replaced if damaged. This involves removing the pump control valve handle from the stem, sliding off the stop nut, and removing O-rings with a safety pin.
- Replacing Pump Seal: The pump seal is inspected and replaced if damaged.
- Cleaning the Check Valve:
- The check valve assembly is turned to remove it.
- Any debris is wiped from the check valve and pump cavity.
- The check valve assembly is reinserted.
- Disassembly or modification beyond the instructions voids the warranty and can lead to unsafe situations. The stove should not be used if parts are missing, broken, or with non-specific replacement parts.
Stove Maintenance:
- Deposits in the jet and fuel line can reduce fuel flow and impair stove performance. Minor deposits can be cleared with the shaker needle, while major deposits may require more extensive cleaning. Maintenance should be performed annually or with pump maintenance.
- Clearing the Jet with the Shaker Needle:
- The pump control valve is closed, and the stove cools for 5 minutes.
- The stove is shaken up and down; the shaker needle inside the jet should rattle.
- The stove is preheated and run. If performance doesn't improve, the jet and flame adjuster valve assembly cleaning steps are performed.
- Cleaning the Jet and Flame Adjuster Valve Assembly:
- The flame spreader is removed.
- The jet is unscrewed using the jet and cable tool (DragonFly Cleaning Tool can be used for leverage).
- The shaker needle is removed (for jet exchange, place the shaker needle in the new jet and reassemble).
- The jet is cleared with a jet cleaning wire.
- The flame adjuster valve is opened 2 turns.
- The stop nut is loosened with the jet and cable tool. The flame adjuster valve is unscrewed completely.
- The flame adjuster valve assembly is removed.
- The grooved end of the flame adjuster is cleaned with a thumbnail or jet cleaning wire.
- The flame adjuster handle is placed onto the DragonFly cleaning tool. The tool is inserted into the flame adjuster tube and rotated clockwise with pressure (approximately 20 turns).
- The flame adjuster tube is tapped on a hard surface to remove loosened deposits.
- The flame adjuster valve assembly is reinserted and tightened securely.
- Flushing the Fuel Line:
- The stove is connected to the pump and fuel bottle.
- The fuel bottle is pressurized with 10-15 strokes.
- The pump control valve and flame adjuster valve are fully opened to flush 4 spoonfuls of fuel through the fuel line into an appropriate container (with the jet uninstalled). Ignition sources must be kept away.
- The flame adjuster valve is closed and reopened to repeat flushing.
- The flame adjuster valve and pump control valve are closed, and the fuel line is removed.
- The flushed fuel is safely disposed of.
- The stove is reassembled. If performance is still impaired, the jet and flame adjuster valve assembly cleaning steps are repeated.
- Replacing the Fuel Line Filter:
- The old fuel line filter is removed with a safety pin.
- A new white fuel line filter is placed on a hard surface.
- The end of the fuel line is centered over the filter.
- The end of the fuel line is pushed until the filter is completely inside.
The MSR Dragonfly stove is a sophisticated outdoor cooking tool that, with proper understanding of its operation and diligent maintenance, provides reliable service for various outdoor adventures. Its design emphasizes user safety through clear instructions and warnings regarding fuel handling, stove placement, and operational procedures.