Pg 2
v2.2 v4r6c
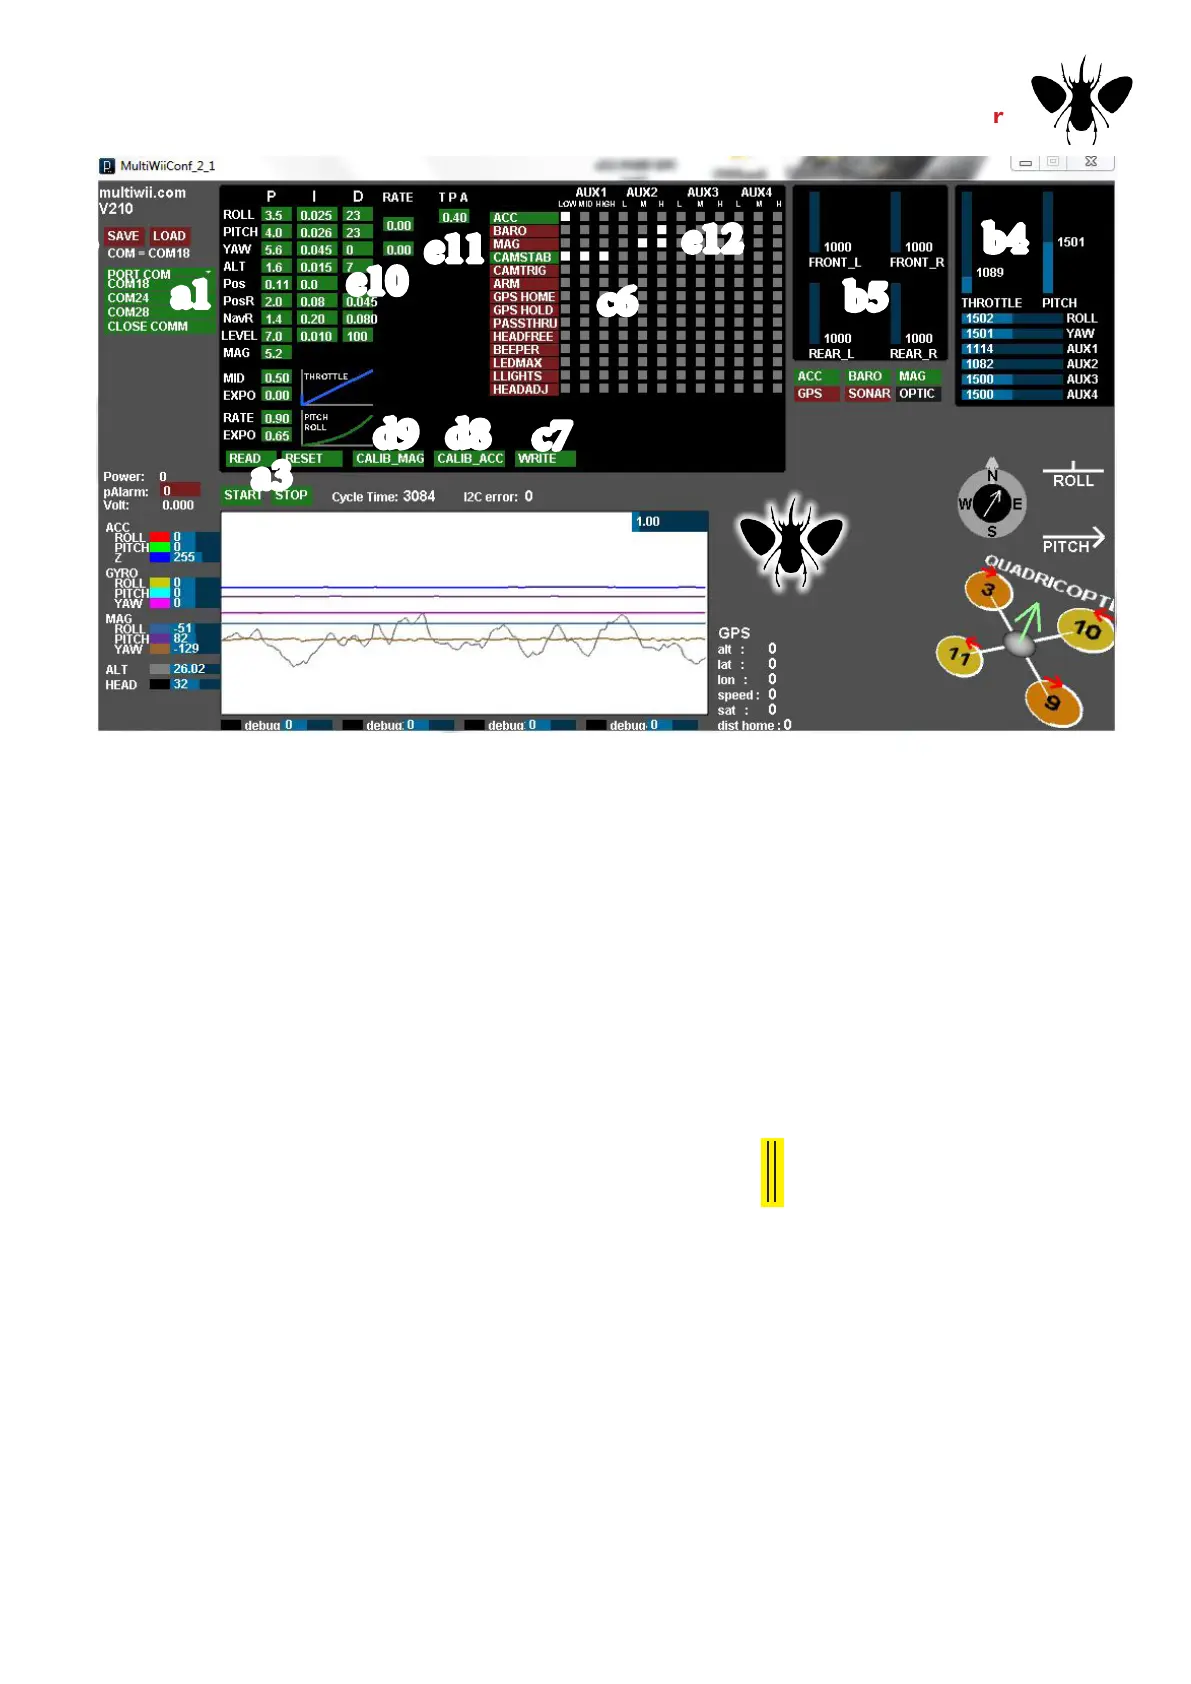
a1
a2
a3
e10
e11
e12
e13
c6
b4
b5
c7
d8d9
GUI (above) - What does it
mean? (Pg1 do b4 rst) Load the
USB ftdi drivers (PC or Mac
- cold restart) and download
the GUI software (above) -
links on Multiwiicopter.com
wiki
Note Quit Arduino® 1.0 software if
running (two applications cannot share
the ftdi -connection) - Do not reload
default code! Stay calm. Your pnp PARIS
has already been tested and calibrated.
Open (or search for) the java App called
MultiWiiConf2.2p app (PC apps end in
.exe) Start this application (program)
a1) After pressing the COM link - wait
2 secs - then press Start a2 -> then wait
2 secs -> press READ a3 ; Your GUI is
now connect live to your PARIS - don’t
rush the clicks or you may wipe the
eeprom to zeros. Make a note of all your
values e10 - do not change PIDs until
after the maiden ight (Screen Capture/
Print Screen) - just incase you have to
go back to them (general rule is never
change more than one thing at a time)
It should look like the values from my
screen capture above b4 - Transmitter
Calibration - covered on Pg 1 - connect
your Tx - Rx and USB-> You will now
importantly see the values for low stick /
mid stick / high stick VERY IMPORTANT
- using your Tx - alter the travel (futaba
call these end points) to rst get 1095
for low stick ; then 1905 for high stick
- then use mid-point (different menu on
your Tx) to set 1500 mids. ESC
THROTTLE LEARNING - NOW
go back and do the ESC calibration one
by one for THORTTLE-LEARNING
(an ESC function - nothing to do with
Multiwiisoftware - KK pilots must re-do)
b5 - check the values in this area are all
even (the same) at low throttle settings
- if not then make sure - again - that you
are in ACRO mode and the mid stick is
at 1500 - see b4 c6 - Click and
hold the boxes (top left of each box) to
change them - then press write c7
If you got a PNP board D8 & D9 are
already done for you. with the PARIS
ACC perfectly level and still press
calib_acc d8 - then wait 4 secs - then
press Calibrate_MAG d9 - the LED blinks
rapidly - you have 30secs to rotate
the board 360° degress in all axis X,
Y and Z - when the LED stops blinking it
will save all the MAG tilt errors to eprom.
The actual heading shown is not used in
2.0.4p yet for Nav - and is set in software
offset - at a future time.
If your Copter is not ying stable or
close to stable on default PIDs, as shown
above e10 then do not alter the PIDs
like a madman - The electronics/software
will not save you from un-balanced
props - or a bad combination of PROPS/
ESC/MotorWindings. Light weight props
and Medium/high timing are required.
Balance your props on a magnetic
balancer until they run silky smooth...then
balance them one at a time on a hand-rig
for dynamic balance. With a motor on a
boom run each one atdifferent RPM to
check the running (dynamic ) balance of
that prop - use electrical tpe to balance
them ---- to change values in e10 -
click-hold-drag ; then press write. e11
- Trottle PID attenuation is for advance full
pwr climb outs - dampens PIDS at high
throttle settings >50% if needed.
Ch5 Rx = Gui Aux1 = blue wire
Ch6 Rx = Gui Aux2 = purple wire.
Select at e12 above - the baro - WRITE
Never change more than one value at a
time - then y - then change it again then
y - make small changes - sometimes a
change of 0.1 will make the difference
between too soft; and oscillations.
NOTE: You cannot ever save the values
stored in your 328CPU (e13) ; nor can
you read back OUT the Arduino software
in it - so what we recommend - is save
the Arduino Sketch in a new folder each
time you load it in (essentially a back-up) ;
then do a screen capture of the GUI (e13)
(above) and put that into the folder on your
PC as well. WinGUI saves all settings.
Your board is running v 2.2 - Use GUI JAVAConfig 2.2
Boards requires 5v - USB or UBEC/ESCbec power - Check polarity
- it will blow above 6v or reversed! DO NOT CONNECT 12v to this board ever
http://www.multiwiicopter.com/pages/multiwiicopter-wiki
this is an abbreviated guide - FULL PARIS info online
 Loading...