EasyManua.ls Logo

Muse M-1010 MR - User Manual

Muse M-1010 MR
16 pages
Print Icon
To Next Page IconTo Next Page
Loading...
Remove the Front Panel
Press button in the upper left corner, and then the front panel will be folded down.
AF button
(release button)
PWR button
7/MOD button
disc slot
SEL/VOL knob
9/ button
8/ button
LCD display
(eject button)
USB Port
AUX IN jack
6/DIR+ button
5/DIR- button
4/RDM button
3/RPT button
2/INT button
1/PAU button
BAND/LOUD button
0/DSP button
EQ button
TA button
PTY button
SCH/AMS button
RESET button
SD/SDHC/MMC slot
Do not attempt to modify the unit, modifying the unit may cause an accident.
Installation or servicing of the unit by persons without training and experience in
electronic equipment and automotive accessories may be dangerous and could
expose you to the risk of electric shock or other hazards.
Stop the vehicle before carrying out any operation that could interfere with your
driving.
Keep the volume at a level which you could hear sounds from outside the vehicle.
Do not work in extremely high or low temperature. Be sure the temperature inside
the vehicle is between +60°C and -10°C before turning on your unit.
When replacing the fuse(s), the replacement must be of the same amperage as
shown on the fuse holder.
Do not block vents or radiator panels. Blocking them will cause heat to build up
inside and may result in re.
Using this unit without running the engine can result in battery drainage.
Use only in cars with a 12 volt negative ground.
After completing the installation and beginning to play the unit(including replacing
the battery), please remove the front panel at rst, and then press RESET button
on the base with pointed object (such as ball-point pen) to set the unit to initial sta-
tus.
Before you install the unit, remove absolutely the two transportation screws on top
of the unit.
1.
2.
3.
4.
5.
6.
7.
8.
9.
10.
11.
12.
13.
14.
15.
16.
17.
18.
19.
20.
21.
22.
23.
24.
25.
26.
1.
2.
3.
4.
5.
6.
7.
8.
9.
10.
11.
M-1010 MR
GB - 1
User Manual
CAR RADIO CD/MP3
PLAYER WITH USB & SD
Please read the instruction carefully
before operating the unit.
PRECAUTIONS
English
* Do not attempt to load more than one disc.
* Only 12cm discs are compatible.
* New discs may have some roughness around the edges. Before load such disc into
the player, use a ball-point pen or the like to remove any roughness from the edge of
the disc.
* If there is a scratch, dirt or ngerprints on the disc, it may cause tracking error. Before
playing, clean the disc with a clean cloth. Wipe the disc from the center out.
* Don’t store discs in places with high temperatures or high humidity, they can become
warped. After playing, store the disc in its case.
GB - 2
GB - 3
CONNECTION
1. Antenna socket
2. Line out Right (red)
3. Line out Left (white)
4. Output plug (male)
5. Output plug (female)
6. FUSE holder (15 A)
Caution!
- Make sure to connect the color coded leads according to the diagram. Incorrect con-
nections may cause the unit to malfunction or damage the vehicle’s electrical system.
- Make sure to connect the speaker (-) leads to the speaker (-) terminal. Never connect
the left and right channel speaker cables each other or to the vehicle body.
- Make sure all the connections are completely correct before turning on your unit.
Do not connect the ignition wire (red) and the battery wire (yellow), it may cause a short circuit,
even result in re.
1. Remove the outer trim frame.
2. Select a position where the screw holes of the mounting bracket supplied with the
car and the screw holes of the main unit become aligned (are tted).
3. Tighten the screws. And then fasten them to the car.
GB - 4 GB - 5
Install the front panel
Insert the panel into the housing and make sure the panel is properly installed.
Otherwise, abnormality occurs on the display or some keys will not function properly.
Note: Never put any objects into the front panel.
Remove the unit
1. Detach the front panel. (please refer to upper part)
2. Take out the outer trim frame.
3. Insert the keys supplied to the unit at the both sides of the unit (shown as illustrated)
until they click. Pulling the keys and makes them to remove the unit from the dash-
board.
GB - 6
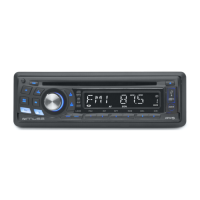
LOCATION OF CONTROLS
GB - 7
Notice on disc
Use such discs may cause malfunction or breakdown of the internal mechanism:
with large scratches; with irregular shape; cracked; with any cellophane tape or other
glue on it or with peeling off marks; with protection sheet; equipped with stabilizers, etc.
- Method 2 DIN Rear-mount (For Japanese car)
BASIC OPERATION
Turning on/off the unit
Press PWR button to turn on the unit. Press this button again to turn off the unit.
Note: When the unit is off, press any key except to turn on the unit.
Selecting the mode
After the unit is on, press 7/MOD button to select different sourcing mode: Radio
CD USB SD/MMC AUX
UNPACK YOUR UNIT
When you unpack your new car radio, make sure that you have removed all the acces-
sories and information papers:
Main unit
User manual
Accessories:
Install the unit
- Method 1: DIN Front-Mount
INSTALL AND REMOVE THE UNIT
SOUND FEATURES
Setting the Sound:
Repeatedly press SEL/VOL knob to select the desired mode in the following order :
“BAS” (Bass) -> “TRE” (Treble) -> “BAL” (Balance) -> “FAD“ (Fader) ->“BEEP“ (BEEP
ON/OFF) -> “TA VOL“ (TA volume) ->”LOC” (local) ->”STEREO” -> “EON” (EON ON/
OFF) -> “VOL” (Volume). After selecting the desired mode, you can adjust the current
level by rotating the SEL/ VOL knob.
- BEEP: In Beep mode, rotate SEL/VOL to select “BEEP ON” or “BEEP OFF”, for cor-
responding BEEP status.
- EON: please refer to RDS operation.
Note: The unit will return to the previous mode after 5 seconds without key press.
Reset the unit
Operating the unit for the rst time or after replacing the car battery, you must reset
the unit. To set the unit to initial status, press RESET button located on the base with
a pointed object. When some errors occur in display, you can also reset the unit, but it
will erase the clock setting and some memorized functions.
Volume adjusting:
To increase or decrease the sound level, rotate SEL/VOL knob clockwise or anti-
clockwise.
2625
Preset equalizer
When you are listening to pop music, classic music or rock music, use the equalizer to
adjust the sound quality. Repeatedly press EQ button to select different equalizer mode
in following order: FLAT->POP->ROCK->CLASS -> EQ off.
Switching Loudness On/off
Press and hold BAND/LOUD button until LOUD ON shows on display to activate
LOUDNESS function. By this function, you can increase the low frequency, which can
improve sound sensitivity. Press and hold this button again until “LOUD OFF” to cancel
LOUDNESS function.
NOTE: It will return to normal play mode if no key is pressed within 5 seconds.
Information display
- In case a RDS station is received.
In radio mode: CT -> FREQ ->PTY ->PS
In CD (MP3 / WMA) mode: CD (MP3/WMA) -> CT -> FREQ -> PTY ->PS
- In case received station is not RDS.
In radio mode: CT -> FREQ -> NO PTY -> NO PS
In CD mode: CD -> CT -> FREQ -> NO PTY -> NO PS
Time display
Press 0/DSP button to show the current time on display.
Adjust time: Long press 0/DSP until clock time with ashing hour digits appears.
Then Press and button to adjust the hour value and press 0/DSP to conrm.
Then minute digits ash. Press and button to adjust the minute value and
press 0/DSP to conrm.
LINE OUT
PartA
Part
B
(GREEN/BLACK)
(VIOLET/BLACK)
(WHITE/BLACK)
+ +
+
-
-
(VIOLET)
(GRAY)
+
+
-
(WHITE)
+
(GRAY/BLACK)
--
-
+
--
(GREEN)
+
642 8
531 7
642 8
531 7
4-SPEAKERSYSTEM
RearLeft
Speaker
FrontLeft
Speaker
FrontRight
Speaker
RearRight
Speaker
GroundWire (Black)
+12V Accessory/Switch (Red)
Power Antenna/Amplifier Turn on (Blue)
+12V Constant Power Supply (Yellow)
FUSE holder (15 A)
5
6
4
3
2
1
1 2 3 5 6
7
4
8 9
11
10
.
M5 X 21
M5 X 21
AR-3108 IB MUSE 001 REV0 GB.indd1 1 2011-8-23 10:09:35
Question and Answer IconNeed help?

Do you have a question about the Muse M-1010 MR and is the answer not in the manual?

Overview

This document describes the M-1010 MR Car Radio CD/MP3 Player with USB & SD, a versatile in-car entertainment system designed to provide audio playback from various sources.

Function Description:

The M-1010 MR is a car radio that integrates a CD/MP3 player, USB port, and SD/SDHC/MMC card slot, offering multiple options for music playback. It also features an FM tuner with RDS (Radio Data System) capabilities, allowing users to listen to radio broadcasts with enhanced information and automatic tuning features. The unit is designed for 12V DC negative ground car systems.

Important Technical Specifications:

  • Power Requirement: 12V DC (11-16V allowable)
  • Load Impedance: 4 ohms
  • Max. Power Output: 40W x 4
  • Tone Controls: Bass at 100 Hz (±10 dB), Treble at 10 kHz (±10 dB)
  • Dimensions (Approx.): 188 x 188 x 59 mm (d/w/h)
  • Mounting Dimensions (Approx.): 169 x 182 x 53 mm (d/w/h)
  • Weight (Approx.): 1.2 kg
  • FM Section:
    • Tuning Range: 87.5-108 MHz
    • IF Range: 10.7 MHz
    • Usable Sensitivity (-30dB): 15 dBuV
    • Signal-to-noise Ratio: 50 dB
    • Stereo Separation: 25 dB
  • CD Player Section:
    • Signal-to-noise Ratio: 60 dB
    • Separation: 50 dB
    • Distortion: 0.1%
    • Frequency Response: 20 - 20000 Hz

Usage Features:

General Operation:

  • Turning On/Off: Press the PWR button to turn the unit on or off. Any key (except the release button) can also turn on the unit when it's off.
  • Mode Selection: Press the 7/MOD button to cycle through different source modes: Radio → CD → USB → SD/MMC → AUX.
  • Volume Adjustment: Rotate the SEL/VOL knob clockwise to increase and anti-clockwise to decrease the sound level.
  • Sound Settings: Repeatedly press the SEL/VOL knob to access settings like Bass, Treble, Balance, Fader, BEEP (ON/OFF), TA Volume, Local/DX, Stereo/Mono, EON (ON/OFF), and Volume. Rotate the SEL/VOL knob to adjust the selected setting.
  • Preset Equalizer: Press the EQ button repeatedly to select different equalizer modes: FLAT → POP → ROCK → CLASS → EQ off.
  • Loudness Function: Press and hold the BAND/LOUD button to activate "LOUD ON" (increases low frequency) or deactivate "LOUD OFF."
  • Time Display and Adjustment: Press the 0/DSP button to show the current time. Long press 0/DSP until the hour digits flash, then use ►►I and ◄◄ buttons to adjust hours, press 0/DSP to confirm, then adjust minutes with ►►I and ◄◄ buttons, and press 0/DSP to confirm.
  • Information Display: In radio mode, it shows CT -> FREQ -> PTY -> PS (if RDS is received) or NO PTY -> NO PS (if not RDS). In CD/MP3/WMA mode, it shows CD (MP3/WMA) -> CT -> FREQ -> PTY -> PS (if RDS is received) or NO PTY -> NO PS (if not RDS). The display returns to normal play mode after 5 seconds if no key is pressed.

Radio Features:

  • Band Selection: Repeatedly press the BAND/LOUD button to select FM1, FM2, or FM3 bands.
  • Manual Tuning: Press and hold ►►I or ◄◄ until "MANUAL" appears, then press ►►I or ◄◄ continuously for step-by-step tuning, or press and hold for faster tuning.
  • Automatic Tuning: Press ►►I or ◄◄ once to automatically search for and play stations. Press again to stop scanning.
  • Automatic Scanning/Memorizing (SCH/AMS):
    • Long press SCH/AMS for 3 seconds to scan and store stations automatically.
    • Press SCH/AMS to play each preset station for a few seconds. Press again or use numeric buttons (1-6) to select a station.
  • Preset Stations (1-6):
    • Tune to a station using ►►I or ◄◄.
    • Press and hold one of the 1-6 Number buttons for 2 seconds to store the station.
    • Press 1-6 Number buttons to listen to stored stations.
  • RDS (Radio Data System) Operations:
    • Alternative Frequency (AF): Press the AF button in FM mode to automatically search for and receive the same program on a different frequency if reception deteriorates. Press again to cancel. Long press AF for 3 seconds to select "REG ON" (local broadcast) or "REG OFF" (national broadcast).
    • Traffic Alarm (TA): Press the TA button to activate TA standby mode. When a traffic announcement starts, it will be received as top priority. "TA" appears on the LCD. If a TP station is not received, the unit continues searching. Press TA again to stop searching.
    • ALARM: "ALARM" is displayed during emergency broadcasts, and volume adjusts automatically.
    • EON (Enhanced Other Networks Information): Rotate SEL/VOL to select EON ON. When EON information is received, the EON indicator is on, allowing local stations to "break into" national broadcasts for traffic announcements.
    • Program Type Selecting (PTY): When PTY is selected, the radio searches for corresponding PTY information. PTY types are grouped into MUSIC (POP M, ROCK M, EASY M, LIGHT M, CLASSICS, OTHER M, JAZZ, COUNTRY, NATION M, OLDIES, FOLK M) and SPEECH (NEWS, AFFAIRS, INFO, SPORT, EDUCATE, DRAMA, CULTURE, SCIENCE, VARIED, WEATHER, FINANCE, CHILDREN, SOCIAL, RELIGION, PHONE IN, TRAVEL, LEISURE, DOCUMENT). The PTY switch cycles through PTY SPEECH group → PTY MUSIC group → PTY off.

Disc/USB/SD Playback:

  • Loading/Removing a Disc: Insert the disc (printed side up) into the DISC SLOT. The player will automatically start playing. Press the release button to remove the disc. If not taken out within 10 seconds, it will reload.
  • Inserting USB Devices: Open the front panel, connect the USB device to the USB port. The unit will automatically switch to "USB" mode.
  • Inserting SD/SDHC/MMC Card: Press the release button to fold down the front panel, insert the card into the receptacle, then close the front panel. It will automatically start playing.
  • Play/Pause: Press 1/PAU to suspend/resume playback.
  • Skip/Fast Search: Press ►►I to skip to the next track, ◄◄ to skip to the previous track. Press and hold ►►I or ◄◄ for fast forward/reverse search.
  • Intro Scan: Press 2/INT (when "INT ON" is displayed) to play the first 10 seconds of each track. Press again to cancel ("INT OFF").
  • Repeat: Press 3/RPT once to repeat the current track, press again to repeat all tracks.
  • Random Playback: Press 4/RDM to play all tracks randomly.
  • Directory Selection (MP3): Press DIR- or DIR+ to select directories downward or upward. This function is unavailable if the disc has no directories.

Searching Tracks (MP3-CD/USB/SD):

  • Search by Track Number: Press SCH/AMS once ("NUM SCH" displayed), then use keys 1-9 (corresponding to numbers/letters in the upper list) to enter the track number. Press SEL/VOL to start playing.
  • Search by Letter: Press SCH/AMS twice ("FILE SCH" displayed), then use keys 1-9 to enter the file name letter by letter. Repeat until the file name is complete. Press SEL/VOL to start searching. Rotate SEL/VOL to select the file, then press to play.
  • Search by Folder: Press SCH/AMS thrice ("DIR SCH" displayed). Rotate SEL/VOL to search for folders, press SEL/VOL to enter. Rotate SEL/VOL to select the track, then press SEL/VOL to play.

Exiting Playback Modes:

  • Disc Mode: Press the release button to eject the disc.
  • USB Mode: Disconnect the USB device.
  • Card Mode: Remove the SD/SDHC/MMC card. The unit will automatically switch to tuner mode after exiting these modes.

Maintenance Features:

  • Cleaning the Front Panel: Use a soft cloth or damp chamois leather. Do not use solvents.
  • Handling the Detachable Front Panel: Do not expose to rain/water, drop, or apply shock. Keep away from high temperatures.
  • Cleaning the Connector: If the connector between the main unit and front panel is dirty, detach the front panel and clean the connector with an alcohol swab. Avoid damaging the connector. Always shut down the engine and remove the ignition key before cleaning.
  • Replacing the Fuse: Ensure the replacement fuse matches the specified 15A value. If the fuse blows, check the power connection and replace it. If the problem persists, consult a service dealer.
  • Resetting the Unit: After installation, battery replacement, or if errors occur, remove the front panel and press the RESET button (located on the base, using a pointed object like a ball-point pen) to restore initial status. This will erase clock settings and memorized functions.
  • Transportation Screws: Before installation, remove the two transportation screws on top of the unit.
  • Disc Handling:
    • Avoid discs with large scratches, irregular shapes, cracks, cellophane tape, glue, peeling marks, protection sheets, or stabilizers.
    • Only 12cm discs are compatible.
    • Remove roughness from new disc edges with a ball-point pen before loading.
    • Clean dirty or scratched discs with a clean cloth, wiping from the center out.
    • Do not store discs in high temperatures or humidity to prevent warping. Store discs in their cases after playing.
    • Do not attempt to load more than one disc.

Safety Precautions:

  • Do not modify the unit.
  • Installation/servicing should be performed by trained personnel.
  • Stop the vehicle before operating the unit.
  • Keep the volume at a level that allows hearing outside sounds.
  • Operate within -10°C to +60°C temperature range.
  • Replace fuses with the correct amperage.
  • Do not block vents or radiator panels.
  • Avoid using the unit without the engine running to prevent battery drainage.
  • Use only in 12V negative ground cars.
  • Do not connect the ignition wire (red) and battery wire (yellow) together, as this can cause a short circuit or fire.
  • Ensure speaker connections are correct (speaker (-) leads to speaker (-) terminal). Do not connect speaker cables to each other or to the vehicle body.
  • This unit uses a laser beam. Only properly trained personnel should open the unit to prevent accidents. The unit conforms to international safety specifications and European community guidelines regarding electrical safety and electromagnetic compatibility (EMC).
  • To reduce the risk of electric shock, do not remove the cover; there are no user-serviceable parts inside.
  • Invisible laser radiation is present when open and interlocks are defeated; avoid exposure to the beam.
  • Do not expose the appliance to rain or moisture to reduce the risk of fire or electric shock.
  • Dispose of waste electrical products responsibly; do not dispose with household waste. Recycle where facilities exist.

Muse M-1010 MR Specifications

General IconGeneral
BrandMuse
ModelM-1010 MR
CategoryCar Receiver
LanguageEnglish

Related product manuals