CARATTERISTICHE TECNICHE
UTILIZZO ESCLUSIVAMENTE IN CORRENTE
CONTINUA.
UTILIZZO ESCLUSIVAMENTE CON COLLEGAMENTO A
CONTATTORE O SCATOLA DI COMANDO.
✓ Alimentazione: 30 VCC Max
✓ Contatti normalmente aperti.
✓ NON utilizzare con carichi superiori a 2 A.
✓ Cavo estensibile fino a 4 Mt.
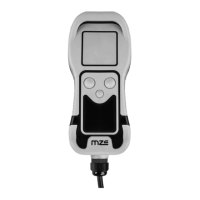
✓ Contenitore ergonomico in resina di poliestere
auto estinguente, resistente agli urti e alla
corrosione marina.
✓ Grado di protezione infiltrazione acqua :
IP 67:
✓ Dimensioni pulsantiera:
170 x 80 x 50 mm
.
INSTALLAZIONE
IL COLLEGAMENTO DEVE ESSERE EFFETTUATO A
BATTERIA SCOLLEGATA!
✓ Montare la presa in un luogo preferibilmente
fresco e asciutto, servendosi della dima di
foratura allegata.
✓ Effettuare i collegamenti elettrici secondo lo
schema di cablaggio e assicurandosi di
rispettare la polarità.
VERIFICA E USO APPARECCHIO
NON APRIRE LA PULSANTIERA NE’ LA SPINA PER
GARANTIRE LA TENUTA STAGNA DELLE STESSE!
✓ Inserire la spina nella presa e girare la ghiera di
chiusura in senso orario per alimentare la
pulsantiera.
✓ Ridare tensione all’impianto. Verificare che al
comando UP corrisponda la salita e al comando
DOWN la discesa dell’ancora, altrimenti
scambiare i cavi UP e DOWN nelle connessioni
della presa.
✓ Utilizzare i comandi per movimentare il
salpancora.
✓ Al rilascio del tasto la manovra relativa si
interrompe.
NON PREMERE I DUE TASTI
CONTEMPORANEAMENTE!
TECHNICAL FEATURES
USE ONLY ON DIRECT CURRENT.
MUST BE USED WITH CONTACTORS OR A CONTROL
BOX.
✓ Feeding tension: 30 VCC Max
✓ Normally open contacts.
✓ DON’T USE with a load more than 2 Amps.
✓ Cable can be extended up to 4 mt.
✓ Ergonomic case moulded in self-extinguishing
polyester resin.
✓ Watertight protection:
IP 67:
✓ Remote control dimensions:
170 x 80 x 50 mm
.
INSTALLATION
ALWAYS DISCONNECT THE BATTERY DURING
INSTALLATION!
✓ If possible mount the socket in a dry place using
the template below.
✓ Make the electrical connections according to the
wiring diagram.
SETTING AND USE OF APPARATE
DON’T OPEN REMOTE CONTROL OR PLUG TO
WARRANTY WATERTIGHT PROTECTION!
✓ Connect the plug into the socket and turn its
locking ring clockwise until it stops to switch on
the remote control.
✓ Switch on electrical power. Be sure that the
controls operate in the correct direction; if not
swap over the UP and DOWN wires at the
socket.
✓ Push UP or DOWN command to use windlass.
✓ Release the button to stop.
DON’T PUSH THE BUTTON SIMULTANEOUSLY!
 Loading...