Do you have a question about the NANLITE WC-USBC-C1 and is the answer not in the manual?
The Nanlite WC-USBC-C1 Wire Controller is a versatile accessory designed to enhance the control and functionality of compatible Nanlite lighting fixtures, specifically the PavoBulb 10C and PavoTube T8-7X. This user manual provides a comprehensive overview of its features, usage, and maintenance.
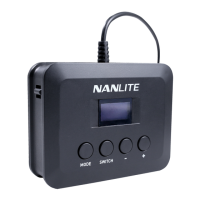
The WC-USBC-C1 acts as an external controller for Nanlite fixtures, allowing users to adjust various lighting parameters and access advanced settings. It features a display screen, a power switch, and three control buttons: MODE, SWITCH, and a +/- button. The controller is equipped with a built-in lithium battery, enabling it to directly power the PavoBulb 10C and PavoTube T8-7X, providing a portable and convenient control solution. It also includes a USB Type-C port for firmware updates and charging.
1. Initial Setup and Power On: * Connect the wire controller to the lighting fixture using the USB Type-C connector. * Toggle the power switch to turn on the controller. The "NANLITE" logo will appear on the display.
2. Fixture Recognition and Display: * Upon connection, the controller reads the fixture's information, including its address and model. * If not connected, the display shows "Disconnected." * When connected, it displays the corresponding lighting mode interface or menu.
3. MODE Button Functionality: * The MODE button is used to switch between different lighting modes (CCT, HSI, EFFECT, PIXEL FX) and to enter the main menu.
4. SWITCH Button Functionality: * The SWITCH button allows users to navigate through options within a specific lighting mode or menu. * In lighting modes, it switches between parameters like DIM, CCT, HUE, and SAT. * In the menu, it switches between options such as Channel, Language, DMX Mode, DMX Pixel, Wireless Protocol, Bluetooth Reset, Firmware Update, and Version.
5. +/- Button Functionality: * The +/- button is used to adjust the values of selected parameters or options. * For example, it can change the dimming percentage, CCT value, HUE, SAT, DMX address, DMX pixel count, or select wireless protocol versions.
6. Menu Navigation and Settings: * Entering the Menu: Press the MODE button to access the main menu. * Channel (Address Code) Setting: * In the menu, press SWITCH to select "CH." * Use the +/- button to adjust the DMX address code. * Language Setting: * In the menu, press SWITCH to select "LANGUAGE." * Use the +/- button to choose between Chinese and English. * DMX Mode Setting: * In the menu, press SWITCH to select "DMX MODE." * Use the +/- button to select the desired DMX mode (e.g., CCT 8bit, CCT 16bit). * DMX Pixel Setting (PavoTube T8-7X only): * After selecting DMX Mode, press SWITCH to select "DMX PIEXL." * Use the +/- button to adjust the number of DMX pixels. * Wireless Protocol Setting (PavoBulb 10C only): * In the menu, press SWITCH to select "WIRELESS PROTOCOL." * Use the +/- button to select V1.0 or V2.0. * Bluetooth Reset: * After selecting Wireless Protocol, press SWITCH to select "BT: RESET." * Press the +/- button to enter the Bluetooth reset interface. * Press SWITCH to select "RESET," then press MODE to confirm. The controller will return to the menu after resetting.
7. Firmware Update: * For the Wire Controller: * Turn off the controller. * Insert a USB flash drive containing the new firmware into the USB Type-C port. * Turn on the controller. The display will show "FOUND FIRMWARE" and the version number. * Press SWITCH to select "UPDATE," then press MODE to confirm. The display will show "FIRMWARE UPDATING" and then "FIRMWARE UPDATED" upon completion. * For Fixtures via Wire Controller: * Turn on the controller and connect it to the fixture to be upgraded. * Insert a USB flash drive with the fixture's new firmware. * Turn on the fixture. * Press MODE to enter the menu. * Press SWITCH to select "FW: UPDATE." * Press the +/- button to enter the firmware update interface. The display will show "SEARCHING FOR FIRMWARE FILE" and then "FOUND FIRMWARE" with the fixture's firmware name. * Press SWITCH to select "UPDATE," then press MODE to confirm. The display will show "FIRMWARE UPDATING" and then "FIRMWARE UPDATED" upon completion.
8. Version Information: * In the menu, press SWITCH to select "VERSION" to view the current firmware version of the controller.
| Brand | NANLITE |
|---|---|
| Model | WC-USBC-C1 |
| Category | Controller |
| Language | English |