Do you have a question about the NAVAC NML1 and is the answer not in the manual?
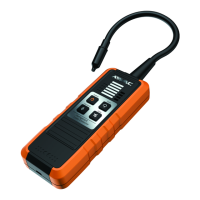
Details the sensor group, leakage indicator lamp, battery interface, and various buttons.
Lists specifications like applicable refrigerants, leakage detection limits, and operating ranges.
Describes the three-color indicator for battery status and its implications.
Explains audible and visible alarm signals for detecting leakage and their variations.
Details the three sensitivity levels (low, medium, high) indicated by color.
Explains auto/manual environmental zeroing to ignore ambient refrigerant.
Covers device diagnosis for probe issues and provides audible alarms.
Describes the automatic shut-off feature that activates after 30 minutes of inactivity.
Instructions for charging the device using a power supply.
Steps for starting the leak detector and its warming-up process.
Guidance on adjusting the sensitivity level for detection.
Instructions for enabling or disabling the auto environment zeroing feature.
Procedures for identifying and pinpointing refrigerant leaks accurately.
Covers cleaning the sensor, its service life, and steps for replacing it.
This document describes the NAVAC NML1 Leak Detector, a device designed for detecting halogen-type refrigerants.
The NAVAC NML1 Leak Detector utilizes a heated semiconductor gas sensor to identify leaks of CFC, HCFC, and HFC type refrigerants. It offers high sensitivity, fast response time, and a long sensor service life, ensuring stable performance and comprehensive functionality. The device provides both audible and visible alarms to indicate leakage. The beeping frequency and the number of lit LEDs increase with the refrigerant concentration, helping to gauge the leakage rate. Users can choose between audible and visible alarms or visible alarms only, with the default setting being both.
The NML1 features three levels of sensitivity: Low, Medium, and High, indicated by green, yellow, and red colors on the sensitivity indicator lamp, respectively. The default sensitivity setting is High. It's important to note that in high sensitivity mode, the detector is quite sensitive, and minor variations in surrounding temperature, pressure, or other factors might trigger an alarm.
An "Environment Zero" function is included, which allows the leak detector to disregard the refrigerant concentration in the surrounding environment. This prevents the device from continuously alarming due to existing background refrigerant levels. By default, the "Environment Zero" function starts automatically when the device powers on and completes its warming-up process, effectively shielding the probe from ambient refrigerant concentrations. Users can also manually zero the environment by long-pressing the "Environment Zero" button to cancel the auto-zero function, then short-pressing it to manually zero the current environment concentration. Long-pressing the button again returns the system to auto "Environment Zero" function.
The device also incorporates diagnostic functions and probe state indication. It can detect a missing or problematic probe and provides an audible alarm. If the sensor is damaged or improperly connected, the beeper will sound continuously, requiring the user to turn off the device and replace or re-install the sensor.
For power management, the NML1 includes a "3-Color" Battery Level Indicator Lamp (green for high, yellow for medium, red for low). When the lamp turns red, the device will automatically shut off in two minutes, prompting the user to charge it or connect it to an external power supply. The device also has an auto power-off feature, which turns it off automatically after 30 minutes of inactivity. Pressing any button resets this 30-minute timer.
Charging: The device contains a lithium battery. For first use, it should be charged with the power off. Charging indications vary based on whether the device is powered on or off. When powered off, a red flashing battery level indicator lamp signifies charging, and a constantly green lamp indicates charging completion. When powered on, a green flashing lamp indicates charging, and a constantly green lamp indicates completion. Charging typically takes less than 4.5 hours and should be done within a 32~104°F environmental temperature range. The auto power-off function is disabled when the device is supplied by external power.
Startup and Warming Up: To start the device, press the "Power ON/OFF" button. A single "BEEP" sound indicates the start of the warming-up period, during which the concentration indicator lamp flashes circularly. After approximately 46 seconds, two continuous "BEEPS" sound, and the concentration indicator lamp turns off, signaling the end of warming up and readiness for use. The device should be started and warmed up in clear air.
Leakage Detection and Positioning: The probe should be moved slowly through areas where leaks are suspected. For flexible probes, it can be bent to reach desired areas. When a leak is detected, the device alarms, with increasing alarm frequency and more lit LEDs as refrigerant concentration rises. To pinpoint the exact leak source, users should re-check neighboring areas and move slowly from non-alarming areas towards the suspected leak. The "Environment Zero" function and sensitivity adjustment can aid in accurate positioning. It is recommended to use high sensitivity to find the general leaking area, then reduce sensitivity to pinpoint the exact leak. Once found, the leaking points should be marked, and the entire refrigerating system should be checked.
Detection Conditions: During detection, the system should have at least 50 psi pressure, and the operation should be performed in relatively static air conditions. Wind can dilute or blow away leaked refrigerant gas, affecting detection accuracy. Before detection, a fan can be used to clear any suspected leaked refrigerant gas in the system. Leaking sources often occur at greasy, dusty positions, node valves, or pipe connections. The probe should be held 1/8"-1/4" away from the suspected leaking point to prevent contamination and moved at approximately 1 inch/second.
General Maintenance: Proper maintenance is crucial for prolonging service life and maintaining performance. The sensor's protective cover should be kept clean, free from water drops, oil, grease, dust, or other contaminants. The sensor can be cleaned with a cotton cloth or dry gas.
Sensor Replacement: The sensor has a limited working life, typically over a year under normal conditions. Prolonged operation in high-concentration refrigerant environments will rapidly consume its lifespan. When the sensor is no longer functional, it must be replaced. To replace, first remove the sensor protective cover, then extract the old sensor. Align the pins of the new sensor with the same position and insert it. Finally, reinstall the sensor protective cover.
Accessory List:
| Brand | NAVAC |
|---|---|
| Model | NML1 |
| Category | Security Sensors |
| Language | English |