Compatibilidade de software
Mac: OS X Snow Leopard 10.6 e superior
Windows: 7 / 8 / 10 (32 / 64 bit)
e
Snabbstartsguide
Filmskanner
FISC3650BK
För ytterligare information, se den utökade manualen online: ned.is/FISC3650BK
Avsedd användning
Produkten är endast avsedd för att skanna negativ lm eller dialm och omvandla dessa till digital video.
Produkt
en arbetar endast i kombination med den medföljande programvaran DIGITNOW!.
Modiering av produkten kan medföra konsekvenser för säkerhet, garanti och korrekt funktion.
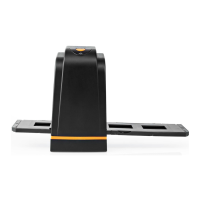
Huvuddelar (bild A)
1
SCAN-knappen
2
LED-statusindikator
3
Hölje
4
Borste
5
Hållare för negativ lm
6
Hållare för diaramar
7
CD-skiva med programvara
8
Mini USB-port
9
Filmhållarslits
10
USB-kabel
Säkerhetsanvisningar
-
VARNING
• Använd produkten endast enligt anvisningarna i denna bruksanvisning.
• Använd inte produkten om en del är skadad eller defekt. Byt en omedelbart en skadad eller defekt
enhet.
• Koppla bort produkten från eluttaget och annan utrustning i händelse av problem.
• Exponera inte produkten till vatten eller fukt.
• Exponera inte produkten till värme, kyla eller direkt solljus.
• Använd inte den medföljande borsten för att rengöra lmen.
Att ansluta lmskannern
1. Anslut A10 till en USB 2.0-port på din dator.
2. Anslut A10 andra ända till A8.
4
Datorn upptäcker automatiskt lmskannern och är klar för användning efter några ögonblick.
3. Placera A7 i din dators CD-spelare.
4. Installera programvaran.
5. Kör programvaran. Skriv in programvarans serienummer när du ombeds att göra detta.
4
Serienumret nns på CD-skivans kuvert.
För in lmen eller diaramarna i skannern (Bild B + C)
1. Öppna lm- eller diaramhållaren genom att försiktigt dra spärren i mitten samtidigt som du håller
hållarens baksida.
2. Placera lmen i lmhållaren eller placera diaramarna i diaramhållaren.
3. Stäng hållaren.
4. För in hållaren i A9 i pilens riktning.
5. Tryck tills den första bilden är centrerad.
Att skanna (Bild D)
1. I menyfältet i DIGITNOW!, klicka på "Hämta foto” ("Get Photo”) och välj "Från lmskanner” ("From Film
Scanner”).
2. Välj lmtyp (D2), upplösning (D3) och lmstorlek (D4).
3. Klicka på "Skanna" ("Scan") (Windows) eller "Ta bild" ("Take image") (Mac) (D7) eller tryck på A1 för att
skanna bilden. Det tar era sekunder att spara din bild och visa den på skärmen.
4. Justeringar (D5) kan göras till mättnaden, ljusstyrka, kontrast och varje RGB-kanals nivå.
5. Klicka på D6 för att återställa justeringsnivåerna till ursprungsnivåerna.
6. Tryck hållaren längre in i A9 tills du når nästa lmruta eller diaram.
7. Klicka på D7.
8. Upprepa för alla återstående lmrutor eller diaramar.
Felsökning
Problem Möjlig orsak Lösning
Ingen elkraft Ingen USB-förbindelse Säkerställ att USB-kabeln är ansluten. A2 ska
tändas.
Fläckar på bilden Smuts i lmskannern Använd A4 för att rengöra lmskannerns
insida
Smuts på lmen Rengör lmen med en specialiserad produkt.
Använd inte den medföljande borsten för att
rengöra lmen.
Specikationer
Produkt
Filmskanner
Artikelnummer
FISC3650BK
Dimensioner (l x b x h)
82 x 86 x 152 mm
Vikt
350 g
Gränssnitt
USB 2.0
Strömförsörjning
5 V DC / 1 A
Bildsensor
5 MP färg CMOS
Objektiv
Fast fokus med precisionsslipade glaselement
Exponeringskontroll
Automatisk med manuell ninställning
Färgbalans
Automatisk med manuell ninställning
Kvalitet
Standard och interpolerad (1800 och 3600 dpi)
Färgdjup
10 bitar per färgkanal
Skanningsmetod
En passage
Ljuskälla
Bakgrundsbelyst med 3 vita LED-lampor
Mjukvarukompatibilitet
Mac: OS X Snow Leopard 10.6 och högre
Windows: 7 / 8 / 10 (32 / 64 bitar)
g
Pika-aloitusopas
Filmiskanneri
FISC3650BK
Katso tarkemmat tiedot käyttöoppaan laajemmasta verkkoversiosta: ned.is/FISC3650BK
Käyttötarkoitus
Tuote on tarkoitettu ainoastaan negatiivi- tai dialmin skannaamiseen ja muuntamiseen digitaaliseksi
videoksi.
Tuote toimii ainoastaan yhdessä mukana toimitetun DIGITNOW!-ohjelmiston kanssa.
Tuotteen muutokset voivat vaikuttaa turvallisuuteen, takuuseen ja asianmukaiseen toimintaan.
Tärkeimmät osat (kuva A)
1
SCAN-painike
2
Tilan LED-merkkivalo
3
Kotelo
4
Harja
5
Negatiivilmipidike
6
Positiividiapidike
7
CD-ROM, jossa ajuriohjelmisto
8
Mini-USB-portti
9
Filmipidikkeen auk
ko
10
USB-johto
Turvallisuusohjeet
-
VAROITUS
• Käytä tuotetta vain tässä oppaassa kuvatun mukaisesti.
• Älä käytä tuotetta, jos jokin sen osa on vaurioitunut tai viallinen. Vaihda vahingoittunut tai viallinen laite
välittömästi.
• Irrota tuote sähköpistorasiasta ja muista laitteista, jos ongelmia ilmenee.
• Älä altista tuotetta vedelle tai kosteudelle.
• Älä altista tuotetta lämmölle, kylmälle äläkä suoralle auringonvalolle.
• Älä puhdista lmiä pakkaukseen sisältyvällä harjalla.
Filmiskannerin kytkeminen
1. Kytke A10 tietokoneen USB 2.0-porttiin.
2. Kytke johdon A10 toinen pää pistorasiaan A8.
4
Tietokone tunnistaa automaattisesti lmiskannerin, joka on hetken kuluttua käyttövalmis.
3. Aseta A7 tietokoneeseen.
4. Asenna ajuriohjelmisto.
5. Suorita ohjelmisto. Pyydettäessä anna ohjelmiston sarjanumero.
4
Sarjanumero on painettu CD-ROM-levyn koteloon.
Aseta lmi tai diat skanneriin (Kuvat B + C)
1. Avaa lmi- tai diapidike vetämällä kevyesti keskellä olevaa salpaa ja pitämällä samalla lujasti kiinni
pidikkeen takaa.
2. Aseta lmi lmipidikkeeseen tai kehystetyt diat diakuvapidikkeeseen.
3. Sulje pidike.
4. Aseta pidike nuoli edellä lmipidikkeen aukkoon A9.
5. Paina, kunnes ensimmäinen kuva on keskellä.
Skannaaminen (Kuva D)
1. Napsauta DIGITNOW!-ohjelmiston valikkopalkista "Hae kuva” ("Get Photo”) ja valitse "Filmiskannerista”
("From Film Scanner”).
2. Valitse lmityyppi (D2), resoluutio (D3) ja lmin koko (D4).
3. Napsauta "Skannaa” ("Scan”) (Windows) tai "Ota kuva” ("Take image") (Mac) (D7) tai paina
skannauspainiketta A1 skannataksesi kuvan. Kuvan tallentaminen ja näyttäminen näytöllä vie
muutaman sekunnin.
4. Värikylläisyyttä, kirkkautta, kontrastia ja kunkin yksittäisen RGB-kanavan tasoa voidaan säätää (D5).
5. Napsauta kohtaa D6 palauttaaksesi säätöjen oletusasetukset.
6. Työnnä pidikettä syvemmälle lmipidikkeen aukkoon A9, kunnes pääset seuraavaan kehykseen tai
diaan.
7. Napsauta D7.
8. Tee samoin kaikille lopuille kehyksille tai dioille.
Vianmääritys
Ongelma Mahdollinen syy Ratkaisu
Ei virtaa Ei USB-yhteyttä Varmista, että USB-kaapeli on kytketty. A2
tulisi syttyä.
Kuvassa on täpliä Likaa lmiskannerin sisällä Käytä harjaa A4 lmiskannerin
puhdistamiseen sisältä
Likaa lmillä Puhdista lmi erikoistuotteella. Älä puhdista
lmiä pakkaukseen sisältyvällä harjalla.
Instrucciones de seguridad
-
ADVERTENCIA
• Utilice el producto únicamente tal como se describe en este manual.
• No use el producto si alguna pieza está dañada o presenta defectos. Sustituya inmediatamente el
aparato si presenta daños o está defectuoso.
• Desconecte el producto de la toma de corriente y de otros equipos si surgen problemas.
• No exponga el producto al agua o a la humedad.
• No exponga el producto al calor, al frío ni a la luz solar directa.
• No utilice el cepillo suministrado para limpiar la película.
Cómo conectar el escáner de película fotográca
1. Conecte A10 a un puerto USB 2.0 de su ordenador.
2. Conecte el otro extremo de A10 a A8.
4
El escáner de película fotográca será reconocido automáticamente por el ordenador y estará listo para
el uso al cabo de unos momentos.
3. Inserte A7 en su ordenador.
4. Instale el software del controlador.
5. Ejecute el software. Cuando se le pida, introduzca el número de serie del software.
4
El número de serie está impreso en la funda del CD-ROM.
Meta la película o las diapositivas en el escáner (Imagen B + C)
1. Abra el soporte de películas o diapositivas tirando con delicadeza del cierre en la parte central mientras
sujeta con rmeza la parte posterior del soporte.
2. Coloque la película en el soporte de películas o coloque diapositivas enmarcadas en el soporte de
diapositivas.
3. Cierre el soporte.
4. Inserte el soporte siguiendo la echa en A9.
5. Empuje hasta que la primera fotografía esté centrada.
Cómo escanear (Imagen D)
1. En la barra de menú del software DIGITNOW! haga clic en «Obtener foto» ("Get Photo") y elija «Del
escáner de película» ("From Film Scanner").
2. Elija el tipo de película (D2), la resolución (D3) y el tamaño de la película (D4).
3. Haga clic en «Escanear» ("Scan") (Windows) o «Tomar imagen» ("Take image") (Mac) (D7) o pulse A1 para
escanear la fotografía. Tardará algunos segundos en guardar su fotografía y mostrarla en la pantalla.
4. Se pueden efectuar ajustes (D5) para la saturación, brillo, contraste y el nivel de cada canal RGB
individual.
5. Haga clic en D6 para restablecer los niveles de ajuste a los valores por defecto.
6. Siga empujando el soporte dentro de A9 hasta que alcance el siguiente marco o diapositiva.
7. Haga clic en D7.
8. Repita para todos los demás marcos o diapositivas que falten.
Resolución de problemas
Problema Posible causa Solución
No hay corriente Sin conexión USB Asegúrese de que esté conectado el cable
USB. A2 debería iluminarse.
Aparecen
manchas en la
imagen
Suciedad dentro del escáner de
película fotográca
Utilice A4 para limpiar el interior del escáner
de película fotográca
Suciedad en la película Limpie la película con un producto
especializado. No utilice el cepillo
suministrado para limpiar la película.
Especicaciones
Producto
Escáner de película fotográca
Número de artículo
FISC3650BK
Dimensiones (L x An x Al)
82 x 86 x 152 mm
Peso
350 g
Interfaz
USB 2.0
Suministro eléctrico
5 V DC / 1 A
Sensor de imágenes
5 MP color CMOS
Lente
Elemento de cristal de precisión de enfoque jo
Control de exposición
Automático con sintonización na manual
Balance de color
Automático con sintonización na manual
Calidad
Estándar e interpolado (1800 y 3600 dpi)
Profundidad de color
10 bits por canal de color
Método de escaneo
Una sola pasada
Fuente de luz
Luz de fondo con 3 LED blancos
Compatibilidad del software
Mac: OS X Snow Leopard 10.6 y superior
Windows: 7 / 8 / 10 (32 / 64 bits)
i
Guia de iniciação rápida
Scanner de películas
FISC3650BK
Para mais informações, consulte a versão alargada do manual on-line: ned.is/FISC3650BK
Utilização prevista
O produto destina-se exclusivamente a digitalizar negativos fotográcos ou slides e converte-os em vídeo
digital.
O produto funciona exclusivamente em combinação com o software DIGITNOW! fornecido.
Qualquer alteração do produto pode ter consequências em termos de segurança, garantia e
funcionamento adequado.
Peças principais (imagem A)
1
Botão SCAN
2
LED indicador de estado
3
Caixa
4
Escova
5
Suporte de película
6
Suporte de slides
7
CD-ROM com software de driver
8
Porta Mini USB
9
Ranhura para suporte de película
10
Cabo USB
Instruções de segurança
-
AVISO
• Utilize o produto apenas conforme descrito neste manual.
• Não utilize o produto caso uma peça esteja danicada ou defeituosa. Substitua imediatamente um
dispositivo danicado ou defeituoso.
• Em caso de problema, desligue o produto da tomada elétrica bem como outros equipamentos.
• Não exponha o produto à água ou humidade.
• Não exponha o produto ao calor, frio ou luz solar direta.
• Não utilize a escova fornecida para limpar a película.
Ligar o scanner de películas
1. Ligue A10 a uma porta USB 2.0 do seu computador.
2. Ligue a outra extremidade de A10 a A8.
4
O scanner de películas/slides é reconhecido automaticamente pelo computador e está pronto a ser
utilizado após alguns momentos.
3. Insira A7 no seu computador.
4. Instale o software do driver.
5. Execute o software. Quando solicitado, introduza o número de série do software.
4
O número de série está impresso na capa do CD-ROM.
Introduza a película ou os slides no scanner (Imagem B + C)
1. Abra o suporte de películas ou slides puxando suavemente o trinco no meio mantendo rmemente a
parte posterior do suporte.
2. Coloque a película no suporte de películas ou coloque slides emoldurados no suporte de slides.
3. Feche o suporte.
4. Insira o suporte pelo lado da seta primeiro dentro de A9.
5. Empurre até que a primeira imagem esteja centralizada.
Digitalização (Imagem D)
1. Na barra de menu do software DIGITNOW!, clique em «Obter foto» ("Get Photo”) e escolha «De scanner
de películas» ("From Film Scanner").
2. Escolha o tipo de película (D2), a resolução (D3) e o tamanho de película (D4).
3. Clique em «Digitalizar» ("Scan”) (Windows) ou «Extrair imagem» ("Take image”) (Mac) (D7) ou prima A1
para digitalizar a fotograa. São necessários vários segundos para guardar a sua foto e visualizá-la no
monitor.
4. Podem ser efetuados ajustes (D5) em termos de saturação, brilho, contraste e nível de cada canal RGB
individual.
5. Clique em D6 para redenir os níveis de ajuste para os níveis padrão.
6. Empurre o suporte ainda mais para dentro de A9 até chegar ao fotograma ou slide seguinte.
7. Clique em D7.
8. Repita para todos os fotogramas ou slides restantes.
Resolução de problemas
Problema Causa possível Solução
Sem energia Sem ligação USB Certique-se de que o cabo USB está ligado.
A2 devem acender.
Aparecem
pontos na
imagem
O interior do scanner de películas
está sujo
Utilize A4 para limpar o interior do scanner de
películas
Sujidade na película Limpe a película com um produto
especializado. Não utilize a escova fornecida
para limpar a película.
Especicações
Produto
Scanner de películas
Número de artigo
FISC3650BK
Dimensões (c x l x a)
82 x 86 x 152 mm
Peso
350 g
Interface
USB 2.0
Alimentação
5 V DC / 1 A
Sensor de imagem
Cor CMOS 5 MP
Lente
Elemento de precisão em vidro com foco xo
Controlo da exposição
Automático com regulação manual
Balanço de cor
Automático com regulação manual
Qualidade
Padrão e interpolado (1800 e 3600 dpi)
Profundidade de cor
10 bits por canal de cor
Método de digitalização
Passagem única
Fonte de luz
Luz de fundo com 3 LED brancos
5. Druk erop totdat het eerste beeld gecentreerd is.
Scannen (afbeelding D)
1. In de DIGITNOW! softwaremenubalk, klik op 'Foto ophalen' ("Get Photo") en kies 'Uit lmscanner’ ("From
Film Scanner").
2. Kies het lmtype (D2), resolutie (D3) en de lmgrootte (D4).
3. Klik op 'Scan' (Windows) of 'Neem afbeelding' ("Take image") (Mac) (D7) of druk op A1 om de foto te
scannen. Het duurt enkele seconden om uw foto op te slaan en op het scherm te tonen.
4. De verzadiging, helderheid, contrast en het niveau van elk afzonderlijk RGB-kanaal kunnen worden
aangepast (D5).
5. Klik op D6 om de aanpassingsniveaus naar de standaardinstellingen terug te zetten.
6. Duw de houder verder in A9 tot u het volgende frame of dia bereikt.
7. Klik op D7.
8. Herhaal dit voor alle overige frames of dia's.
Probleem oplossing
Probleem Mogelijk oorzaak Oplossing
Geen stroom Geen USB-verbinding Controleer of de USB-kabel is aangesloten. A2
moet gaan branden.
Er verschijnen
vlekken op het
beeld
Vuil in de lmscanner Gebruik A4 om de lmscanner binnenin te
reinigen
Vuil op de lm Reinig de lm met een gespecialiseerd
product. Gebruik de bijgeleverde borstel niet
om de lm te reinigen.
Specicaties
Product
Filmscanner
Artikelnummer
FISC3650BK
Afmetingen (l x b x h)
82 x 86 x 152 mm
Gewicht
350 g
Interface
USB 2.0
Voeding
5 V DC / 1 A
Beeldsensor
5 MP kleur CMOS
Lens
Precisie glaselement met vaste focus
Bediening van de belichting
Automatisch met handmatige jnafstelling
Kleurbalans
Automatisch met handmatige jnafstelling
Kwaliteit
Standaard & geïnterpoleerd (1800 & 3600 dpi)
Kleurdiepte
10 bits per kleurkanaal
Scanmethode
Een keer scannen
Lichtbron
Achtergrondverlichting met 3 witte LED's
Software compatibiliteit
Mac: OS X Snow Leopard 10.6 en hoger
Windows: 7 / 8 / 10 (32 / 64 bit)
j
Guida rapida all’avvio
Scanner per pellicole
FISC3650BK
Per maggiori informazioni vedere il manuale esteso online: ned.is/FISC3650BK
Uso previsto
Il prodotto è inteso esclusivamente per la scansione di negativi o diapositive e per la conversione in video
digitali.
Il prodotto funziona esclusivamente in combinazione con il software DIGITNOW! in dotazione.
Eventuali modiche al prodotto possono comportare conseguenze per la sicurezza, la garanzia e il corretto
funzionamento.
Parti principali (immagine A)
1
Pulsante SCAN
2
Spia LED di stato
3
Custodia
4
Spazzola
5
Supporto per negativi
6
Supporto per diapositive
7
CD-ROM con driver software
8
Porta Mini USB
9
Fessura del suppor
to per pellicole
10
Cavo USB
Istruzioni di sicurezza
-
ATTENZIONE
• Utilizzare il prodotto solo come descritto nel presente manuale.
• Non utilizzare il prodotto se una parte è danneggiata o difettosa. Sostituire immediatamente un
dispositivo danneggiato o difettoso.
• Scollegare il prodotto dalla presa elettrica e da altre apparecchiature se si vericano problemi.
• Non esporre il prodotto all’acqua o all’umidità.
• Non esporre il prodotto al calore, al freddo o alla luce diretta del sole.
• Non utilizzare la spazzola in dotazione per la pulizia della pellicola.
Collegamento dello scanner per pellicole
1. Collegare A10 a una porta USB 2.0 sul computer.
2. Collegare l’altra estremità di A10 a A8.
4
Lo scanner per pellicole viene riconosciuto automaticamente dal computer ed è pronto all’uso dopo
alcuni istanti.
3. Inserire A7 nel computer.
4. Installare il driver software.
5. Eseguire il software. Quando richiesto, immettere il numero di serie del software.
4
Il numero di serie è stampato sulla custodia del CD-ROM.
Inserire pellicole o diapositive nello scanner (Immagine B + C)
1. Aprire il supporto per pellicole o diapositive tirando delicatamente il fermo al centro, trattenendo
saldamente il retro del supporto.
2. Inserire la pellicola nel supporto per pellicole oppure inserire le diapositive nel supporto per diapositive.
3. Chiudere il supporto.
4. Inserire il supporto con la freccia rivolta verso A9.
5. Spingere no a quando la prima immagine è centrata.
Scansione (Immagine D)
1. Nella barra del menu del software DIGITNOW!, fare clic su “Ottieni foto” ("Get Photo") e scegliere “Da
scanner per pellicole” ("From Film Scanner").
2. Scegliere il tipo di pellicola (D2), la risoluzione (D3) e il formato della pellicola (D4).
3. Fare clic su “Scansione” ("Scan")(Windows) o “Acquisisci immagine” (“Take image”) (Mac) (D7) oppure
premere A1 per eseguire la scansione dell’immagine. Sono necessari diversi secondi per salvare
l’immagine e visualizzarla sullo schermo.
4. È possibile eettuare regolazioni (D5) relative a saturazione, luminosità, contrasto e il livello di ciascun
singolo canale RGB.
5. Fare clic su D6 per ripristinare i livelli di regolazione ai valori predeniti.
6. Premere ulteriormente il supporto in A9 no a raggiungere la diapositiva o il fotogramma successivi.
7. Fare clic su D7.
8. Ripetere la procedura per tutti i fotogrammi o le pellicole rimanenti.
Risoluzione dei problemi
Problema Causa possibile Soluzione
Mancanza di
alimentazione
Nessun collegamento USB Assicurarsi che il cavo USB sia collegato. A2 si
dovrebbe accendere.
Appaiono
delle macchie
sull’immagine
Sporco all’interno dello scanner per
pellicole
Utilizzare A4 per pulire l’interno dello scanner
per pellicole
Sporco sulla pellicola Pulire la pellicola con un prodotto
specializzato. Non utilizzare la spazzola in
dotazione per la pulizia della pellicola.
Speciche
Prodotto
Scanner per pellicole
Numero articolo
FISC3650BK
Dimensioni (p x l x a)
82 x 86 x 152 mm
Peso
350 g
Interfaccia
USB 2.0
Alimentazione
5 V DC / 1 A
Sensore immagini
CMOS a colori 5 MP
Lente
Elemento di vetro di precisione con messa a fuoco ssa
Controllo dell’esposizione
Automatico con regolazione di no manuale
Bilanciamento dei colori
Automatico con regolazione di no manuale
Qualità
Standard e interpolato (1800 e 3600 dpi)
Profondità di colore
10 bit per canale di colore
Metodo di scansione
Passaggio singolo
Sorgente luminosa
Retroilluminazione con 3 LED bianchi
Compatibilità del software
Mac: OS X Snow Leopard 10.6 e superiore
Windows: 7 / 8 / 10 (32 / 64 bit)
h
Guía de inicio rápido
Escáner de película fotográca
FISC3650BK
Para más información, consulte el manual ampliado en línea: ned.is/FISC3650BK
Uso previsto por el fabricante
El producto está diseñado exclusivamente para escanear película en negativo o película de diapositivas y
convertirla en vídeo digital.
El producto funciona exclusivamente en combinación con el software DIGITNOW! suministrado.
Cualquier modicación del producto puede tener consecuencias para la seguridad, la garantía y el
funcionamiento adecuado
.
Partes principales (imagen A)
1
Botón SCAN
2
Indicador LED de estado
3
Carcasa
4
Cepillo
5
Soporte para película en negativo
6
Soporte para diapositivas positivas
7
CD-ROM con software de controlador
8
Puerto Mini USB
9
Ranura para el soporte de películas
10
Cable USB
Spezikationen
Produkt
Filmscanner
Artikelnummer
FISC3650BK
Größe (L x B x H)
82 x 86 x 152 mm
Gewicht
350 g
Schnittstelle
USB 2.0
Stromversorgung
5 V DC / 1 A
Bildsensor
5 MP Farb-CMOS
Objektiv
Festfokus-Präzisionsglaselement
Belichtungssteuerung
Automatisch mit manuellem Feintuning
Farbabstimmung
Automatisch mit manuellem Feintuning
Qualität
Standard & interpoliert (1800 & 3600 dpi)
Farbtiefe
10 Bit pro Farbkanal
Scanverfahren
Einzelscan
Lichtquelle
Hintergrundbeleuchtung mit 3 weißen LEDs
Softwarekompatibilität
Mac: OS X Snow Leopard 10.6 und höher
Windows: 7 / 8 / 10 (32 / 64 bit)
b
Guide de démarrage rapide
Scanner de lm
FISC3650BK
Pour plus d'informations, consultez le manuel détaillé en ligne : ned.is/FISC3650BK
Utilisation prévue
Le produit est exclusivement destiné à la numérisation de lms négatifs ou de diapositives et à leur
conv
ersion en vidéo numérique.
Le produit fonctionne exclusivement en combinaison avec le logiciel DIGITNOW!.
Toute modication du produit peut avoir des conséquences sur la sécurité, la garantie et le bon
fonctionnement.
Pièces principales (image A)
1
Bouton SCAN
2
Voyant LED d’état
3
Boîtier
4
Brosse
5
Support de lm négatif
6
Porte-diapositive
7
CD-ROM avec logiciel pilote
8
Port Mini USB
9
Emplacement pour porte-lm
10
Câble USB
Consignes de sécurité
-
AVERTISSEMENT
• Utilisez le produit uniquement comme décrit dans le présent manuel.
• Ne pas utiliser le produit si une pièce est endommagée ou défectueuse. Remplacer immédiatement un
appareil endommagé ou défectueux.
• Débrancher le produit de la prise secteur et de tout autre équipement en cas de problème.
• Ne pas exposer le produit à l'eau ou à l'humidité.
• Ne pas exposer le produit à la chaleur, au froid ou aux rayons directs du soleil.
• Ne pas utiliser la brosse fournie pour nettoyer le lm.
Connexion du scanner de lm
1. Reliez A10 à un port USB 2.0 de votre ordinateur.
2. Branchez l’autre extrémité de A10 à A8.
4
Le scanner de lm est reconnu automatiquement par l’ordinateur et prêt à être utilisé après quelques
instants.
3. Insérez A7 dans votre ordinateur.
4. Installez le logiciel du pilote.
5. Exécutez le logiciel. Lorsque vous y êtes invité, entrez le numéro de série du logiciel.
4
Le numéro de série est imprimé sur la pochette du CD-ROM.
Introduisez un lm ou des diapositives dans le scanner (Images B + C)
1. Ouvrez le support de lm ou de diapositive en tirant doucement sur le loquet au milieu tout en
maintenant fermement le dos du support.
2. Placez le lm dans le support de lm ou placez les diapositives encadrées dans le support de
diapositives.
3. Fermez le support.
4. Insérez le support dans le sens de la èche dans A9.
5. Appuyez jusqu’à ce que la première image soit centrée.
Numérisation (Image D)
1. Dans la barre de menu DIGITNOW! du logiciel, cliquez sur «Obtenir une photo» ("Get Photo") et
choisissez «À partir du scanner de lm» ("From Film Scanner").
2. Choisissez le type de lm (D2), la résolution (D3) et la taille du lm (D4).
3. Cliquez sur «Numériser» ("Scan") (Windows) ou «Prendre une image» ("Take image") (Mac) (D7) ou
appuyez sur A1 pour numériser l’image. Plusieurs secondes sont nécessaires pour enregistrer votre
photo et l’acher à l’écran.
4. Des ajustements (D5) peuvent être eectués sur la saturation, la luminosité, le contraste et le niveau de
chaque canal RVB.
5. Cliquez sur D6 pour réinitialiser les niveaux d’ajustement à leurs valeurs par défaut.
6. Poussez le support plus loin dans A9 jusqu’à ce que vous atteigniez l’image ou la diapositive suivante.
7. Cliquez sur D7.
8. Répétez l’opération pour toutes les images ou diapositives restantes.
Dépannage
Problème Cause possible Solution
Pas
d’alimentation
Pas de connexion USB Assurez-vous que le câble USB soit connecté.
A2 doit s’allumer.
Des points
apparaissent sur
la photo
Saleté à l’intérieur du scanner de lm Utilisez A4 pour nettoyer l’intérieur du scanner
de lm
Saleté sur le lm Nettoyez le lm avec un produit spécialisé.
Ne pas utiliser la brosse fournie pour nettoyer
le lm.
Spécications
Produit
Scanner de lm
Article numéro
FISC3650BK
Dimensions (L x l x H)
82 x 86 x 152 mm
Poids
350 g
Interface
USB 2.0
Source d’alimentation
5 V DC / 1 A
Capteur d'image
5 MP couleur CMOS
Lentille
Élément en verre de précision à focale xe
Contrôle de l’exposition
Automatique avec réglage n manuel
Balance des couleurs
Automatique avec réglage n manuel
Qualité
Standard et interpolé (1800 et 3600 dpi)
Profondeur de couleur
10 bits par canal de couleur
Méthode de numérisation
Passage unique
Source lumineuse
Rétro-éclairage avec 3 LED blanches
Compatibilité logicielle
Mac: OS X Snow Leopard 10.6 et supérieur
Windows: 7 / 8 / 10 (32 / 64 bit)
d
Verkorte handleiding
Filmscanner
FISC3650BK
Zie voor meer informatie de uitgebreide handleiding online: ned.is/FISC3650BK
Bedoeld gebruik
Het product is uitsluitend bedoeld voor het scannen van negatief lm of dialm en het omzetten ervan
naar digitale video.
Het pr
oduct functioneert uitsluitend in combinatie met de meegeleverde DIGITNOW! software.
Elke wijziging van het product kan gevolgen hebben voor veiligheid, garantie en correcte werking.
Belangrijkste onderdelen (afbeelding A)
1
SCAN knop
2
Statusindicatie LED
3
Behuizing
4
Borstel
5
Negatieve lm houder
6
Positieve dia houder
7
CD-ROM met driversoftware
8
Mini USB-poort
9
Filmhouder sleuf
10
USB-kabel
Veiligheidsvoorschriften
-
WAARSCHUWING
• Gebruik het product alleen zoals beschreven in deze handleiding.
• Gebruik het product niet als een onderdeel beschadigd of defect is. Vervang een beschadigd of defect
apparaat onmiddellijk.
• Koppel het product los van het stopcontact en van andere apparatuur als er zich problemen voordoen.
• Stel het product niet bloot aan water of vocht.
• Stel het product niet bloot aan hitte, koude of direct zonlicht.
• Gebruik de bijgeleverde borstel niet om de lm te reinigen.
De lmscanner aansluiten
1. Steek A10 in een USB 2.0-poort van uw computer.
2. Steek het andere uiteinde van A10 in A8.
4
De lmscanner wordt automatisch door de computer herkend en is na enkele ogenblikken klaar voor
gebruik.
3. Steek A7 in uw computer.
4. Installeer de driversoftware.
5. Voer de software uit. Voer het serienummer van de software in wanneer daarom wordt gevraagd.
4
Het serienummer wordt op het cd-rom-hoesje afgedrukt.
Voer lm of dia's in de scanner in (Afbeelding B + C)
1. Open de lm- of diahouder door voorzichtig aan de vergrendeling in het midden te trekken en de
achterkant van de houder stevig vast te houden.
2. Plaats de lm in de lmhouder of plaats de ingeraamde dia's in de diahouder.
3. Sluit de houder.
4. Steek de houder met de pijl voorop in A9.
a
Quick start guide
Film Scanner
FISC3650BK
For more information see the extended manual online: ned.is/FISC3650BK
Intended use
The product is exclusively intended for scanning negative lm or slide lm and converting it to digital
video.
The product func
tions exclusively in combination with the provided DIGITNOW! software.
Any modication of the product may have consequences for safety, warranty and proper functioning.
Main parts (image A)
1
SCAN button
2
Status indicator LED
3
Casing
4
Brush
5
Negative lm holder
6
Positive slide holder
7
CD-ROM with driver software
8
Mini USB port
9
Film holder slot
10
USB cable
Safety instructions
-
WARNING
• Only use the product as described in this manual.
• Do not use the product if a part is damaged or defective. Replace a damaged or defective device
immediately.
• Disconnect the product from the electrical outlet and other equipment if problems occur.
• Do not expose the product to water or moisture.
• Do not expose the product to heat, cold or direct sunlight.
• Do not use the provided brush to clean the lm.
Connecting the Film scanner
1. Connect A10 to a USB 2.0 port of your computer.
2. Connect the other end of A10 to A8.
4
The lm scanner is recognised automatically by the computer and is ready for use after a few moments.
3. Insert A7 into your computer.
4. Install the driver software.
5. Run the software. When prompted, enter the software serial number.
4
The serial number is printed on the CD-ROM sleeve.
Feed lm or slides into the scanner (Image B + C)
1. Open the lm or slide holder by gently pulling the latch in the middle while rmly holding the back of
the holder.
2. Place lm in the lm holder or place framed slides in the slides holder.
3. Close the holder.
4. Insert the holder arrow-rst into A9.
5. Push until the rst picture is centered.
Scanning (Image D)
1. In the DIGITNOW! software menu bar, click "Get Photo" and choose "From Film Scanner".
2. Choose the lm type (D2), resolution (D3) and the lm size (D4).
3. Click "Scan" (Windows) or "Take image" (Mac) (D7) or press A1 to scan the picture. It takes several
seconds to save your picture and show it on screen.
4. Adjustments (D5) can be made to the saturation, brightness, contrast and the level of each individual
RGB channel.
5. Click D6 to reset the adjustment levels to their defaults.
6. Push the holder further into A9 until you reach the next frame or slide.
7. Click D7.
8. Repeat for all remaining frames or slides.
Troubleshooting
Problem Possible cause Solution
No power No USB connection Make sure the USB cable is connected. A2
should light up.
Spots show up
on the picture
Dirt inside the lm scanner Use A4 to clean the inside of the lm scanner
Dirt on the lm Clean the lm with a specialised product. Do
not use the provided brush to clean the lm.
Specications
Product
Film Scanner
Article number
FISC3650BK
Dimensions (l x w x h)
82 x 86 x 152 mm
Weight
350 g
Interface
USB 2.0
Power supply
5 V DC / 1 A
Image sensor
5 MP colour CMOS
Lens
Fixed focus precision glass element
Exposure control
Automatic with manual ne tuning
Colour balance
Automatic with manual ne tuning
Quality
Standard & interpolated (1800 & 3600 dpi)
Colour depth
10 bits per colour channel
Scan method
Single pass
Light source
Backlight with 3 white LEDs
Software compatibility
Mac: OS X Snow Leopard 10.6 and above
Windows: 7 / 8 / 10 (32 / 64 bit)
c
Kurzanleitung
Filmscanner
FISC3650BK
Für weitere Informationen beachten Sie die erweiterte Anleitung online: ned.is/FISC3650BK
Bestimmungsgemäße Verwendung
Das Produkt ist allein zum Einscannen von Negativlmen oder Dias und deren Umwandlung in digitale
Videos gedacht.
Das Produkt funktioniert nur in Kombination mit der mitgelieferten DIGITNOW! Software.
Jegliche Modikation des Produkts kann Folgen für die Sicherheit, Garantie und ordnungsgemäße
Funktionalität haben.
Hauptb
estandteile (Abbildung A)
1
SCAN-Taste
2
Statusanzeige-LED
3
Gehäuse
4
Bürste
5
Negativlm-Halter
6
Positiv-Dia-Halter
7
CD-ROM mit Treibersoftware
8
Einschub für Mini-USB-Karte
9
Filmhalterungsschlitz
10
USB-Kabel
Sicherheitshinweise
-
WARNUNG
• Verwenden Sie das Produkt nur wie in dieser Anleitung beschrieben.
• Verwenden Sie das Produkt nicht, wenn ein Teil beschädigt ist oder es einen Mangel aufweist. Ersetzen
Sie ein beschädigtes oder defektes Gerät unverzüglich.
• Trennen Sie das Produkt vom Stromanschluss und anderer Ausrüstung, falls Probleme auftreten.
• Setzen Sie das Produkt keinem Wasser oder Feuchtigkeit aus.
• Setzen Sie das Produkt weder Hitze oder Kälte noch direkter Sonneneinstrahlung aus.
• Verwenden Sie die mitgelieferte Bürste nicht, um den Film zu reinigen.
Verbinden des Filmscanners
1. Verbinden Sie A10 mit einem USB 2.0-Anschluss an Ihrem Computer.
2. Verbinden Sie das andere Ende von A10 mit A8.
4
Der Filmscanner wird von dem Computer automatisch erkannt und kann nach wenigen Augenblicken
verwendet werden.
3. Legen Sie A7 in Ihren Computer ein.
4. Installieren Sie die Treibersoftware.
5. Starten Sie die Software. Wenn Sie dazu aufgefordert werden, geben Sie die Seriennummer ein.
4
Die Seriennummer ist auf der Hülle der CD-ROM aufgedruckt.
Einsetzen von Filmen oder Dias in den Scanner (Abbildung B + C)
1. Önen Sie den Film- oder Diahalter, indem Sie vorsichtig am Riegel in der Mitte ziehen und dabei die
Rückseite des Halters gut festhalten.
2. Platzieren Sie den Film im Filmhalter oder legen Sie gerahmte Dias in den Diahalter.
3. Schließen Sie den Halter.
4. Führen Sie den Halter mit dem Pfeil voran in A9.
5. Drücken Sie ihn hinein, bis das erste Bild zentriert ist.
Scannen (Abbildung D)
1. Klicken Sie im Menü der DIGITNOW! Software auf „Foto abrufen“ ("Get Photo“) und wählen Sie „Vom
Filmscanner“ ("From Film Scanner“).
2. Wählen Sie den Filmtyp (D2), Auösung (D3) und die Filmgröße (D4).
3. Klicken Sie auf „Scannen“ ("Scan“) (Windows) oder „Bild erfassen“ ("Take image“) (Mac) (D7) oder drücken
Sie A1, um das Bild zu scannen. Es dauert ein paar Sekunden, um Ihr Bild zu speichern und es auf dem
Bildschirm anzuzeigen.
4. Anpassungen (D5) können für Sättigung, Helligkeit, Kontrast und der Höhe jedes einzelnen RGB-Kanals
durchgeführt werden.
5. Klicken Sie auf D6, um die angepassten Werte auf die Standardwerte zurückzusetzen.
6. Drücken Sie den Halter weiter in A9 bis Sie das nächste Bild oder Dia sehen.
7. Klicken Sie auf D7.
8. Wiederholen Sie dies für alle anderen Bilder oder Dias.
Problemlösung
Problem Mögliche Ursache Lösung
Kein Strom Keine USB-Verbindung Stellen Sie sicher, dass das USB-Kabel
angeschlossen ist. A2 sollte leuchten.
Punkte im Bild Verschmutzung im Inneren des
Filmscanners
Verwenden Sie A4, um das Innere des
Filmscanners zu reinigen
Schmutz auf dem Film Reinigen Sie den Film mit einem
Spezialprodukt. Verwenden Sie die
mitgelieferte Bürste nicht, um den Film zu
reinigen.
1
2
3
4
6
5
7
10
8
9
A
B
Film Scanner
to digitise your photos
FISC3650BK
ned.is/FISC3650BK
Nedis BV
De Tweeling 28, 5215 MC ’s-Hertogenbosch – The Netherlands 08/19
1
2
3
4
5
7
6
D - Windows
1
7
2
3
4
6
5
D - Mac
C
FISC3650BK_MAN_COMP_0819_19448.indd 6 29-08-19 14:16