8
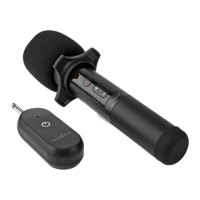
Switch on the receiver
1. Press and hold the on / o button A
w
for 2 seconds to
switch on the product.
2. The status indicator LED A
q
lights up blue to indicate
pairing is successful.
3. Connect the AUX plug A
9
to an audio output device.
4. Speak into the microphone A
1
to amplify your voice.
• A
q
ashes slowly to indicate pairing is unsuccessful.
• A
q
ashes fast to indicate that the battery is low.
• Tap and hold A
w
for 3 seconds to switch o the product.
Volume controlling
• Press the volume+ button A
4
to increase the volume
level.
• Press the volume– button A
5
to decrease the volume
level.
Channel controlling
1. Press the channel button A
3
to enter the channel control
mode.
2. "CH00" A
y
ashes to indicate channel control mode is
active. Press A
4
or A
5
to select a channel.
Lock / Unlock ID
Lock the microphone and receiver to avoid interference by
another microphone or receiver nearby.
• Press A
4
and A
5
for 3 seconds to lock or unlock the ID.
• A
2
ashes slowly to indicate that the ID will be unlocked.
• A
2
ashes fast to indicate that the ID will be locked.
Declaration of Conformity
We, Nedis B.V. declare as manufacturer that the product
MPWL200BK from our brand Nedis
®
, produced in China,
has been tested according to all relevant CE standards and
regulations and that all tests have been passed successfully.
This includes, but is not limited to the RED 2014/53/EU
regulation.
The complete Declaration of Conformity (and the safety
datasheet if applicable) can be found and downloaded via:
nedis.com/mpwl200bk#support
For additional information regarding the compliance, contact
the customer service:
Web: www.nedis.com