5
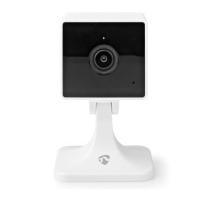
Main parts (image A)
1 Status indicator LED
2 Camera lens
3 Microphone
4 Reset button
5 MicroSD card slot
6 Speaker
7 Micro USB port
8 USB power adapter
9 Reset pin
q Micro USB cable
Safety instructions
-
WARNING
• Ensure you have fully read and understood the instructions in this document
before you install or use the product. Keep this document for future reference.
• Only use the product as described in this document.
• Do not use the product if a part is damaged or defective. Replace a damaged
or defective product immediately.
• Do not drop the product and avoid bumping.
• This product may only be serviced by a qualied technician for maintenance to
reduce the risk of electric shock.
• Do not expose the product to water or moisture.
• Unplug the product from the power source and other equipment if problems
occur.
• Do not unplug the product by pulling on the cable. Always grasp the plug and
pull.
• Consult the local laws and regulations for this product before installing and
using.
Preparing the security camera
4
Use an SD card with a minimum of 8 GB and a maximum of 128 GB.
1. Insert the new microSD card into the microSD card slot A
5
.
2. Connect the USB cable A
q
to the micro USB port A
7
.
3. Connect A
q
to the USB power adapter.
4. Connect the USB power adapter to a power outlet to charge the camera.
The product switches on automatically.