Produktów zasilanych elektrycznie nie należy
wyrzucać wraz z domowymi odpadkami, lecz oddać
je do utylizacji w odpowiednich zakładach. Informacji
na temat utylizacji udzieli sprzedawca produktu lub
miejscowe władze. Zużyty sprzęt elektryczny i
elektroniczny zawiera substancje nieobojętne dla
środowiska naturalnego. Sprzęt nie poddany
recyclingowi stanowi potencjalne zagrożenie dla
środowiska i zdrowia ludzi.
GWARANCJA I SERWIS
Warunki gwarancji oraz opis postępowania w przypadku reklamacji zawarte
są w załączonej Karcie Gwarancyjnej.
Serwis Centralny GTX Service Sp. z o.o. Sp.k.
ul. Pograniczna 2/4 tel. +48 22 364 53 50
02-285 Warszawa e-mail bok@gtxservice.com
Sieć Punktów Serwisowych do napraw gwarancyjnych i pogwarancyjnych
dostępna na platformie internetowej gtxservice.pl
Zeskanuj QR kod i wejdź na gtxservice.pl
EN
Digital Level
Original User Manual
72-300
CAUTION! BEFORE OPERATING THE DEVICE, READ THIS USER
MANUAL CAREFULLY AND KEEP IT FOR REFERENCE.
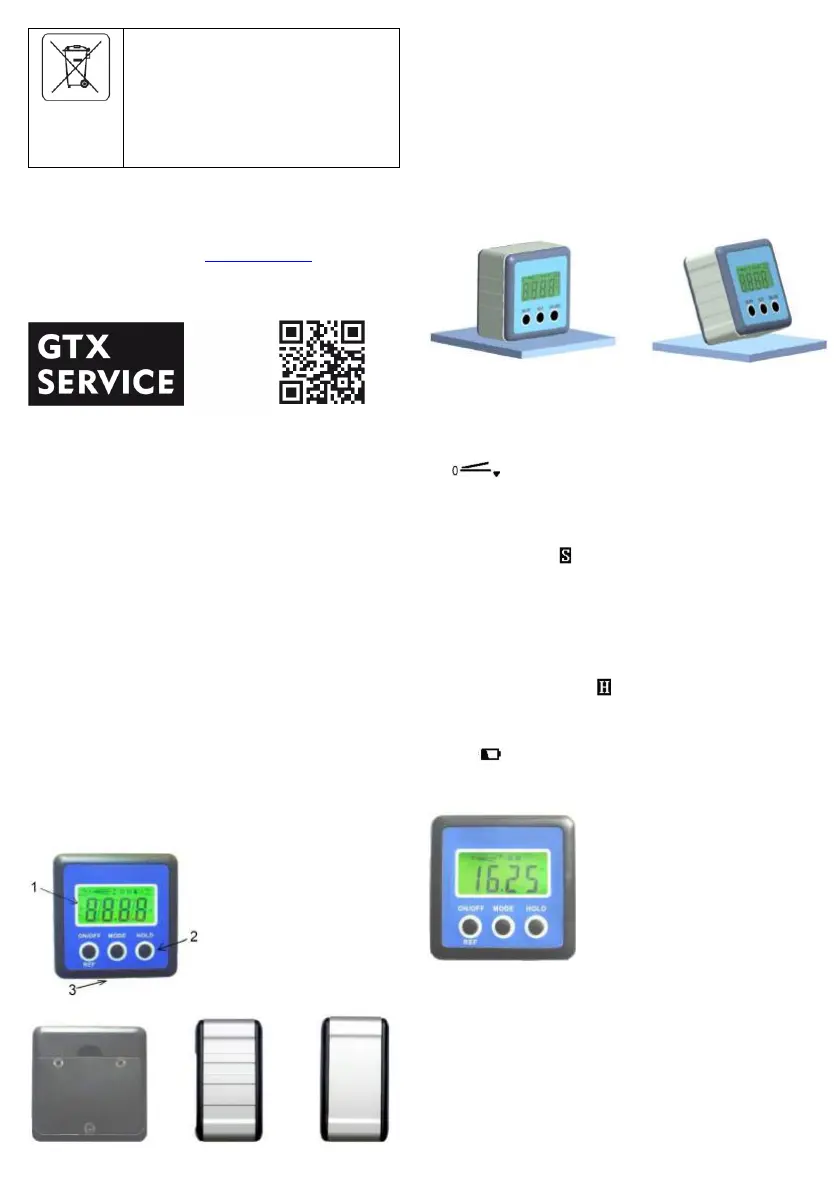
DESCRIPTION
This digital level is a highly versatile leveling tool designed for fast,
easy operation.
• Measuring range of digital display: 4×90°
• Resolution of Digital Display: ±0.01°
• Precision of Digital Display: ±0.1° at 0° and 90°; ±0.2° at other angles
• Unit of measurement (°degrees / % / mm/m / IN/FT)
• Backlight
• Hold function
• 0° calibration
• Powerful built-in magnets on the base secures the attachment to iron
surface
• Battery type: 2x1.5V “AAA” batteries
• Working temperature: 0°C ~ 40°C
• Storage temperature: -10°C ~ 50°C
• Dimensions: 58 * 58 * 32 mm
• Weight: About 71g (Not containing batteries)
1. Display, 2. Keyboard, 3. Measuring surface
Operation instructions
1. Battery replacement
Remove the rear battery cover of the receiver by unscrewing the battery
cover retaining screw. The cover will now lift off.
Open the battery case. Put two “AAA” batteries and close the case.
Your electronic level is now ready to use.
2. ON/OFF
Press ON/OFF button to turn the equipment on. Press and hold ON/OFF
button to turn off.
After about 3 minutes not using the equipment, it will
switch off automatically.
3. Level measure
Turn on the equipment and put it to the level position for measuring.
Correct measuring Wrong measuring
4. Unit of measurement selection (°degrees / % / mm/m / IN/FT)
After switching on, the screen always shows the actual slope in degree. By
pressing the MODE button you can change the angles unit display units
from degrees (°) to percent (%), to (mm/m) to pitch (in/ft). Pitch readings are
in 1/8-inch/feet increments.
The icon indicates the current angle’s position, either up or down
away from the horizontal or vertical position.
5. Angle measure
If the equipment isn’t in level, it will display a value on the screen. Press REF
button to set current angle to be zero, entering into the relative angle
measurement mode. The icon will show on the screen. Press REF button
again to exit the function.
6. Backlight function
Any button is pressed or the screen reading is changed, backlight of the
screen will be turned on automatically. The backlight will turn off
automatically after 20 seconds of inactivity.
7. Hold
If you need to move the device to read the display, press the HOLD button
to freeze the measurement. The icon will display. Press HOLD again to
return to measuring mode.
8. Low battery indicator
Recommend to replace two new “AAA” batteries, when the low battery
indicator “ ” shows on the screen.
9. User’s calibration
a. Turn off the equipment. Put the equipment on a flat and smooth solid
surface (see the following figure).
b. In the shutdown status, press and hold HOLD button first, then press
ON/OFF button, until the LCD display reads “CAL”.
c. Keep the equipment still for a period of time and then press the HOLD
button, display reads “CAL1”.
d. In the same location, rotate the equipment 180°(see the following figure),
then press the HOLD button, display reads “CAL2”. After the “CAL2”
disappears, the calibration is completed and then the LCD will show the
current angle in high-accuracy-display.
 Loading...