Overview ..................................................................................................1
Controls and display ...............................................................................1
Settings .....................................................................................................1
Initial power up ..................................................................................................1
Pairing procedure ..............................................................................................2
Operating ................................................................................................. 1
Temperatures setting .........................................................................................1
Factory settings ................................................................................................... 2
Troubleshooting .......................................................................................2
Technical specications ......................................................................... 2
What is a room thermostat......................................................................2
RTE0RFa NEO ENG FP V02 29 05 2015
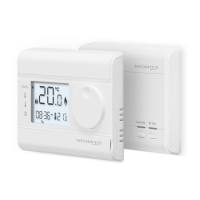
RT0 RF
WIRELESS ROOM THERMOSTAT AND
RECEIVER
1
OPERATING INSTRUCTIONS
1- To start: insert the two AA bat-
teries provided into the battery
compartment.
Oncebatteriesarettedall
symbolswillbedisplayedon
the LCD screen as shown for
two seconds.
2- After 2 seconds, the LCD will
show:
- The ambient temperature (°C)
solid.
- The icon
is solid when the
heating is turned ON.
- The setpoint temperature (°C)
solid.
-RFiconashes.
Note: Whenthebatteriesmustbechanged,alowbatterylevelindicator
appears on the device.
Remembertotakeusedbatteriestobatterycollectionpointssotheycan
berecycled.
• Thermostat
ThankyouforpurchasingourRT0RF,wireless
digitalroomthermostat.
It is by listening to your requirements we
have created and designed our products
tobeeasytooperateandinstall.
It is this ease of operation that is intended
tomakeyourlifeeasierandhelpyousave
energy and money.
OVERVIEW
CONTROLS AND DISPLAY
INITIAL POWER UP
SETTINGS
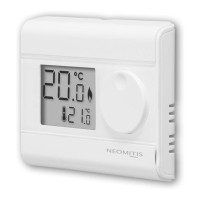
• LCD Display
C
C
Measured room
temperature
Pairing icon
Low battery
icon
Frost protection
icon
Callforheat
icon
Temperature
setpoint
C
C
Batteries
compartment
Rotarydial
Reset
button
LCDdisplay
RF test button
PAIRING PROCEDURE
The thermostat and the receiver are not bonded together at the facto-
ry.
Tobondthetransmitterandthereceivertogether,proceedasbelow:
2- Within1minute,pressandhold
for 5 seconds the RF test button
on the thermostat. Pairing icon
isashing.
1- Pressandholdfor5 seconds
the RF test button on the
receiver.RFtestgreenlightis
blinking.
5 sec
Override RF Test
5 sec