NOBØ ELECTRO AS
3.9.2 PROGRAMMING THE ECONOMY PERIODS
Use the down button ”11” to enter the required economy
periods. The timer will advance in steps of half-an-hour.
The comfort period units in the programme will be can-
celled according to the timer settings. When the down
button ”11” is released, the next comfort period unit will
fl ash.
3.9.3 PROGRAMMING THE COMFORT PERIODS
Use the up button ”12” to enter the required comfort
periods. The timer will advance in steps of half-an-hour.
When the up button ”12” is released, the corresponding
comfort period unit in the programme sequence will
fl ash.
3.9.4 PROGRAMMING A 24-HOUR DAY
Complete the programming for the whole 24-hour day
with economy and comfort periods as explained in sec-
tions 3.9.2 and 3.9.3. When the full 24 hours have been
pro-grammed, the timer will display 00:00 (midnight).
The unit is now ready for programming the next 24-hour
day. Programming can be started over again without re-
entering all the settings for the day, by pressing the up
and down buttons ”11” and ”12” at the same time.
3.9.5 COPYING THE 24-HOUR PROGRAMME
If you wish to use the same 24-hour programme for
several days in the week, this can be simplifi ed by copy-
ing the programme.
Enter or fi nd the 24-hour programme you want to copy.
Press the ”Copy” button ”10”. The word ”copy” will be shown. The ”day”
fl ashes.
Display the day onto which you want to copy the programme by pressing
the timer button ”9”. The day fl ashes.
Complete the operation by pressing the copy button ”10”. The word ’Copy’
will disappear and the day will stop fl ashing. Repeat this operation to
copy the programme onto another day. Press the copy button ”10”. The
word ’Copy’ is displayed and the day fl ashes.
3.9.6 TERMINATING THE WEEK’S PROGRAMMING
When the entire week has been programmed (in accordance with sec-
tions 3.9.4 and 3.9.5), terminate the operation by pressing the program-
ming button ”7” again. The control panel will now show the correct day,
programme type UP, the temperature with corresponding economy or
comfort symbol together with the red or green light, and the programme
sequence for the present day. The programme is now active and is
running in ’real time’. The programme information is stored and will not
be lost when a factory-set programme is used.
3.10 ALTERING THE USER PROGRAMME FOR THE WEEK Display the UP
programme type if another programme is operating. See section 3.8 for
selection of programme.
1. Press the programming button ”7” to open the programme.
Make the required alterations as described in sections 3.9.1 -3.9.6 about
program-ming. Parts of a 24-hour programme cannot be altered, a
complete new 24-hour programme has to be entered.
3.11 CHANGING BETWEEN SUMMER TIME AND WINTER TIME
Press the timer button twice so that the fl ashing hour display can be seen.
Press the up button ”12” to advance the timer clock one hour for changing
over to summertime.
Press the down button ”11” to set the timer clock back one hour for
changing over to winter time. Terminate the operation by again pressing
the timer button ”9” twice so that the current programme is displayed on
the control panel.
3.12 ADJUSTING THE TEMPERATURE WHILE A PROGRAMME IS RUNNING
The position of the heater in the room may affect the temperature sensor.
This can make the actual temperature higher or lower than the setting.
This can be compensated for by adjusting the temperature setting. For
example, if the comfort temperature is set at 22°C but the actual room
temperature is 24°C, compensate for this by lowering the setting to 20°C.
Similarly increase the temperature setting if the actual room temperature
is lower than the setting. NB! Make these adjustments when the tempera-
ture is stable.
Press temperature button ”5”. The temperature setting and comfort
symbol fl ash.
Use the up and down buttons ”11” and ”12” to adjust the comfort tempera-
ture as described above.
Press the temperature button ”5” again so that the economy symbol is
displayed.
Adjust the economy temperature in the same way.
Terminate by pressing the temperature button again. The unit will revert to
the last se-lected programme..
3.13 LOCKING THE CONTROL PANEL FUNCTIONS
3.131 ELECTRONIC LOCKING
Press the programme selector button ”6”. The programme type will fl ash.
Press the timer button ”9” and the programming button ”7” at the same
time until the lock symbol, a padlock, is displayed. All the control functions
are now locked, and the buttons will no longer operate. Locking is cancel-
led by repeating the steps described above until the lock symbol disap-
pears.
3.13.2 MECHANICAL LOCKING
Lift up the cover of the control panel and remove the screw from under it.
Replace the cover and screw it down with this same screw.
3.14 BACK-UP IN THE EVENT OF A MAINS POWER FAILURE All the values for
the timer, temperatures, programme creating and programme selection
that have been set by the user, are saved for at least 24 hours after the
start of a power failure.
4. Concealed functions
The heater is fi tted with a temperature releaser which cuts out when
the heater is cove-red. Heaters with automatic reset will switch back on
automaticly when the cause of the cut-out is removed.
Heaters with manual reset in are delivered in two different versions. After
the cause of the cut-out is removed, the heater can be reset in one of
two ways:
A: Push one (or two) button(s) on the rear side of the heater B: Switch of
the heater, wait approx. 5 minutes, then switch on the heater. To fi nd
which kind of releaser your heater is fi tted with, see the rating plate on the
back of the heater (Fig. 2- L2):
Heater model ### ###-### #M# = Manual resetting
Heater model ### ###-### #A# = Automatic resetting
5. User tips
Cleaning behind the heater
It is very easy to pull the heater forwards in order to clean behind it. This is
done by pressing down the two top catches ”P” (fi g. 3) on the back of the
heater, which secure it to the wall bracket.
After cleaning, the heater must be fi xed in the normal position.
6. Service
When you require service, contact your local dealer or NOBO ELECTRO AS.
7. Warning
Heaters must not be covered as this can cause afi re.
8. In the event of a claim, your rights are protected by local sales
legislation.
AUSTRALIA:
SUPERVISION OF CHILDREN.
This appliance is not intended for use by young children or infi rm persons
without supervision.
Young children should be supervised to ensure that they do not play with
the appliance.
REPLACEMENT OF SUPPLY CORD.
If the supply cord is damaged it must be replaced by an Electro Pty Ltd.
service agent or similar qualifi ed person in order to prevent a hazard.
WWW - R80 UDF
Page 2 of 2
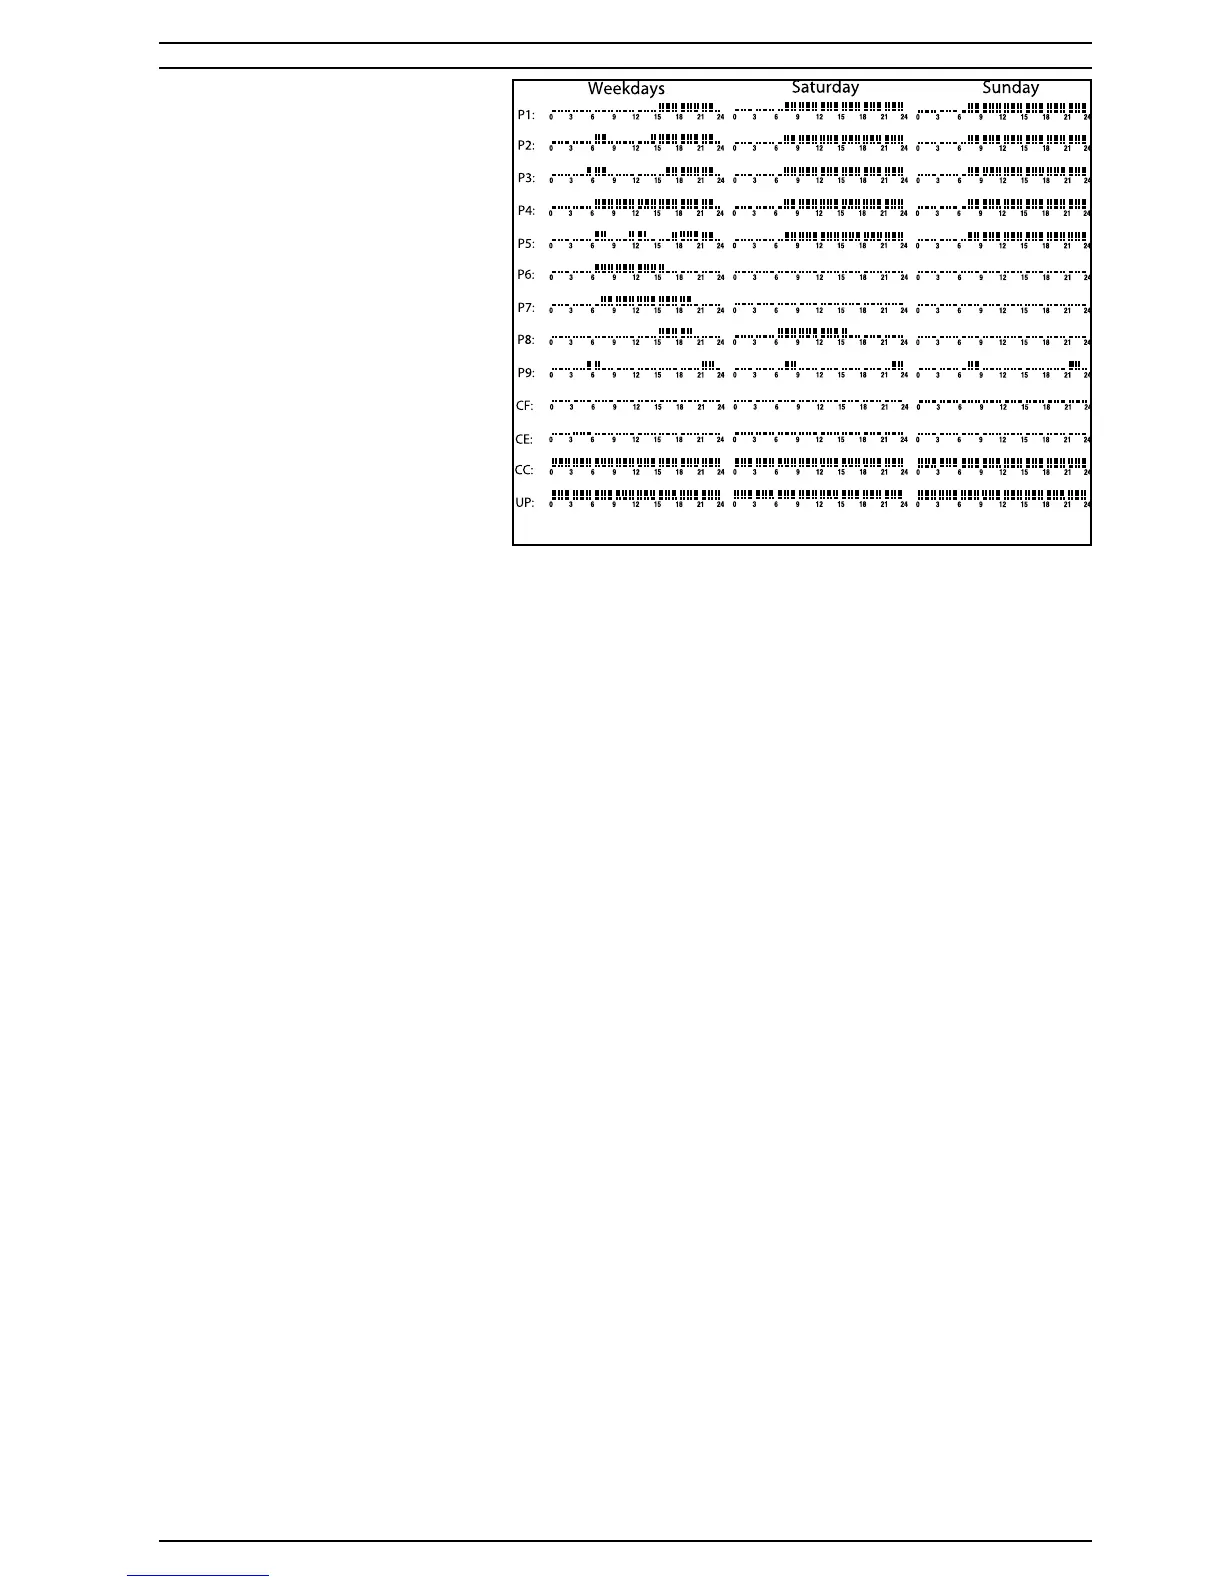
Fig. 4
 Loading...