Step 3. Install the SIM Card.Step 3. Install the SIM Card.
Set Up Instructions Guide
Take a moment to look through your Nokia 9300 device sales
package. Please make sure the following components are
included:
Thank you for purchasing the Nokia 9300 device!
START
HERE!
To get started, we recommend the following:
• Carefully follow the step-by-step instructions below to set up
your Nokia 9300 device.
• Review the Getting Started CD-ROM for:
a. Nokia 9300 User Guide containing more detailed
information and safety instructions
b. Nokia 9300 Shortcuts Guide
c. User Guide for Nokia PC Suite
and more…
Caution! DO NOT connect the data cable to a computer until you
have been instructed to do so after installing Nokia PC Suite in the steps
below. Connecting the data cable at the wrong time may prevent you
from ever properly synchronizing your Nokia device.
SIM Card
A SIM card is needed to enable your Nokia 9300
device to access your wireless service. A SIM card
may also be used to store information,
such as contacts.
Install the SIM Card
1. With the back of the device facing you,
hold down the cover release button (Fig. 3.1a)
and slide the battery cover off in
the direction shown (Fig. 3.1b).
2. Remove the battery.
3. With the cover off, insert an active
Cingular-branded SIM card with the metal
contacts facing down and the beveled edge
pointing towards the MMC slot (Fig. 3.2).
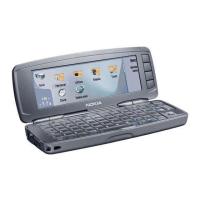
Get familiar with your new Nokia 9300 device.
Power key (Press this button to access the wireless network,
after the inside display is fully powered on.)
Earpiece
Phone display
Right and left selection keys
Scroll key
[up] [down] View your contacts
[left] Compose a message
[right] View your inbox
Call key
End key
Infrared
Back cover
Microphone
Charger connector
PopPort
TM
connector
TIP! To lock your external keypad, press the center of the scroll key
then, press (
*
). To unlock, press the center of the scroll key and
press (
*
) again.
Step 1. Take inventory.Step 1. Take inventory.
Step 2. Check it out.Step 2. Check it out.
Fig. 4.3
9242553
Printed in U.S.A.
Fig. 4.1
All screen images are simulated.
Step 4. Insert and charge the battery.Step 4. Insert and charge the battery.
A fully charged battery provides up to 7 hours of talk time and up to 200 hours
of standby time* on the Nokia 9300 device. After you have inserted the SIM card
(see above), follow the steps below.
1. Insert the battery by aligning the contacts of the battery with the
corresponding connectors on the battery compartment (Fig. 4.1).
2. Replace the battery cover (Fig. 4.2).
3. Charge the battery by connecting the Nokia charger into a standard
AC wall outlet, and connect the charger cable to the bottom of
the Nokia 9300 device (Fig. 4.3).
The battery charge indicator scrolls on both displays while charging. The
indicator stops scrolling when the charge is complete.
You can complete the set up process below and continue to use your Nokia 9300 You can complete the set up process below and continue to use your Nokia 9300
device while charging is in progress.device while charging is in progress.
After installing the battery, open your Nokia 9300 device. The inside display will
take a moment to power on. The inside display powers on automatically when a
battery is inserted. You will be instructed to turn on the phone (outside) display
later.
Caution! Do not press the power key on the phone (outside) display
until the inside display has fully powered on and the Desk screen is visible
(Fig.5.3). You will be instructed later in this guide when to turn on
the phone (outside) display.
* Talk and standby times are estimates and vary based on many factors. For complete battery
information for this phone and a list of major factors impacting charge times, please refer to
www.nokiausa.com or the Nokia 9300 User guide.
a.
b.
b.
Fig. 3.1
Fig. 4.2
a.
b.
b.
Nokia 9300 device
Nokia Battery BP-6M
Nokia Travel Charger
ACP-12U
Nokia Headset HS-5*
Nokia Data Cable*
Getting Started CD-ROM