Assemblyrequirestwopersons.SetthetreadmHUinaclearedareaandremoveaHpackingmatedaUs,Donot
disposeofthe packingmaterialsuntil assemMyis completed.
Note:TheundersideofthetreadmHUwaUkingbeUtiscoatedwithhigh-performanceUubdcant,Duringshipping,a
smallamountofDbdcantmaybetransferredtothetopofthewaUkingbeUtortheshippingcarton,Thisisa normaU
conditionanddoesnotaffecttreadmHUperformance,ifthereisUubdcantontopofthewaUMngbeUt,simpUywipeoff
theUubricantwithasoftclothanda mild,non-abrasivecleaner,
Assemblyrequirestheincludedallenwrench _ andyourownphillipsscrewdriver_,
wrench_, andrubbermallet_-_. Forhetpidentifyingtheassemblyhard-
adjustable
ware,seethedrawingsbelow.Thenumberinparenthesesbeloweachdrawingisthekeynumberofthepart,
fromthePARTLISTonpages30and31,Thenumberfollowingtheparenthesesisthequantityneededforassem°
biy,Note:Somesmallpartsmayhavebeenpre-assemb[ed,if a part is not in the parts bag, check to see if
it has been pre-assembled.
1" Tek Screw (82)-4
8© 1@
Nut (106)-4 Star Washer (67)-4
Washer (96)-8
Plastic Spacer
(it5)-4
Extension Leg Bolt (87)-4 Console Bolt (72)-4
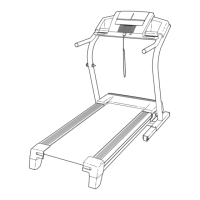
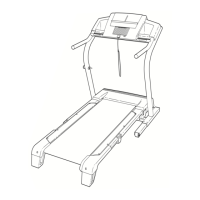
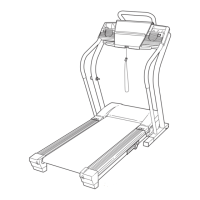
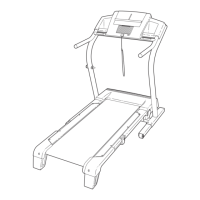
With the help of a second person, carefully raise the
Uprights (85) to the vertical position, Remove the band
securing the Upright Wire Harness (73) to the right
Upright, Have a second person hold the console assembly
near the right Upright,
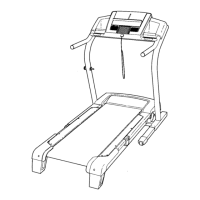
Connect the Upright Wire Harness (73) to the wires extend-
ing from the console assembly, Make sure to eonnect the
connectors properJy (see the inset drawing}. The con-
nectors should slide together easily and snap into
pJace. If the connectors do not slide together easily and
snap into place, turn one connector and try again, IF THE
CONNECTORS ARE NOT CONNECTED PROPERLY,
THE CONSOLE MAY BE DAMAGED WHEN THE
POWER IS TURNED ON. Insert the connectors into the
right Upright (85),
Console
Assembl,
6
 Loading...