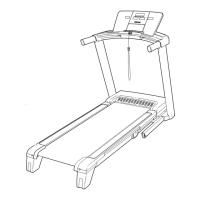
16
19. Attach the Console Cover (105) with two #8 x
3/4" Screws (2).
Tighten the six 3/8" x 4" Screws (7). Then, press
the Base Covers (82, 83) into place.
19
7
2
83
82
7
105
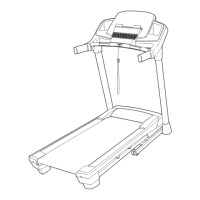
20. Note: If assembled on a smooth surface, the
treadmill may roll forward during this step.
Raise the Frame (56) to the upright position.
Have a second person hold the Frame until
step 22 is completed.
Remove the two 5/16" x 3/4" Screws (4) from the
Latch Crossbar (38).
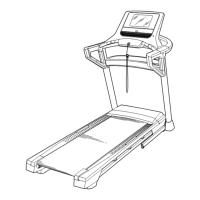
Orient the Latch Crossbar (38) as shown. Make
sure that the “This side toward belt” sticker
(J) is facing the treadmill. Attach the Latch
Crossbar to the brackets on the Frame (56) with
the two 5/16" x 3/4" Screws (4) that you just
removed and two 5/16" Star Washers (11).
56
38
J
11
11
4
4
Brackets
20
 Loading...