Do you have a question about the Novasina LabMaster-aw and is the answer not in the manual?
Initial steps and guidance for users beginning to operate the instrument.
Crucial information on intended use, safety warnings, and operational precautions.
Introduction to the LabMASTER-aw system's capabilities and technology.
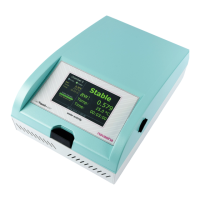
Explanation of how the LabMASTER-aw and LabPARTNER-aw units connect and communicate.
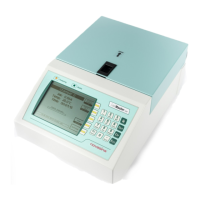
Detailed identification of the physical parts and interfaces of the instrument.
List of items included in the standard packages for different instrument versions.
Description of optional accessories that can enhance the instrument's features.
Instructions for unpacking, checking, and installing the instrument correctly.
Steps for connecting power, switching on the instrument, and initial readiness checks.
Procedure for connecting and configuring additional LabPARTNER-aw units to the system.
Guidance on basic startup, measurements, display modes, temperature settings, and stability parameters.
Overview of the key features and user elements of the LabMASTER-aw system.
Instructions on system startup, operation modes, and managing measurements.
Detailed guide to configuring chamber, sample database, printer, and general system settings.
Step-by-step guide for conducting water activity measurements on samples.
Critical information on sensor care, handling, and important notes for accurate measurements.
Explains the function principle of stability observation for aw and temperature.
Guide to optimizing stability observation time factors for accurate measurements.
Instructions for recording desorption and adsorption curves for products.
Detailed procedure for setting up and recording sorption isotherm curves.
Step-by-step guide for recording desorption curves.
Information on the initial factory calibration and delivery status of the instrument.
Procedure to set a password for the intelligent sensor unit for security.
How to view stored calibration points and their associated details.
Detailed steps for calibrating the instrument using SAL-T humidity standards.
Function to clear all calibration points for a full recalibration.
Information on connecting the instrument to a PC via RS-232 or USB.
Guidelines for safely cleaning the instrument housing and connectors.
Procedure and recommendations for periodic recalibration of the humidity sensor.
Information on the use and replacement of protective filters for sensor longevity.
Step-by-step instructions for replacing the CM-2 sensor unit.
Guide on how to safely replace the instrument's main fuse.
Addresses frequent problems and provides solutions for instrument operation.
Lists common error messages and the necessary actions to resolve them.
| Measurement Range (RH) | 0 to 100% RH |
|---|---|
| Measurement Range (aw) | 0.030 to 1.000 aw |
| Temperature Range | 0 to 50°C |
| Accuracy (aw) | ±0.003 aw |
| Resolution (aw) | 0.001 aw |
| Resolution (RH) | 0.1% RH |
| Resolution (Temperature) | 0.1°C |
| Power Supply | 100-240 V AC, 50/60 Hz |
| Display | LCD |
| Interface | USB |
| Accuracy (RH) | ±0.8 %RH (5...95 %RH / 23 °C) |
| Repeatability | ±0.002 aw |