NL
6 7
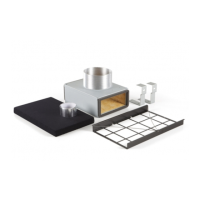
Schroef de recirculatiebox H vast aan montageplaat
M (4x 906-151).
Zorg dat de bevestigingslip van H zich altijd
aan de buitenzijde bevindt!
Na het monteren van de recirculatiebox kan de
wandschouw gemonteerd worden. Gebruik voor
het monteren van de dampkap en de schouwen
de montagematerialen die bij de schouwkap zijn
geleverd.
8
De boormal bevindt zich in de montage instructie
van de wandschouw. Plaats deze boormal op het
kruispunt van de aslijn A en de waterpaslijn B en
teken de 2 gaten af op de waterpaslijn. Boor met
een 8mm boor de gaten in de muur.
9
Gebruik de grote pluggen (906055) en draai de
bijbehorende grote schroeven (906143) gedeeltelijk
in de muur. Let op, de schroeven nog niet helemaal
indraaien!
Hang de wandschouwkap met de beugel bovenop
het motorhuis over deze schroeven.
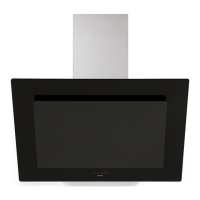
10 11
Positioneer de schouwkap C waterpas door de
schroeven op de schouwkap zodanig te draaien
zodat de schouwkap waterpas komt te hangen. Ook
de hoogte van de schouwkap kan nog iets gesteld
worden door de schroeven in en uit te draaien.
Let op, de schroeven in de muur nog niet vast
draaien!
DE
6 7
Schrauben Sie die Umluftbox H an der Montageplatte
M (4x 906-151) fest.
Sorgen Sie dafür, dass sich die Befesti-
gungskante von H immer auf der Außenseite
befindet!
Nach der Montage der Umluftbox kann die Wandhaube
montiert werden. Verwenden Sie für die Montage der
Dunstabzugshaube und der Schächte das mit der
Dunstabzugshaube mitgelieferte Montagematerial.
8
Die Bohrschablone befindet sich in der Montage-
anleitung für die Dunstabzugshaube. Halten Sie die
Bohrschablone auf den Schnittpunkt der Achsenlinie
A und der horizontalen Linie B und zeichnen Sie
die beiden Löcher auf der horizontalen Linie an.
Bohren Sie die Löcher mit einem 8-mm-Bohrer in
die Wand.
9
Verwenden Sie die großen Dübel (906055) und
drehen Sie die zugehörigen großen Schrauben
(906143) teilweise in die Wand. Achten Sie darauf,
die Schrauben noch nicht vollständig festzudrehen!
Hängen Sie Wandhaube mit dem Bügel oben auf
dem Motorgehäuse über diese Schrauben.
10 11
Positionieren Sie die Wandhaube C horizontal,
indem Sie die Schrauben an der Wandhaube so
verdrehen, dass die Wandhaube horizontal hängt.
Auch die Höhe der Wandhaube kann etwas korrigiert
werden, indem man die Schrauben hinein- oder
herausdreht.
Achten Sie darauf, die Schrauben in der Mau-
er noch nicht festzudrehen.
FR
6 7
Vissez la boîte de recirculation H contre la plaque
de montage M (4x 906-151).
Assurez-vous que la patte de fixation de H se
trouve toujours du côté extérieur !
Après avoir monté la boîte de recirculation, vous
pouvez monter la cheminée murale. Pour le montage
de la hotte et des gaines, utilisez le matériel de
montage fourni avec la hotte à cheminée.
8
Le gabarit de perçage se trouve dans la notice de
montage de la cheminée murale. Placez ce gabarit
de perçage à l’intersection de l’axe A et de la ligne
horizontale B et marquez les 2 trous sur la ligne
horizontale. Percez les trous dans le mur à l’aide
d’une mèche de 8 mm.
9
Utilisez les grandes chevilles (906055) et vissez les
grandes vis correspondantes (906143) partiellement
dans le mur. Attention ! Ne serrez pas les vis à fond!
Accrocher la hotte à cheminée murale avec l’étrier
en dessus du boîtier du moteur par-dessus ces vis.
10 11
Mettez la hotte à cheminée C en position horizontale
en tournant les vis sur la hotte de manière ce que la
hotte à cheminée se trouve accrochée en position
parfaitement horizontale. De même, vous pouvez
ajuster encore légèrement la hauteur de la hotte à
cheminée en serrant et en desserrant les vis.
Ne serrez pas encore les vis à fond dans le
mur !
EN
6 7
Screw the recirculation box H onto the mounting
plate M (4x 906-151).
Make sure that the attachment lip of H is
always on the outside!
After having mounted the recirculation box, the
wall-mounted chimney hood can be mounted. Use
the mounted materials supplied with the chimney
hood for mounting the hood and the shafts.
8
The drilling jig is to be found in the mounting
instructions of the wall-mounted hood. Place this
drilling jig on the crossing point of the axis A and
the level line B and draw the 2 holes on the level
line. Drill holes in the wall using an 8 mm drill.
9
Use the large plugs (906055) and partly screw the
accompanying large screws (906143) into the wall.
Attention: do not fully screw in the screws yet!
Hang the wall-mounted chimney hood with the
bracket on top of the motor housing over these
screws.
10 11
Level the chimney hood C by turning the screws
on the chimney hood such, that the chimney hood
is hanging level. The height of the chimney hood
can slightly be adjusted by screwing the screws in
and out.
Do not tighten the screws in the wall yet!
9
 Loading...