14 15
(4) Auto Cleaning (Cleaning of Irrigation Tube ( )
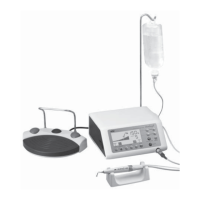
1) Remove the bottle from the Bottle Base by pulling straight.
2) Fill the spare Bottle over half full with clear water.
After each use, remove all the disinfectant solution and perform "Auto Cleaning" procedure.
If you have not cleaned the system, there is a good chance that dried disinfectant is stuck in the tubing or some of
the metal parts may be rusted.
CAUTION
Use only distilled water for cleaning.
CAUTION
Fig. 40 Fig. 41
Water Selection Mode Key
Fig. 39
4) Turn the Bottle Water Adjustment Knob to maximum. (Fig. 40)
5) Use the Water Selection Mode Key to select Bottle Water. (The Bottle Lamp will light.) (Fig. 41)
3) Install the cap on the Bottle, check the Joint Hole
and surrounding area and clean as needed. After
cleaning install the Bottle Joint into the Joint Hole
and press down until it click into place. (Fig. 39)
Before installing the Bottle, make sure the Air Hole
and surrounding area are clean and free of debris.
CAUTION
Air HoleAir Hole
Joint Hole
Joint
Bottle Water
Adjustment Knob
Bottle Water
Adjustment Knob
To maximumTo maximum
Bottle Lamp
Use of BottleUse of Bottle
7) When the Auto Cleaning sequence completes the Control Unit will revert to the settings prior to cleaning.
Remove the Bottle from the Bottle Base by pulling straight.
After cleaning thoroughly clean and dry both Bottles prior to use.
Fig. 42
Fig. 43
Cover Lamp
Socket
View from A
Lamp Pin Lamp
A
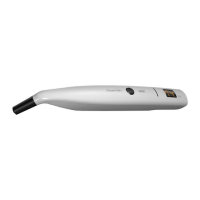
(6) Changing Lamp (Varios 750 LUX)
Refer to 5. Mounting and Removing the Handpiece. Disassemble the handpiece from the Handpiece Cord. Remove the cover.
Use a prevision screw driver and push lamp out. Align the lamp pins of a new lamp with the holes, and push the lamp into.
(Fig. 43) Align the mark on the cover with the same on the Handpiece Cord. Push the cover to the cord unit it clicks. (Fig. 44)
Assemble the handpiece and the Handpiece Cord.
Optional Lamp : VA Bulb Set (A Set consist of 3 pieces) Order No. Y900107
(5) Cleaning of Donut-Shape Light (Varios750LUX)
Wipe the debris off the end of the Optic Fibers at the
handpiece with alcohol soaked cotton swab.(Fig. 42)
Following method is also available for cleaning. (Manual Cleaning)
1) Remove the Bottle from the Bottle Base.
2) Open the cap of the Bottle and fill the with solution.
3) Close the cap firmly and insert the joint part on the Bottle Cap into Joint Hole on the Bottle Base until it clicks.
(Make sure air hole located on the Bottle Cap is not closed with dirt.)
4) Operate the Control Unit about 20 seconds with water supply at maximum setting.
Do not use any sharp pointed tools to clean the
Optic Fiber End. In case the light becomes dim,
contact dealer.
CAUTION
End Face Optic Fiber
Cotton Swab
6)
Press and hold the Water Selection Mode Key for 2 seconds. The Control Unit will emit a beep, all the lamps except the
Bottle Lamp will shut off and the auto cleaning sequence will start. The auto cleaning sequence takes about 30 seconds.
After the auto cleaning sequence commences pushing the water Selection Mode Key will stop the sequence.
If you press the Mode Selection Key and the Power Key during auto cleaning, the Tip will vibrate. Make sure power
setting does not exceed the maximum recommended power for the Tip.
CAUTION
Setting the Bottle Water Adjustment Knob at less than maximum during cleaning, Result in incomplete cleaning in
the 30 seconds cycle.
NOTICE
Fig. 44
Alignment Mark
Cover Handpiece Cord
Alignment Mark
· Make sure that the bulb is sufficient cooled,
when it is replaced.
· Do not touch glass part of new lamp.
· Care needs to be execised when mounting a
new lamp to avoid the O-ring off from the
groove or being twisted.
CAUTION

 Loading...