8
MAINTENANCE
Never clean the machine and its components with solvents, flammable or
toxic liquids. Us only a damp cloth making sure you have unplugged the
compressor from the current outlet.
After approx. 2 hours of use, the condensate that has formed must be
drained from the receiver. First of all, vent all the air using the accessory
connected, as described above. Back off vent valve
7 located underneath
the compressor (switched off beforehand) by two turns, taking care to
maintain the compressor in a vertical position. After draining all the water,
draw up the valve tightly.
Warning: if the water that condenses is not drained, it may corrode the
receiver, reducing its capacity and impairing safety.
As it is a contaminating product, condensate must be DISPOSED of
in accordance with laws on protection of the environment and current
legislation.
The compressor must be disposed in conformity with the methods
provided for by local regulations.
INFLATION GUN
4
For inflating tires, rubber dinghies, air beds, footballs and other objects
PRESSURE LEVEL: 1 - 4
Warning: Do not direct the jet of compressed air towards people or
animals.
Never inflate the objects above the recommended inflation pressure as
this may be dangerous and cause damage and/or injuries.
The gun is not suitable for inflating car tires. For this operation, use of the
approved inflation gun that can be purchased separately is recommended.
USE
1) Connect the inflation gun 11 to the compressor as explained in chapter
“2 - CONNECTING THE ACCESSORIES TO THE COMPRESSOR”
2) When inflating tires or certain bicycle tires, it is not necessary to insert
any of the adapters (fig. 7). Press tab
E (fig. 5) and connect the hose
of the gun to the tire pushing the fitting on the valve and then releasing
the tab.
3) Regulate working pressure to the value indicated for this accessory (see
table 1)
4) Inflate the tire pressing lever F (fig. 6). Release the lever and read the
pressure reached on gauge
G of the gun. Repeat the operation until the
pressure required is obtained (do not exceed the recommended inflation
pressure indicated in table 1). In the case of over-inflation, press button
H to reduce inflation pressure
Warning: do not hold down the lever too long before checking the
pressure reached as this could cause explosion of the object being
inflated.
5) When inflating footballs, rubber dinghies, certain bicycle tires and
children’s inflatable swimming-pools, you may have to use a suitable
adapter (fig. 7)
Adapter 8 is used for footballs
Adapter 9 is used for rubber dinghies, air beds and children’s swimming-
pools
Adapter 10 is used for certain bicycles
Select the suitable adapter and push it in the inflation hose pressing tab
E (fig. 8). Once it is inserted, release tab E.
To secure the adapter, turn it slightly in a clockwise direction
6) Inflate the object concerned as described in point 4).
TIPS FOR USING THE INFLATION GUN
Use the inflation gun at least once every two weeks in order to check that
your tires are at the right pressure; this promotes fuel economy, increases the
service life of your tires and improves safety as it reduces braking distances
and improves handling of the vehicle.
MAINTENANCE
Do not clean the inflation gun and adapters with solvents or flammable or
toxic liquids.
BLOWER GUN
5
To remove dust and dirt
PRESSURE LEVEL: 4 – 8
Warning: it is advisable to wear safety goggles when using the blower gun.
Do not direct the jet of compressed air towards people or animals.
Take care not to blow dust and dirt towards yourself or other persons.
USE
1) Connect the blower gun 13 to the compressor as explained in chapter
“2 - CONNECTING THE ACCESSORIES TO THE COMPRESSOR”.
2) Set operating pressure to the value indicated for this accessory (see
table 1).
3) Direct the blower gun towards the surface to be cleaned and press the
lever I (fig. 9). The flow of air can be regulated according to how far you
press down lever I.
TIPS FOR USING THE BLOWER GUN
Clean the carpets of your home or car mats very efficiently using the blower
gun. It is also ideal for keyboards, electrical items, refrigerators, cameras, TV
cameras, glassware and the filters of vacuum cleaners (fig. 10).
Warning: when using the blower gun on delicate or precision equipment (TV
cameras, camera lenses, etc.) reduce the pressure of the jet to minimum
value.
MAINTENANCE
Do not clean the blower gun with solvents or flammable or toxic liquids.
OTHER USES
6
Other uses* are possible purchasing the accessories separately.
** Consult the indications provided on the object to be inflated.
Please check that the air consumption and the maximum working
pressure of the pneumatic tool to be used are compatible with the
pressure set on the pressure regulator and with the amount of air
supplied by the compressor
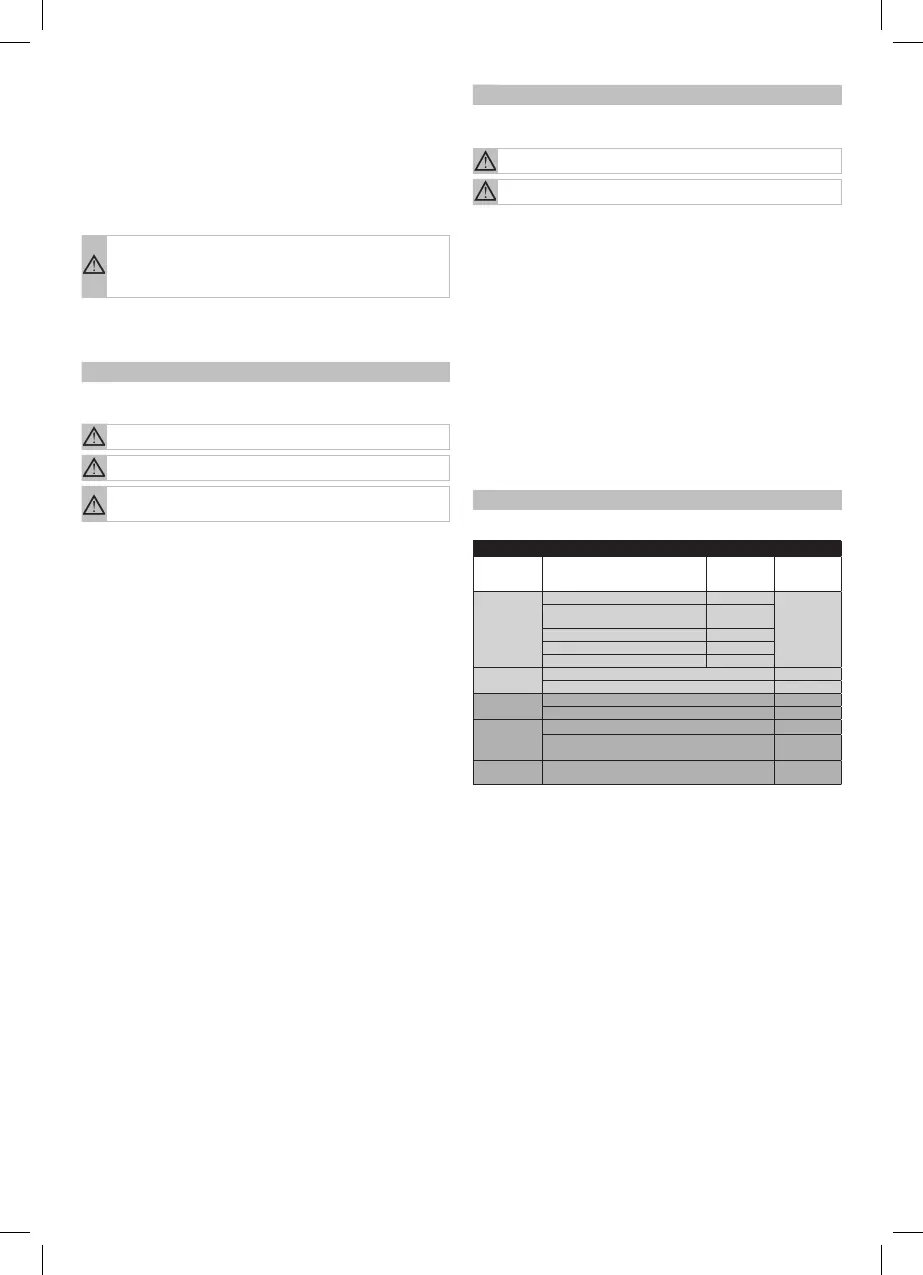
TABLE 1 – RECOMMENDED OPERATING PRESSURES
FUNCTION APPLICATION
INFLATION
PRESSURE
(IN BAR)
OPERATING
PRESSURE
(IN BAR)
Inflation
To inflate: footballs 0,8 - 1**
1 - 4
Dinghies, air beds,
children’s swimming pools
0,5 - 1**
Tires 2 - 3
Ordinary bicycle tires 1 - 3
Mountain bike tires 2 - 2,5
Blowing
To remove dust from ordinary objects 8
To remove dust from precision equipment 4
Painting*
To paint small surfaces at low pressure 2 - 3
For airbrush work 1,5 - 2
Washing/
spraying*
For washing with air/water gun 8
To spray detersives on engines
To spray water/products on plants/flowers
8
Clinching/
Nailing*
For woodwork 6

 Loading...