EasyManua.ls Logo

OasisSpace OS-KLD-9261 - User Manual

Default Icon
18 pages
Print Icon
To Next Page IconTo Next Page
Loading...
OS- KLD-9261
If you have any problem, kindly contact our customer
service: csr@oasisspace.com
Question and Answer IconNeed help?

Do you have a question about the OasisSpace OS-KLD-9261 and is the answer not in the manual?

Summary

General Introduction and Safety

Understanding the User Manual

Emphasizes reading and understanding the user manual, agreeing to its conditions, and its importance for warranty.

Product Quality and Policy

Highlights OasisSpace's focus on product quality and reliability, reserving the right to make changes to the manual.

Safety Instructions and Guidance

Covers general safety instructions, recommending professional consultation for developing safe usage techniques.

Tips and Warnings Identification

Explains that tips enhance rollator use, and warnings must be followed to prevent damage or injury.

Rollator Components and Explanation

Component Identification

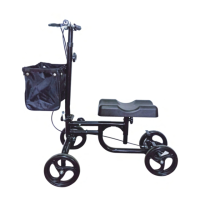
Lists and describes the main components of the heavy duty rollator, advising users to study them before proceeding.

General Rollator Functionality

Provides a general explanation of the rollator's design for support and stability, emphasizing careful reading of the manual.

Warranty Void Warning

Warns that any changes to the rollator's general structure will void the warranty.

Safety Regulations and Usage Warnings

General Safety Regulations

Stresses the importance of regular checks and maintenance for safe operation and preventing dangerous situations.

Safe Usage Warnings and Instructions

Details specific warnings for safe operation, including usage restrictions, terrain, and weight limits.

Advanced Safe Usage Practices

Brake Functionality Check

Instructs users to always check brake functionality before use and not to use the rollator if brakes are faulty.

Safe Handling and Posture

Provides guidance on safe posture, folding/unfolding, clothing, and general user conduct to prevent accidents.

User Instructions and Operation

Learning Correct Usage

Emphasizes studying user instructions thoroughly and consulting professionals for personalized safe usage methods.

Balance and Center of Gravity

Explains how weight distribution affects balance and provides guidelines to prevent tipping or dangerous situations.

Using the Seat Safely

Instructs on safely using the rollator's seat, including engaging the parking brake before sitting down.

Navigating Obstacles

Details the correct technique for ascending obstacles with the rollator, emphasizing a straight line and proper wheel lifting.

Advanced Operational Guidance

Descending Obstacles

Describes the safe method for descending obstacles, using brakes and a controlled backward movement.

Ascending and Descending Inclines

Provides instructions for ascending and descending inclines, focusing on body posture and speed control.

Product Specifications

Technical Details

Lists the technical specifications of the heavy duty rollator, including dimensions, weight, and seat adjustments.

Rollator Operation and Components

Folding and Unfolding Procedure

Explains the steps and precautions required for folding and unfolding the rollator to make it compact.

Component Handling and Maintenance

Backrest Removal

Provides step-by-step instructions on how to remove the backrest from the heavy duty rollator.

Brake System Operation

Hand Brake Installation and Adjustment

Details the process of installing the hand brake, including adjustment options for comfort and grip.

Driving Brake Usage

Explains how to use the driving brake to reduce speed and warns against misuse that could cause damage.

Parking Brake and Seat Usage

Parking Brake Engagement

Describes how to engage and disengage the parking brake, emphasizing the click confirmation for proper locking.

Using the Seat Safely

Provides instructions on safely using the rollator seat, including engaging the parking brake and proper foot placement.

Rollator Accessories

Shopping Basket Removal

Details the steps for removing the shopping basket, involving flipping the seat and releasing snap fasteners.

Shopping Basket Weight Limit

Warns that the shopping basket has a maximum weight limit of 5 kilos to prevent destabilization and tipping.

Wheel System

Front and Rear Wheel Description

Describes the front castors and rear wheels, their importance for steering, stability, and brake function.

Adjusting Wheel Height

Explains how to adjust the height of the rear wheels using an adjustment button and frame manipulation.

Front Wheel Height Adjustment

Front Wheel Height Adjustment

Details the steps to adjust the front wheel height using a silver adjustment button and sliding the tube.

Symmetric Height Warning

Warns to ensure both front or both rear wheels are at the same height for correct posture, safety, and stability.

Rollator Maintenance

Importance of Maintenance

Highlights that periodical maintenance is necessary for product lifespan, user comfort, and preventing malfunction or warranty voiding.

Tyre Wear Check

Instructs users to check tyres for wear and tear and replace them if wear becomes too severe.

Brake System Checks

Details checks for brake parts, smoothness, and potential contact with tyres, suggesting lubrication if needed.

Frame and Wheel Checks

Frame Condition Checks

Emphasizes keeping the frame in excellent condition by checking its folding, unfolding, and straight-line driving.

Rear Wheel Checks

Advises checking rear wheels for smooth rotation, no drag, and play to ensure stability and ease of propulsion.

Castors and Front Forks Checks

Recommends checking castors and front forks for smooth movement, proper nut tightening, and wear.

Cleaning and Periodic Maintenance Schedule

Rollator Cleaning Procedure

Provides instructions for cleaning upholstery, frame, and plastic parts using mild soap and water, avoiding harsh agents.

Monthly Maintenance Checks

Lists checks to perform monthly: folding, upholstery, wheel play, and brake function.

Quarterly Maintenance Checks

Lists checks to perform every three months: nuts/bolts tightening and tyre thread wear.

Overview

The OasisSpace OS-KLD-9261 is a heavy-duty rollator designed for both indoor and outdoor use, providing support and stability for individuals with decreased balance or difficulty walking. This medical equipment is engineered for user adjustability and features multifunctional brakes and stable, smoothly rotating wheels.

Function Description:

The primary function of the OasisSpace rollator is to assist users with mobility, offering a stable frame to lean on while walking and a seat for resting. It is designed to enhance safety and independence for individuals requiring walking assistance. The rollator's structure includes ergonomic push handles, a backrest, a seat, a shopping bag, and adjustable front and rear wheels.

Important Technical Specifications:

  • Model: OS-KLD-9261
  • Total Length: 706 cm
  • Total Width: 661 cm
  • Total Height: 101.5 - 120 cm (adjustable height push handles)
  • Total Weight: 11.3 kg
  • Maximum User Weight: 204 kg (also indicated on the frame label)
  • Seat Width: 48 cm
  • Seat Depth: 40.5 cm
  • Seat Height: 48.8 cm - 58 cm (adjustable)
  • Front Castors Diameter: 8 inches
  • Rear Wheels Diameter: 8 inches
  • Shopping Bag Maximum Weight: 5 kg

Usage Features:

General Use and Safety:

  • Users and attendants must thoroughly read and understand the user manual before use.
  • The rollator is a quality product from OasisSpace, with a focus on continuous improvement.
  • It is crucial to read the manual carefully for safe use and maintenance, as it also serves as proof of warranty.
  • Safety instructions are general guidelines; users are advised to consult a professional for personalized techniques based on their physical capabilities.
  • The rollator requires frequent maintenance, much of which can be done by the user, with an annual professional check recommended.
  • Any structural changes to the rollator will void the warranty.
  • Regular checks are essential to ensure the rollator functions correctly and to prevent dangerous situations.
  • Only use the rollator on pavements or rollator-user friendly roads; avoid roads meant for motor vehicles.
  • Do not use on loose sand, rough terrain, or wet and slippery surfaces with little traction.
  • Avoid driving the rollator onto the edges of curbs.
  • Never attach anything to the wheels.
  • Engage the parking brake when using an elevator or escalator.
  • The shopping bag has a maximum weight capacity of 5 kg; never use the rollator to transport people or heavy goods.

Braking System:

The rollator features two types of brakes: a parking brake and a driving brake.

  • Brake Check: Always check if the brakes are functioning correctly before use. Squeeze both brake levers and attempt to roll the rollator forward. If the rear wheels lock and drag, the brakes are working. Do not use if brakes are faulty.
  • Hand Brake Installation: Insert the handbrake to the handle bar twist on the screw.
  • Handgrip Adjustment: The handgrip can be rotated 360 degrees, and its front and rear distance can be adjusted for user comfort. Ensure it is firmly installed.
  • Driving Brake: To reduce speed while walking, squeeze the brake lever (photo 13). Do not push the rollator while squeezing the brake lever, as this will damage the tires and is not covered by warranty.
  • Parking Brake: To engage, push down the brake lever until a click is heard (photo 13 & 14). To disengage, pull the brake lever upwards until a click confirms release (photo 16). Always engage both parking brakes before sitting.

Folding and Unfolding:

  • To fold: Stand behind the rollator, flip up the seat (photo 1). Lift the black bar above the back of the frame and pull upwards (photo 2 & 3). Adjust push handles to the lowest height and wheels to the shortest length for a compact form (photo 4).
  • To unfold: Ensure the locking mechanism on the frame clicks into place.
  • Caution: Pay attention to garments or body parts to avoid getting caught in moving parts during folding/unfolding. Loose clothing can be dangerous.

Backrest:

  • The backrest is removable.
  • To remove: Twist the lever from 'lock' to 'open' position on one side (photo 6). Slide the backrest upwards (photo 7) to release it from the frame (photo 8). Repeat on the other side to fully remove (photo 10).

Seat Use:

  • Always engage the parking brake before sitting on the rollator to prevent movement.
  • Sit calmly; do not 'plop down' onto the seat.
  • Only use the seat when the rollator is stationary. Moving or pushing the rollator while seated is dangerous and voids the warranty.
  • For safety, do not bend or reach forward, backward, or sideways while seated.
  • Ensure all four wheels are in contact with the ground for stability.
  • Always place your feet between the rear wheels and your back towards the front wheels when seated.

Shopping Basket:

  • The rollator includes a removable shopping basket.
  • To remove: Flip up the seat (photo 18). Release the four snap fasteners that attach the basket loops to the frame (photo 19). Once all fasteners are released, the basket can be removed (photo 20).
  • To reattach: Follow the steps in reverse order.
  • Warning: The shopping basket has a maximum capacity of 5 kg. Exceeding this weight can destabilize the rollator and cause it to tip over.

Ascending and Descending Obstacles/Inclines:

  • Ascending an Obstacle: Approach in a straight line, backwards. Stand on the obstacle with the rollator in front on the lower surface. Lift the rear wheels by pulling upwards on the push handles. Pull the rollator towards you, place the rear wheels on the obstacle. Step backwards and roll the rollator further onto the obstacle. Carefully place the front wheels on the obstacle, pushing the rollator forward and lifting the rear wheels if necessary. Ensure no objects are on the seat.
  • Descending an Obstacle: Approach in a straight line, downwards. Drive the front wheels onto the lower part and brake slightly to safely descend. Release the brake once fully descended.
  • Ascending an Incline: Always ascend in a straight line, never at an angle. Lean forward slightly to shift the center of gravity. Do not carry extra weight on the rollator.
  • Descending an Incline: Always descend in a straight line, never at an angle. Do not lean forward; lean backwards slightly for stability. Engage the parking brake if stopping. Regulate speed by braking slightly as needed.

Wheel Adjustment:

  • Rear Wheels: On the rear of the frame, find the silver adjustment button. Press the button (photo 23) and pull on the frame part where the rear wheel is attached to change height (five positions). Ensure the wheel tube clicks into place. Release the button to lock.
  • Front Wheels: On the front of the frame, find the silver adjustment button. Push the button and slide the tube with the wheel up or down (photo 26) to change height (four positions). Ensure the wheel tube clicks into place. Release the button to lock.
  • Warning: Always adjust both rear wheels or both front wheels to the same height for correct posture, safety, and stability.

Maintenance Features:

General Maintenance:

  • Periodical maintenance is crucial for a long product lifespan and optimal user comfort. Poor maintenance can lead to malfunctions and void the warranty.
  • Users can perform small maintenance tasks to extend the rollator's life and maximize comfort.

Cleaning:

  • Clean the upholstery, frame, and plastic components regularly with mild soap and water.
  • Avoid aggressive or abrasive cleaning agents, pressure washers, or steam cleaners.
  • Regularly wax the frame to protect it from moisture, but do not use wax with abrasive properties, solvents, harsh chemicals, or silicone spray.
  • Always dry the rollator thoroughly after cleaning or exposure to rain.

Tyres:

  • Check tyres periodically for wear and tear. Replace if wear is severe.

Brakes:

  • Check for sharp edges on the brakes; replace if found.
  • Ensure all brake parts are properly attached.
  • Check if the braking mechanism operates smoothly. If not, apply W30 oil or Teflon to the brake joints.
  • Ensure brakes do not touch the tyres while walking.

Frame:

  • Keep the frame in excellent condition.
  • Check if the rollator folds and unfolds smoothly.
  • Check if the rollator drives in a straight line.

Rear Wheels:

  • Check if rear wheels rotate smoothly and do not drag.
  • Check for play on the rear wheels; if present, the housing may be loose.

Castors and Front Forks:

  • Ensure castors and front forks move smoothly for proper steering.
  • Check if nuts are tightened correctly: not too loose (to prevent vibration/looseness) and not too tight (to prevent ball bearings from being under too much pressure and restricting movement).
  • Check the front fork housing of the castors for wear.

Periodical Maintenance Schedule:

  • Every Month:

    • Check if the rollator folds and unfolds properly.
    • Check the upholstery for wear and tear.
    • Check for play on either the front or rear wheels.
    • Check if the brakes function properly.
  • Every Three Months:

    • Check if all nuts and bolts are still tightened properly and adjust if necessary.
    • Check the tread of the tyres for any signs of wear.

OasisSpace OS-KLD-9261 Specifications

General IconGeneral
BrandOasisSpace
ModelOS-KLD-9261
CategoryMobility Aid
LanguageEnglish

Related product manuals