SIDE
Control Solution Testing
OKmeter control solutions contain a known amount of glucose that reacts with
OKmeter Hitech test strips. By testing your control solution and comparing the test
results with the expected range printed on the test strip vial label, you can make sure
that the meter and the test strips are working properly together as a system and that
you are performing the test correctly. It is very important that you do this simple check
routinely to make sure you get accurate results.
Why perform a control solution test?
1. To ensure that your meter and test strip are working properly together.
2. To allow you to practice testing without using your own blood.
When should the control solution test be performed?
1. When you rst get your OKmeter Hitech meter. Before use this system to test your
blood, you can practice the procedure by using control solution. When you can do
three tests in a row that are within the expected range, you are ready to test your
blood.
2. Once a week (to make sure that you continue to get accurate results)
3. When you begin using a new vial of test strips.
4. Whenever you suspect that the meter or test strips are not working properly.
5. When your blood glucose test results are not consistent with how you feel, or
when you think your results are not accurate.
6. When test strips are exposed to extreme environmental conditions.
7. If you drop the meter.
Important Control Solution Information
1. Check the expiration date on the control solution bottle. Do not use if expired.
2. Control solution, meter, and test strips should come to room temperature (68-77
ºF/20-25ºC) before testing.
3. Shake the bottle before use, discard the first drop of control solution after
squeezing, wipes off the dispenser tip to avoid contaminations. These steps
ensure you will get a good sample and an accurate result.
4. The discard date for control solution is 30 days after first opening. Record the
discard date on the bottle, when you open a new bottle of control solution.
5. Store the control solution closed at temperatures below 30ºC (86ºF). Do not
refrigerate.
NOTE :
1. There are two levels of control solution (normal and high) available to
purchase. Please contact with your local distributor when required.
2.The control solution range printed on the test strip vial is for OKmeter
Control Solution only. It is used to test meter and strip performance. It is
not recommended range for your blood glucose level.
How to Perform a Control Test
NOTE :
1. DO NOT APPLY THE CONTROL SOLUTION DIRECTLY TO THE TEST
STRIP! Overdosed solution may give inaccurate result.
2. Repeat test if test result falls outside the control range stated on the test
strip label. If subsequent test remains to produce unacceptable result,
the meter or test strip may be faulty. DO NOT use the system. Contact
us or your local distributor for help.
About Alternative Site Testing
(AST )
There are important limitations for doing AST. Please consult your healthcare
professional before you perform AST.
What is AST?
Alternative Site Testing (AST) means you can use parts of the body other than your
ngertips to check your blood glucose levels. The OKmeter Hitech allows you to test
from the palm, forearm, upper arm, calf or thigh, with equivalent results to ngertip
testing.
What is the advantage?
Fingertips feel pain more readily because they are full of nerve endings (receptors).
At other body sites, nerve endings are not so numerous and you will not feel as much
pain as you will experience at the ngertip.
When to use AST?
Food, medication, illness, stress and exercise can affect blood glucose levels.
Capillary blood at ngertip reects these changes faster than capillary blood at other
sites. Therefore, if you are testing blood glucose level during or immediately after
meal, physical exercise or stressful event, take the blood sample from your ngertip
only.
Use AST only:
1. In a pre-meal or fasting state (more than 2 hours since the last meal).
2. Two hours or more after taking insulin.
3. Two hours or more after exercise.
4. During steady state blood glucose conditions.
Do NOT use AST if:
1. You have reason to believe you have hypoglycemia or hyperglycemia.
2. Your routine glucose results are often uctuating.
3. You are pregnant.
Display Messages And
Problem-Solving Guide
The following is a summary of some display messages and symbols. These messages
help to identify certain problems but do not appear in all cases when a problem has
occurred.
Improper use may cause an inaccurate result without producing an error message.
In the event of a problem, refer to information under ‘‘action to take’’
Display Description Action To Take
Blinking dot
The meter is ready for
blood applying into test
strip.
Test result is higher than
600 mg/dL (33.3 mmol/L)
If this is not conrmed by
the way you feel, review
proper testing procedure
and perform a control test.
Repeat blood test, if the
display still appears, please
call medical assistance
immediately.
Test result is lower than
20 mg/dL (1.1 mmol/L)
Battery is dead
Replace battery now.
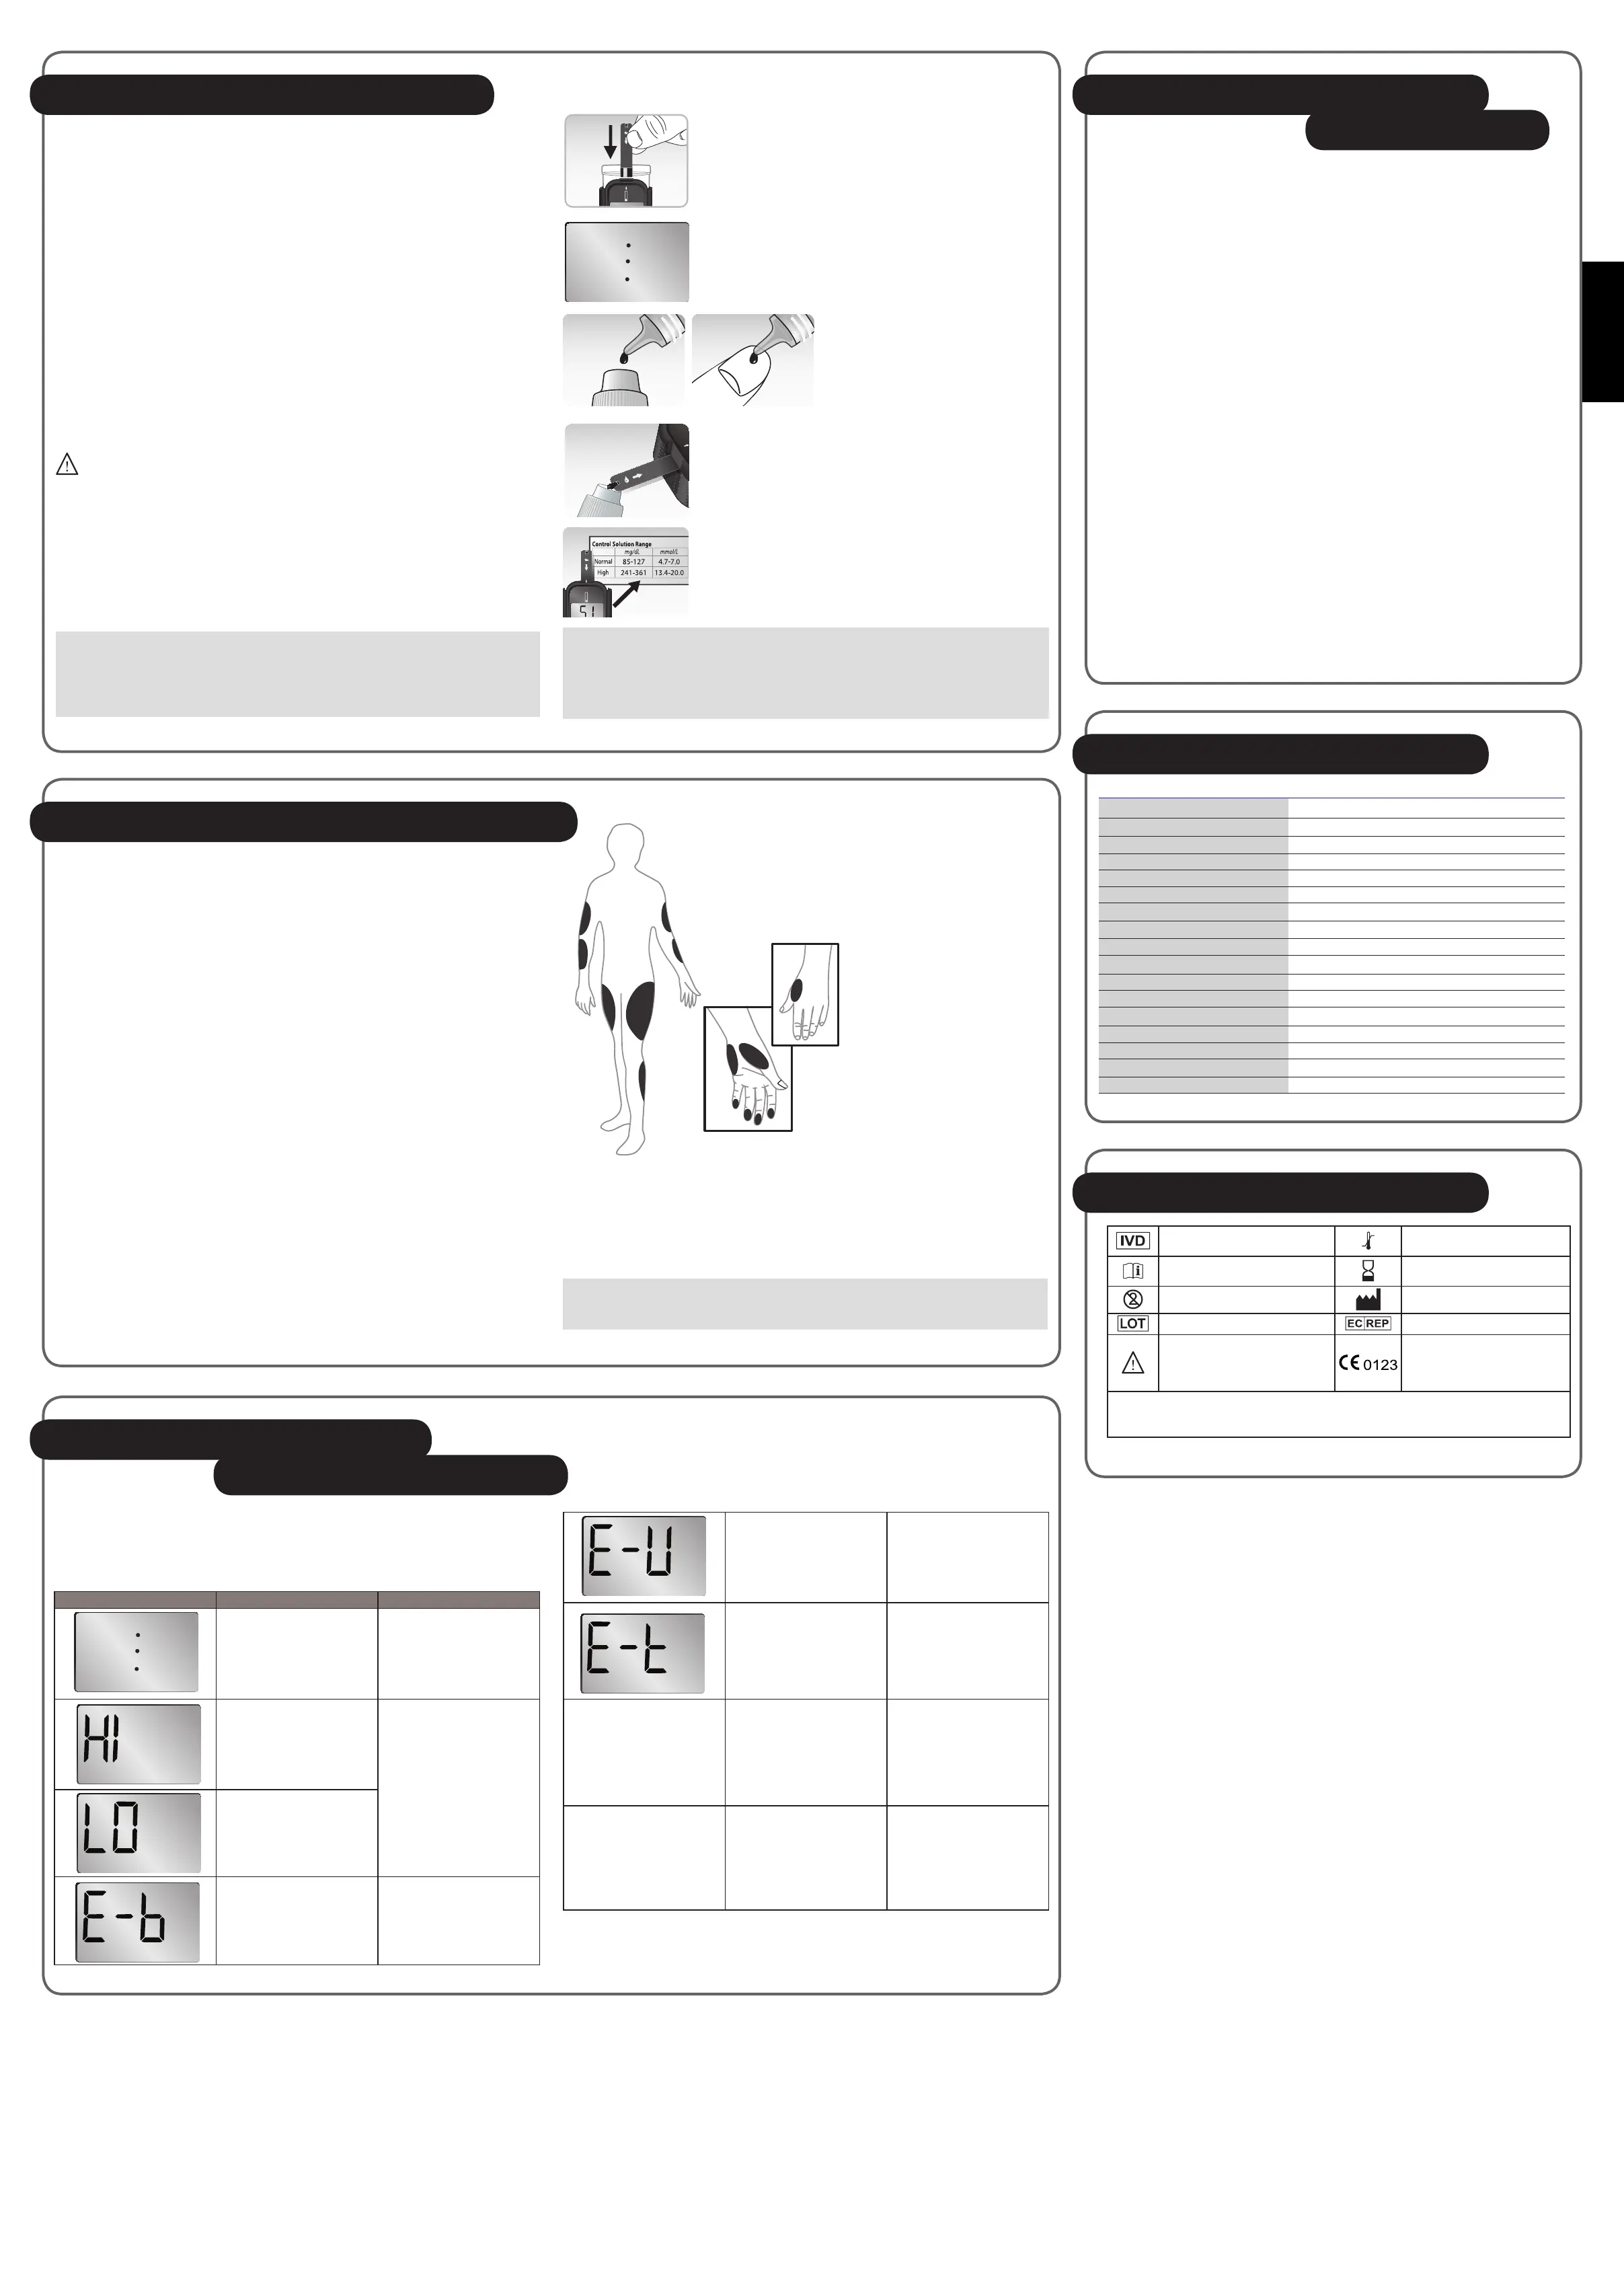
1. Insert test strip, this will turn on the meter automatically.
2. The blinking dot signies the meter is ready for testing.
3. Shake control solution bottle well.
Remove the cap. Squeeze bottle,
discard the first drop and wipe off
the dispenser tip with a clean tissue
paper or cotton swab. Squeeze a
drop on clean bottle cap/ngertip /
non-absorbent surface.
4. Then transfer the control solution to the test strip.
5. Test result will show up after 5 seconds. Value should be
within the range suggested on the test strip vial label in
use.
Caring For Your Meter
And Test Strip
To avoid the meter and test strips getting dirt, dust or other contaminants, please
wash and dry your hands thoroughly before use.
Cleaning
Your meter does not require special maintenance. As long as no blood or control
solution comes in direct contact with the meter, there is no special cleaning
required.
To clean the meter exterior, wipe with a cloth moistened with tap water or a mild
cleaning agent, then dry the device with a soft and dry cloth. Do not flush with
water.
Do not use organic solvents to clean the meter. Your meter is a precision
instrument. Please handle it with care.
Storage
1. Meter Storage
* Storage condition: -4ºF~122ºF (-20ºC~50ºC), below 90% relative humidity.
* Avoid dropping and strong impact.
* Avoid direct sunlight and humidity.
2. Strip Storage
* Storage condition: 4ºC~45ºC (39ºF~113ºF), and 10~85% relative humidity. Do
not refrigerate.
* Store your test strips in their original vial only. Do not transfer to other
container.
* Store test strip packages in a cool and dry place. Keep away from direct
sunlight and heat.
* Touch the test strip with clean and dry hands.
* After removing a test strip from the vial, immediately replace the vial cap and
close it tightly.
* Use each test strip immediately after removing it from the vial.
* Do not bend, cut, or alter a test strip in any way.
3. Control solution storage
* Storage condition: Store the control solution tightly closed at temperatures
below 86ºC (30ºC). Do not refrigerate.
How to increase the accuracy?
Stimulating blood perfusion by rubbing the puncture site prior to blood extraction has
a signicant inuence on the glucose value obtained.
Blood from the site without rubbing exhibits a measurably different glucose
concentration than blood from the ngertip. When the puncture site was rubbed prior
to blood extraction, the difference was signicantly reduced.
IMPORTANT :
To increase the accuracy when using AST, rub the puncture site more than 20
seconds before extracting blood.
System Specifications
Model Name OK-7N
Assay Method Electrochemical biosensor
Test Sample Capillary whole blood
Test Result Referenced to plasma glucose value
Alternative Site Testing YES (palm, forearm, upper arm, calf and thigh)
Sample Size 0.7 μL
Measuring Time 5 seconds
Measuring Range 20 – 600 mg/dL (1.1 – 33.3 mmol/L)
Acceptable Hematocrit Range 20~60%
Operating Condition 5°C~45°C(41°F~113°F), 10~85% R. H.
Storage/Transportation Condition 4°C~45°C(39°F~113°F), 10~85% R. H.
Memory Capacity 1 test result
Power Supply One 3-volt Lithium Battery (battery type CR2032)
Battery Life Approximately 3,000 tests
Automatic shut-off In 5 minutes
Dimensions 40mm(L)×26mm(W) ×37.5mm(H)
Weight 16 g included battery
Symbols Description
For
in vitro
diagnostic use.
Temperature limitation /
Store at.
Please consult instructions
for use.
Use by /Expiry date.
Do not reuse.
Manufacturer.
Lot number. EU representative.
Caution, consult
accompanying document.
This product fulls the
requirements of Directive
98/79/EC
in vitro
diagnostic
medical device.
The device has been certied to meet the following standards:
EN ISO 13485:2003, EN ISO 14971:2007-10-01, EN ISO 15197:2003,EN 980:2008, EN ISO 18113-4:2009, IEC/EN60601-1,
IEC/EN60601-1-2, EN61010-1, EN61010-2-101:2002, EN 61326-1, Pr ISO 17511:2003, and EN61326-2-6
Used strip or moistened
strip
Repeat test with a new
test strip. If the display
still appears, contact local
distributor for help.
Temperature is out of the
operating range.
The meter is not working.
Move to an area with
temperature between 5ºC
to 45ºC (41ºF - 113ºF) and
wait at least 30 minutes.
Do not articially heat or
cool the meter.
No responses when strip
is inserted into the meter
Maybe:
1. Battery is dead
2. Wrong strip be inserted
3. Meter is defective
You have to:
1. Replace new battery.
2. Insert the test strip
correctly
3. Contact your local
distributor for help.
No responses when blood
sample is applied to the
strip
Maybe:
1.Blood is not sufcient.
2.Meter is defective
You have to:
1. Repeat test with
sufcient sample.
2. Contact your local
distributor for help.
 Loading...