EasyManua.ls Logo

Oliso PRO Series - User Manual

Oliso PRO Series
16 pages
Print Icon
To Next Page IconTo Next Page
Loading...
All manuals and user guides at all-guides.com
all-guides.com
Question and Answer IconNeed help?

Do you have a question about the Oliso PRO Series and is the answer not in the manual?

Summary

Important Safety Instructions

Introducing the Oliso PRO Vacuum Sealer

Flexi Tube Valve Port

Description of the port for accessories like canisters and jars.

DUAL SEAL Area

Area with cutting blade and heat seal, requires cleaning.

Liquid Drip Tray

Tray that collects liquids, removable and washable for moist foods.

Simple Steps to Vacuum Sealing

Step 1: Prepare Bag and Food

Press out air, shift food away from seal edge before closing bag.

Step 2: Seal the Zipper

Zip shut using Zip Disc for a perfect seal to ensure maximum vacuum.

Step 3: Select Sealing Mode

Choose MOIST or DRY setting for optimal vacuum sealing.

Step 4: Position Bag for Sealing

Lay bag flat, aligning indicator circle over drip tray arrow.

Step 5: Initiate Vacuum Seal

Slide bag to "BAG EDGE" line to start the vacuum sealing process.

Step 6: Confirm Seal Completion

Wait for two beeps and DONE light; remove bag and check seal.

Vacuum Sealing on the MOIST Setting

Prepare Seal Area for Moist Food

Ensure seal area is clean and dry, free from liquids for an airtight seal.

Secure Bag During Vacuuming

Hold the Vac-Snap bag securely in place during the vacuum process.

Optimize Seal for Sous Vide

For Sous Vide, hang bag over counter edge to prevent air pockets.

Check Heat Seal Coil

Verify the heat seal coil is clean, as residue can prevent a complete seal.

Useful Tips for Moist Items

Package moist items flat; empty drip tray after sealing to prevent overflow.

Vacuum Sealing with the Flexi Tube

Prepare Bag for Flexi Tube

Stand bag upright, press out air, and zip shut using Zip Disc.

Connect Flexi Tube to Bag

Attach one end of the flexi tube to the accessory valve port on the bag.

Connect Flexi Tube to Sealer

Connect the other end to the sealer's flexi tube valve port, twisting slightly.

Activate Flexi Tube Vacuum

Press the FLEXI TUBE button after the light illuminates to start vacuuming.

Complete Flexi Tube Seal

Wait for two beeps and DONE light; twist to disconnect hose.

Control Panel Overview

Flexi Tube Controls

Flexi Tube Button activates vacuum for accessories; Flexi Tube Valve Port connects hose.

Food Type Settings

MOIST provides longer seal time for meat/fish; DRY provides shorter time for dry goods.

Status Indicator Lights

READY (green), WAIT (amber, operating), DONE (red, cycle finished).

Stop Vacuum Button

Press this button to stop the vacuum process immediately.

How to Reuse a Vac-Snap Bag

Select Initial Sealing Circle

For first use, start with an alignment circle at the bottom of the bag.

Understand Seal Formation

After vacuum sealing, the bag melts around the circle, creating an airtight seal.

Use Subsequent Sealing Circles

To reseal, use a different alignment circle for maximum bag volume.

Using the 12 Volt DC Cord (VS97 A Only)

Connect Cord to Sealer

Plug the 12V DC cord into the Oliso®PRO™ VS97A Vacuum Sealer.

Connect Cord to Power Source

Plug the 12V DC cord into your vehicle's DC power source (ensure 10 amp fuse).

Vehicle Operation Precautions

Ensure vehicle engine is on; turn off lights, radio, and AC while using cord.

Care and Maintenance

Cleaning the Drip Tray

Unplug unit, remove tray, disassemble, wash pieces with warm soapy water.

Storing the Flexi Tube Hose

Store flexi tube in a loose knot to prevent pinching or deforming.

Storing the Vacuum Sealer

Unplug when not in use; store on counter, in cabinet, or drawer.

Troubleshooting Guide

Bag Orientation for Sealing

Bag orientation does not matter, but print side up aids in using indicator circles.

Protecting Fragile Food Items

Par-freeze items or place them in a container inside the Vac-Snap bag.

Addressing Bag Insert Area Blockage

Unplug and re-plug sealer if mechanism did not retract before READY light.

Releasing a Stuck Vac-Snap Bag

Unplug sealer, try to remove bag; wait 3 seconds before plugging back in.

Troubleshooting Light Sequences

Guide for understanding DONE/WAIT light flashing and corresponding solutions.

Quick Tips for Vacuum Sealing

Creating Partial Vacuums

Use STOP VACUUM button mid-cycle for fragile foods.

Handling Wet Items

Par-freeze wet items like soup or marinades before vacuum sealing.

Ensuring a Uniform Melt Ring

Check seal after cycle; re-align and reseal if necessary.

Sealing Bag Edges

Follow pre-printed circles; do not vacuum or seal over the zipper edge.

Vac-Snap Bag Usage

Bags are microwave/simmer safe; do NOT boil them.

Securing Bags with Zip-Disc

Always use the Zip-Disc to ensure Vac-Snap bags are securely closed.

Protecting Fragile Foods

Par-freeze fragile foods for 15-25 minutes before sealing.

Alternative Fragile Food Protection

Place fragile items in a sturdy container within the Vac-Snap bag.

PRO-1000 Limited Warranty

VS97 A Limited Warranty

Overview

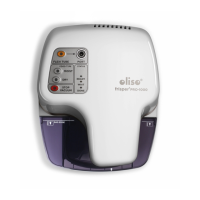
The Oliso®PRO™ Series Dual Seal Freshkeeper Technology Vacuum Sealer is a device designed for preserving food by removing air from specially designed bags and containers, creating an airtight seal. This process helps to extend the shelf life of various food items, from meats and fish to dry goods and fragile foods. The vacuum sealer offers both moist and dry settings, catering to different types of food and ensuring optimal sealing.

Function Description:

The primary function of the Oliso®PRO™ Vacuum Sealer is to create a vacuum-sealed environment for food, which inhibits the growth of bacteria and mold, thus preserving freshness for longer periods. It achieves this through a combination of vacuum suction and heat sealing. The device features a dual seal area that contains a cutting blade and a heat seal mechanism. When a Vac-Snap® bag is properly positioned, the vacuum sealer extracts air and then applies heat to create a strong, airtight seal.

The Oliso®PRO™ also supports vacuum sealing with accessories via its Flexi Tube Valve Port. This allows users to vacuum seal items in canisters, permanent valve pantry bags, bottle stoppers, and Mason jar attachments, expanding its utility beyond just Vac-Snap® bags.

Usage Features:

The vacuum sealer is designed for ease of use with several intuitive features:

  • Vac-Snap® Bags: The device works with proprietary Vac-Snap® bags, which are specifically designed for vacuum sealing and are more durable than standard zipper or freezer bags. These bags feature indicator circles or arrows to guide proper placement for sealing.
  • Moist and Dry Settings: Users can select between "MOIST" and "DRY" settings depending on the food type. The "DRY" setting provides a shorter seal time suitable for dry goods, while the "MOIST" setting offers a longer seal time, ideal for vacuuming meats, fish, and other moist foods. The device defaults to the "DRY" setting for quick vacuum sealing.
  • Simple Sealing Process: To vacuum seal a Vac-Snap® bag, users first press out excess air and zip the bag shut using the provided Zip Disc. The bag is then laid flat with the indicator circle aligned over an arrow on the drip tray, and slid forward to the "BAG EDGE" line. After selecting the appropriate food type setting, the vacuum sealing process begins automatically.
  • Flexi Tube for Accessories: For vacuum sealing with accessories, one end of the flexi tube is connected to the accessory valve port on the bag or container, and the other end to the flexi tube valve port on the vacuum sealer. The "FLEXI TUBE" button is then pressed to initiate the vacuum.
  • Indicator Lights (Status): The control panel includes "READY," "WAIT," and "DONE" indicator lights. "READY" (green) signifies the sealer is ready for use or can be unplugged. "WAIT" (amber) indicates the sealer is operating, and the unit should not be unplugged. "DONE" (red) illuminates after a vacuum cycle is complete, accompanied by two beeps.
  • STOP VACUUM Button: This button allows users to immediately stop the vacuum process, which can be useful for creating a partial vacuum for fragile foods without crushing them.
  • Reusing Vac-Snap® Bags: A key feature is the ability to reuse Vac-Snap® bags. After washing and air-drying, users can reseal bags by using the next closest alignment circle, ensuring maximum volume and an airtight seal.
  • 12 Volt DC Cord (VS97A only): The VS97A model includes a 12 Volt DC cord, allowing the vacuum sealer to be used in cars, RVs, trucks, and boats, providing portability for outdoor adventures or travel.

Maintenance Features:

Proper maintenance ensures the longevity and optimal performance of the Oliso®PRO™ Vacuum Sealer:

  • Drip Tray Cleaning: The device features a removable liquid drip tray that catches liquids pulled from bags during vacuum sealing, especially with moist foods. The drip tray and its gasket insert should be emptied and cleaned with warm, soapy water after each use to prevent bacterial contamination and overflow. The tray separates into two pieces for easy cleaning and is top-rack dishwasher safe.
  • Bag Sealing Area Cleaning: The dual seal area, which includes the cutting blade and heat seal, should be wiped with warm water and antibacterial soap regularly. Caution is advised due to the sharp, concealed blade and the heat coil, which remains warm for a few seconds after use.
  • Flexi Tube Care: The flexi tube hose should be stored in a loose knot (like a pretzel) to avoid pinching or deforming. If liquid is inadvertently vacuumed into the flexi tube, the "STOP VACUUM" button should be pressed immediately, and the tube cleaned promptly.
  • Gasket Maintenance: The orange gasket in the drip tray should be removed and washed with warm, soapy water, then dried completely before reassembling. The black rubber ring should not be removed.
  • Storage: When not in use, the vacuum sealer should always be unplugged. Its compact size allows for convenient storage on a counter, in a cabinet, or a drawer.

The Oliso®PRO™ Vacuum Sealer is designed to be a versatile and user-friendly appliance that simplifies food preservation, helping to reduce food waste and keep ingredients fresh for longer.

Oliso PRO Series Specifications

General IconGeneral
ModelPRO Series
Pulse ModeYes
Moist/Dry Food SettingsYes
Accessory PortYes
CategoryFood Saver
Bag Storage CompartmentYes
Cord StorageYes
Accessory HoseYes
Sealing TechnologyHeat Sealing

Related product manuals