Chapter 2
2-6
Example System Startup
2-3 Setting and Wiring Hardware
Use the following procedures to mount, set, and wire the hardware.
2-3-1 Mounting and Setting the DeviceNet (Master) Unit
■ Settings
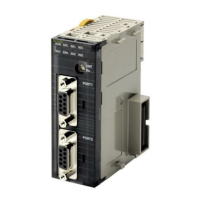
The components, functions, and switch settings for the CS1W-DRM21(-V1) or CJ1W-DRM21
DeviceNet (Master) Unit mounted to a CS/CJ-series PLC are shown as an example in the following
diagram.
For information on switch settings, refer to the operation manual for the DeviceNet (Master) Unit.
■ CS1W-DRM21(-V1)
UNIT
No.
NODE
ADR
ON
DRM21
CS
MS
NS
4
3
2
1
DR0
DR1
ESTP
HOLD
X10
1
1234
Indicators
Unit No. switch
This rotary switch sets the single-digit hexadecimal
unit number of the Master on the DeviceNet network.
Node address switches
These rotary switches set the double-digit decimal
node address of the Unit.
DIP switch
These pins have the following functions:
Pins 1 and 2: Baud rate
Pins 3: Continue/stop remote I/O communications
for error (for Master functions)
Pin 4: Hold/clear I/O for communications error
(for Slave functions).
Communications connector
This connector is connected to the Network
communications cable. Communications power is
also supplied through this connector. An XW4B-
05C1-H1-D Parallel Connector with Screws is
provided as the node connector.
 Loading...