Do you have a question about the OmySalon MANICURE NAIL TABLE and is the answer not in the manual?
Instructions to prevent furniture tipover, including securing furniture and avoiding child climbing.
Demonstrates the correct method for installing hardware components.
Illustrates the process for safely disassembling hardware components.
Connects parts 3, 2, and 30 using hardware A.
Continues assembling the base frame by connecting parts 3, 2, 1, and 30 using hardware A.
Connects parts 30, 31, 2, and 2 with hardware D.
Attaches drawer slides (I) and hardware C to panels 20 and 21.
Connects side panels 21 and 22 to the assembled unit using hardware A.
Secures top panel 19 to the cabinet structure using hardware D.
Secures bottom panel 18 to the cabinet structure using hardware A.
Installs drawer slides (I) and hardware C/J onto the main unit.
Attaches hardware L and H to panel 11 for drawer support.
Connects panels 14, 6, 11, and 5 using hardware A.
Attaches hardware L, H, A to panels 10 and 13.
Connects panels 13, 10, 5, and A using hardware A.
Connects panels 14, 5, 13, 10, and 11 using hardware A and N.
Connects panels 13, 5, 11, 14, and 12 using hardware A.
Attaches support beams 8 to panel 28 and 9 using hardware A.
Connects panel 10 to the left cabinet structure using hardware A.
Connects panel 4 to the right cabinet structure using hardware A.
Secures back panel 7 to the left cabinet using hardware D.
Secures back panel 4 to the right cabinet using hardware J and C.
Attaches hinges (K, H, E) and hardware C to panels 17, 15, 16.
Mounts doors using hinges (G) and hardware C/G onto the main unit.
Installs drawer slides and connects base parts 1, 2, 18, 30 with hardware B.
Connects drawer box parts 25, 26, 24 with hardware I and C.
Secures drawer box front panel 24 to sides 25, 26 using hardware F.
Slides drawer bottom panel 27 into the assembled drawer box.
Connects drawer back panel 23 to the box using hardware A.
Attaches drawer runners (E, K) to the drawer box using hardware Kx3, Ex6.
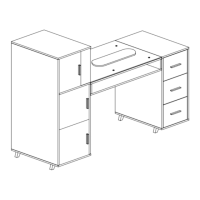
Shows the completed assembly of the manicure nail table.
Illustrates inserting the assembled drawers into the table.
Places glass top 29 onto the main table surface using hardware M.
| Type | Manicure Nail Table |
|---|---|
| Color | White |
| Material | MDF |
| Features | Wrist rest |
| Adjustable Height | No |
| Wheels | Yes |