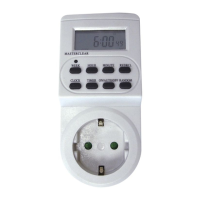
OPERATING INSTRUCTIONS (GB)
Please read the following instructions carefully before connecting this timer to electrical appliances.
1. IMPORTANT
Don't plug in an appliance where the load exceeds 16 Amp. Always ensure the plug of any appliance is
fully inserted into the timer outlet. If cleaning of the timer is required, remove from mains power and wipe
timer with a dry cloth.
DO NOT IMMERSE TIMER IN WATER OR ANY OTHER LIQUID.
Heaters and similar appliances should never be left unattended during operation. The manufacturer
recommends such appliances not be connected to timers.
2. KEYBOARD DEFINITION
1) MASTER CLEAR: Clear all data in memory including current time and all programs.
2) RANDOM: Set or cancel random function.
3) CLOCK: Set current time combined with buttons WEEK, HOUR, MIN. Select 12 or 24 hour mode
combined with button TIMER. Activate summertime function combined with button ON/AUTO/OFF.
4) TIMER: Set programs combined with buttons WEEK, HOUR, MIN. Select 12 or 24 hour mode
combined with button CLOCK.
5) ON/AUTO/OFF: Select operating modes of timer.
6) WEEK: Set week combined with button CLOCK or TIMER.
7) HOUR: Set hour combined with button CLOCK or TIMER.
8) MIN: Set minute combined with button CLOCK or TIMER.
9) RST/RCL: Override programs or recall the overridden programs.
3. GENERAL FEATURES
1) 10 ON/OFF programs with 1 minute step.
2) MANUAL ON/AUTO/MANUAL OFF selectable.
3) 12/24 hour mode selectable.
4) Large LCD display with second.
5) Summer time function available.
6) Random function with a random advance of 10-31minutes between 6:00 PM and 6:00 AM.
7) 16 combinations of day or blocks of days available as follows:
1) MO,2) TU, 3) WE, 4) TH, 5) FR, 6) SA, 7) SU; 8)MO, TU, WE, TH, FR, SA, SU
9)MO, TU, WE, TH, FR 10)SA, SU 11) MO, TU, WE, TH, FR, SA 12)MO, WE, FR
13)TU, TH, SA, 14) MO, TU, WE; 15)TH, FR, SA 16)MO, WE, FR, SU
4. INITIAL OPERATION
1) Plug the timer into a regular 230 Volts power outlet and turn the power on. Leave for approximately 14
hours to charge the Memory Back-up battery.
2) Clear all current information by pressing MASTER CLEAR button with a sharp object such as a pen
or pencil after charging.
3) The timer is now ready to be set up for use.
5. SETTING CURRENT TIME
1) Press CLOCK button and hold, simultaneously press WEEK button until the actual day is displayed.
Continue by pressing HOUR or MIN button until the current hour or minute is displayed. When setting,
the buttons WEEK, HOUR or MIN can be held down for rapid forward counting.
2) Release both buttons. The week and time will be set.