x4 T-Nuts
x4 Ballistic Screws*
*Longer screws are available for special applications.
INSTALLATION INSTRUCTIONS
PACKAGE CONTENTS
=
(1) Head-Loc
®
H-Nape Chinstrap, and the following ballistic installation hardware:
REMOVE OLD CHINSTRAP
Use a screwdriver or large coin to loosen
the screws and remove your old chinstrap.
INSTALL HEAD-LOC CHINSTRAP
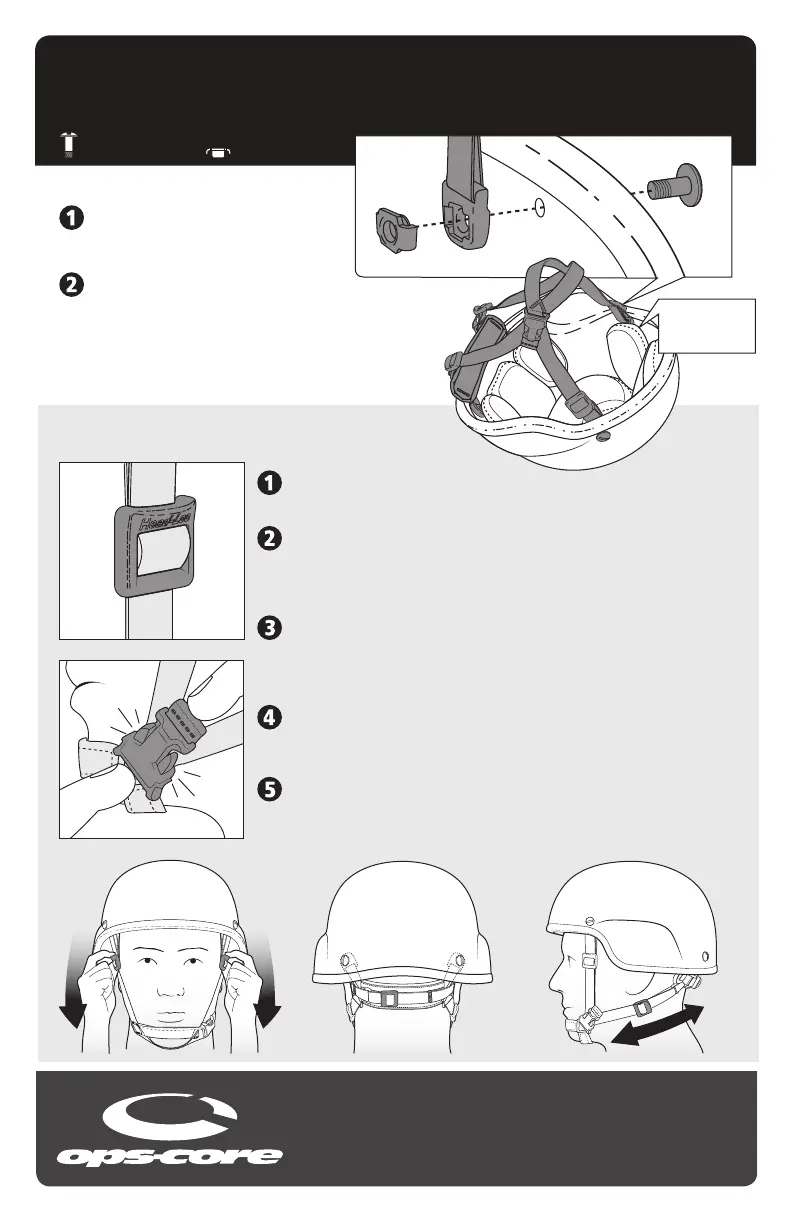
Using a screwdriver or large coin, follow the
diagram on the right to properly install all four
Strap Anchors as shown.
NOTE: BE SURE TO COVER THE ANCHOR HARDWARE
WITH THE HELMET’S COMFORT / SUSPENSION PADS.
LOOSEN HEAD-LOC SLIDERS
Loosen all (4) Head-Loc Sliders by sliding them away from the chin cup.
CONNECT CHINSTRAP BUCKLE
Place the helmet on your head and connect the low prole chinstrap
buckle. This is easiest when placing your index ngers behind each side
of the buckle as shown.
TIGHTEN FRONT HEAD-LOC SLIDERS
Tighten the front straps by pulling the Head-Loc Sliders toward your chin.
This is easiest when holding either side of the slider with your thumb and
middle nger while using your index nger in the top recess.
ADJUST NAPE PAD
Position comfortably (as low as possible) on the back of your head. Pull
Head-Loc Slider with your right hand.
TIGHTEN SIDE STRAPS
Tighten the side straps by pulling the Head-Loc Sliders toward your chin.
This is easiest when holding either side of the slider with your thumb and
middle nger while using your index nger in the top recess.
FITTING INSTRUCTIONS:
Ballistic Screw
Strap AnchorT-Nut
Be sure to cover
anchor hardware
with helmet pads
OPS-CORE, INC.
Marine Industrial Park
12 Channel Street
Boston, MA 02210
Tel: 617.670.3547
Fax: 617.670.3581
Or visit our website
at www.ops-core.com
ACH helmet shown in the diagram. Shell and suspension may vary.
 Loading...