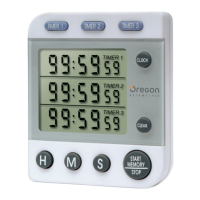
Couvercle du
Compartiment à Piles
Clip
Pied de support
pliable
Clip
Aimant
Minuteur 1
Minuteur 2
Minuteur 3
Ecran
LCD
Heure
Effacer
Démarrage Mémoire/Arrêt
H M S
3-CHANNEL
JUMBO DISPLAY CLOCK TIMER
MODEL : WB388
USER MANUAL
ENGLISH
INTRODUCTION
Congratulations on your purchase of the 3-Channel Jumbo Display Clock
Timer (WB388). The unit is a handy three-channel timer/calendar alarm
clock with the following functions:
• Three separate, jumbo LCD display screens for timer 1, timer 2, and
timer 3 or clock, alarm and date
• Six-digit display for showing timer and clock
• Automatic count-up/count-down functions for individual timers
• Memory recall function for preset timers
• Different beeps for easy recognition of different timers
• Selectable 12- and 24-hour clock display modes
• Selectable U.S. and European date display modes
• Audible key tone to indicate successful key entry
• Automatic snooze function for alarm clock
• Mounting clip for pocket or belt
• Foldaway stand leg
• Magnet for attaching onto metallic surfaces
BEFORE YOUR BEGIN
The unit operates on a 1.5V, G-13 battery which has already been installed.
The battery is insulated by a red tape to provide the product with a maximum
shelf life. So before you begin, remember to remove the insulation tape by
gently pulling it out from inside the battery compartment. Once that is
done, the display on the screens will reset to normal CLOCK mode.
The unit has two operating modes: CLOCK and TIMER. CLOCK mode
allows you to display and set the clock, alarm and date; whereas the TIMER
mode allows you to start and set the timers. To change from one mode to
another, simply press CLOCK while in normal mode.
The LCD display for the operating modes are as follows:
HOW TO SELECT THE 12- AND 24-HOUR
CLOCK DISPLAY FORMATS
The clock display can be changed from 12-hour format to 24-hour format
and vice-versa by pressing H at any time in normal CLOCK operating
mode. The AM or PM indicator will be displayed to indicate the hour of
the day when the 12-hour clock display mode is selected.
Note: If nothing is selected, the 12-hour format will be selected
automatically.
HOW TO SELECT THE U.S. AND EUROPEAN
DATE DISPLAY FORMATS
The U.S. and European date display formats can be changed from one to
another by pressing START MEMORY/STOP when setting the date.
For the U.S. format, the month will be displayed prior to the day; whereas
the opposite will be displayed for the European format.
Note: If nothing is selected, the U.S. format will be selected automatically.
HOW TO SET THE CLOCK, TIME AND DATE
1. Press and hold CLOCK for two seconds to enter the setting mode. A
beep will be emitted and all digits of the clock will flash.
2. Press H and M to change the setting for the hour and minute. The
display of the clock depends on which display format was selected
prior to the setting of the clock.
3. Press S to set the seconds, which will be reset to zero if the previous
setting was 29 or less. If the previous setting was 30 or above, the
minute value will be advanced automatically.
4. When finished, press CLOCK to confirm the setting. All digits of the
clock will stop flashing, and those of the alarm clock will start to flash.
5. Press H and M to change the setting for the hour and minute of the
alarm clock.
6. Press START MEMORY/STOP to enable or disable the alarm clock.
When the alarm clock is enabled, the
indicator will be displayed
on the screen.
7. When finished, press CLOCK to confirm the setting. All digits of the
alarm clock will stop flashing, and those of the date will start to flash.
8. Press H and M to change the setting for the month and day of the
calendar.
9. Press START MEMORY/STOP to change from U.S. to European
date display format and viceoversa.
10. When finished press CLOCK to confirm. All digits will stop flashing.
Note:
1. If you do not confirm the setting by pressing CLOCK after changing
the values of the clock, alarm or date, the setting mode will be exited
automatically after two minutes with the last entered values.
2. If you want to skip from one setting procedure to another, such as
from clock to alarm, or alarm to date, simply press CLOCK once
when in setting mode.
3. Holding H or M while in setting mode will advance the digits in faster
increments.
HOW TO USE THE ALARM CLOCK AND ITS
SNOOZE FUNCTION
The alarm clock will go off at exactly the time that it is preset to. The alarm
will sound for one minute if unattended.
To disable the alarm, simply press any button, or let it expire on its own
after one minute. If CLEAR is pressed in between, it will trigger the snooze
function.
The snooze function will enable the alarm to go off again after eight minutes.
The alarm can then be disabled in the same way. However, if CLEAR is
pressed again, the snooze function will be triggered again.
The snooze function will repeat if the alarm is disabled by pressing CLEAR
every time.
HOW TO SET A TIMER
1. Select TIMER mode by pressing CLOCK once while in normal
CLOCK mode.
The LCD display will switch to indicate the current settings of all
three timers.
2. Select the timer to set by pressing and holding TIMER 1, TIMER 2
or TIMER 3 for two seconds. The display for the selected timer will flash.
3. Press CLEAR to reset the setting to zero, or press H, M and S to
change the setting for the hour, minute and second, respectively.
Holding the buttons will advance the corresponding digits in faster
increments. You can set a timer up to 99 hours, 59 minutes and 59 seconds.
4. When finished, press the corresponding timer button again to confirm
the setting. All digits of that particular timer will stop flashing.
HOW TO START A TIMER
Simply press the corresponding timer button once. For instance, to start
timer 1, press TIMER 1 once. To start timer 2, press TIMER 2 instead. To
start all timers press START MEMORY/ STOP.
Note:
1. When a timer with a preset value other than zero is activated, it will
start counting down. If undisturbed, it will emit a beeping alarm for
one minute after reaching down to zero and start counting up again.
2. If a timer is preset to zero when it is activated, it will start counting up
immediately.
3. The alarm beeps of the timers are different for your easy recognition.
If a second timer expires when the alarm for another one is going off,
the alarm for the second timer will take over and replace the first one.
4. Whenever a timer is counting up, the "TIME’S UP" indicator will be
displayed and flash.
HOW TO STOP/RESUME A TIMER
You can stop the timer at any time by pressing the corresponding timer
button. Pressing START MEMORY/STOP will stop all timers.
To resume, simply press the TIMER 1, TIMER 2, TIMER 3 or START
MEMORY/STOP button again.
Note:
1. If the timer is counting down when it is stopped, it will continue to
count down.
2. If the timer is at zero when it is stopped, it will start to count up.
3. If the timer is already counting up when it is stopped, it will continued
to do so.
HOW TO CLEAR A TIMER
Press CLEAR while the timer/timers is/are deactivated. The timer/timers
will be reset to zero. The operating status of other activated timer/timers
will not be affected.
HOW TO RECALL THE PREVIOUS SETTING OF
A TIMER
Recalling the previous setting of a timer is easy. Simply press the
corresponding timer button or START MEMORY/STOP after the timer
is cleared and reset to zero.
HOW TO REPLACE THE BATTERY
Under normal operating circumstances, the battery which is included with
the product can keep it running for more than a year. Should you need to
replace the battery, simply uncover the battery compartment cover and
insert a new 1.5V LR44 battery (with positive (+) side facing up) into the
compartment. Replace the compartment cover.
Note:
The unit may not work if the battery is not properly inserted. Try to reinsert
the battery once again.
HOW TO USE THE CLIP, FOLDAWAY STAND
LEG AND MAGNET
A clip can be found on the back of the product for you to clip the clock
onto a pocket or belt. A stand leg can also be flipped open easily to form a
stand with the clip. You can also attach the clock to any metallic surface by
making use of the magnet.
MAINTENANCE
When handled properly, this unit is engineered to give you years of satisfactory
service. Here are a few product care instructions:
1. Do not immerse the unit in water. If the unit comes in contact with water,
dry it immediately with a soft lint-free cloth.
2. Do not clean the unit with alcohol containing detergent, abrasive or corrosive
materials. Abrasive cleaning agents may scratch the plastic parts and corrode
the electronic circuit.
3. Do not subject the unit to excessive: force, shock, dust, temperature, or
humidity. Such treatment may result in malfunction, a shorter electronic life
span, damaged batteries, or distorted parts.
4. Do not tamper with the unit's internal components. Doing so will terminate
the unit's warranty and may cause damage. The unit contains no user-
serviceable parts.
5. Only use new batteries as specified in this instruction manual. Do not mix
new and old batteries as the old batteries may leak.
6. Read this instruction manual thoroughly before operating the unit.
7. The contents of this manual and the product specifications are subject to
change without further notice.
ABOUT OREGON SCIENTIFIC
Visit our website (www.oregonscientific.com) to learn more about Oregon
Scientific products such as digital cameras; MP3 players; children’s
electronic learning products and games; projection clocks; health and fitness
gear; weather stations; and digital and conference phones. The website
also includes contact information for our Customer Care department in
case you need to reach us, as well as frequently asked questions and
customer downloads.
We hope you will find all the information you need on our website, however
if you’re in the US and would like to contact the Oregon Scientific Customer
Care department directly, please visit:
www2.oregonscientific.com/service/support
OR
Call 1-800-853-8883.
For international inquiries, please visit:
www2.oregonscientific.com/about/international/defaul.asp
FRENCH
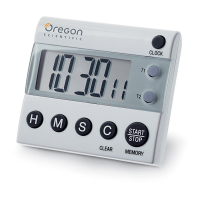
Alarm
Display
Time Display
Month - Date
Display
Timer 2
Display
Timer 1
Display
Timer 3
Display
TIMER Mode
CLOCK Mode
FRENCH
PRESENTATION
Félicitations pour votre achat du Minuteur à Affichage Triple de l’Heure et
du Compte à Rebours de Grande Taille (WB388). Cet appareil est un réveil,
calendrier, minuteur équipé des fonctions suivantes :
• Trois écrans LCD géants pour le minuteur 1, le minuteur 2 et le
minuteur 3 ou l’heure, le réveil et la date
• Affichage à six chiffres pour montrer le compte à rebours et l’heure
• Fonctions compte à rebours/chronomètre automatiques pour les
minuteurs individuels
• Fonction de rappel de mémoire pour les minutages préréglés
• Bips sonores différents pour reconnaître chaque minuteur facilement
• Affichage de l’heure en mode 12- et 24-heures sélectionnable
• Affichage de la date en format U.S. ou européen sélectionnable
• Son de confirmation d’entrée des données
• Fonction répétition automatique pour le réveil
• Clip pour attacher à la poche ou la ceinture
• Pied de support pliable
• Aimant pour fixer aux surfaces métalliques
AVANT DE COMMENCER
L’appareil fonctionne avec une pile G-13 1,5V qui a déjà été installée. La
pile est isolée par un ruban rouge qui assure la plus grande durée de stockage
possible. Donc, avant de commencer, bien se rappeler d’enlever le ruban
isolant en le tirant doucement de l’intérieur du compartiment à piles. Une
fois que c’est fait, l’affichage des écrans démarre dans le mode HEURE
normal.
L’appareil à deux modes de fonctionnement : HEURE et MINUTEUR
HEURE permet d’afficher et de régler l’heure, le réveil et la date ; alors
que le mode MINUTEUR permet de démarrer et de régler les minuteurs.
Pour changer d’un mode à l’autre, simplement appuyer sur HEURE en
mode normal.
Les modes de fonctionnement affichés à l’écran LCD sont les suivants :
COMMENT SÉLECTIONNER LES MODES
D’AFFICHAGE 12 OU 24 HEURES
L’affichage de l’heure peut être changé du format 12 heures au format 24
heures et vice-versa en appuyant sur H à n’importe quel moment dans le
mode de fonctionnement HEURE normal. L’indicateur AM ou PM s’affiche
pour indiquer l’heure ou le jour quand le mode 12 heures a été choisi.
Remarque: Si rien n’est choisi, le mode 12 heures est sélectionné
automatiquement.
SÉLECTION DU MODE DE DATE EN FORMAT
U.S. OU EUROPÉEN
L’affichage des formats de date en mode U.S. ou européen peut ête changé
de l’un à l’autre en appuyant sur DEMARRAGE MEMOIRE/ARRET
lors du réglage de la date.
Pour le format U.S., le mois s’affiche avant le jour ; alors que l’opposé
s’affiche dans le format européen.
Remarque: Si rien n’est choisi, le mode U.S. est sélectionné
automatiquement.
REGLAGE DE L’HEURE ET DE LA DATE
1. Appuyer et tenir HEURE pendant deux secondes pour entrer dans le
mode réglage. Un bip se fait entendre et tous les chiffres de l’heure
clignotent.
2. Appuyer sur H et M pour changer le réglage de l’heure et des minutes.
L’affichage de l’heure dépend du format choisi avant le réglage de
l’heure.
3. Appuyer sur S pour régler les secondes qui revient à zéro si le réglage
précédent était 29 ou moins. Si le réglage précédent était de 30 ou
plus, la minute avance automatiquement.
4. Appuyer sur CLOCK pour confirmer après avoir fini. Tous les chiffres
de l’heure arrêtent de clignoter et ceux du réveil commencent à
clignoter.
5. Appuyer sur H et M pour changer le réglage de l’heure et des minutes
du réveil.
6. Appuyer sur DEMARRAGE MEMOIRE/ARRET pour activer ou
désactiver le réveil. Quand le réveil est activé, l’indicateur
s’affiche
à l’écran.
7. Appuyer sur HEURE pour confirmer le réglage après avoir fini. Tous
les chiffres du réveil arrêtent de clignoter et ceux de la date commencent
à clignoter.
8. Appuyer sur H et M pour changer le réglage des mois et des jours du
calendrier.
9. L’affichage des formats de date peut être changé de mode U.S. en
européen ou vice versa en appuyant sur DEMARRAGE MEMOIRE/
ARRET.
10. Appuyer sur HEURE pour confirmer après avoir fini. Tous les chiffres
arrêtent de clignoter.
Remarque:
1. Sans confirmation du réglage en appuyant sur HEURE après avoir
changé l’heure, le réveil ou la date, le mode de réglage s’arrêtera
automatiquement après deux minutes avec les dernières données
entrées.
2. Pour sauter d’une procédure de réglage à l’autre, comme de l’heure
au réveil ou du réveil à la date, appuyer simplement sur HEURE une
fois dans le mode de réglage.
3. Tenir H ou M dans le mode de réglage fera avancer les chiffres plus
rapidement
COMMENT UTILISER LE REVEIL ET SA
FONCTION REPETITION
Le réveil sonne à l’heure exacte à laquelle il est réglé. La sonnerie résonne
pendant une minute si rien n’est fait.
Pour désactiver le réveil, simplement appuyer sur n’importe quel bouton
ou laisser la sonnerie s’arrêter après une minute. Si le bouton EFFACER
est activé entre temps, cela va déclencher la fonction répétition.
La fonction répétition laisse le réveil sonner encore après huit minutes.
Le réveil est alors désactivé de la même façon. Cependant, appuyer de
nouveau sur EFFACER va remettre en route la fonction répétition.
La fonction répétition va se répéter si le réveil est arrêté en
appuyant sur EFFACER à chaque fois.
POUR RÉGLER UN MINUTEUR
1. Choisir le mode MINUTEUR en appuyant sur HEURE une fois en
mode HEURE normal.
2. L’affichage LCD passe à l’indication des réglages actuels des trois
minuteurs.
3. Sélectionner le minuteur en appuyant et tenant MINUTEUR 1,
MINUTEUR 2 OU MINUTEUR 3 pendant deux secondes. L’affichage
du minuteur choisi clignote.
4. Appuyer sur EFFACER pour remettre à zéro, ou appuyer sur H, M et
S pour changer les réglages des heures, minutes et secondes
respectivement. Tenir les boutons fera avancer les chiffres
correspondants plus rapidement. Un minuteur peut être réglé jusqu’à
99 heures, 59 minutes et 59 secondes.
5. Appuyer sur le bouton de minuteur correspondant pour confirmer le
réglage après avoir fini. Tous les chiffres de ce minuteur particulier
s’arrêtent de clignoter.
POUR DÉMARRER UN MINUTEUR
Appuyer simplement sur le bouton de minuteur correspondant une fois.
Par exemple, pour démarrer le minuteur 1, appuyer sur MINUTEUR 1
une fois . Pour démarrer le minuteur 2, appuyer sur MINUTEUR 2 à la
place . Pour démarrer tous lez minuteurs, appuyer sur DEMARRAGE
MEMOIRE/ARRET.
Remarque:
1. Quand un minuteur avec un réglage différent de zéro est activé, il
commence un compte à rebours. Si rien n’est fait, il émet un bip sonore
pendant une minute après être arrivé à zéro et commence à
chronométrer.
2. Quand un minuteur avec un réglage de zéro est activé, il commence
un chronométrage immédiatement.
3. Les bips sonores des alertes sont différents pour une reconnaissance
aisée. Si un deuxième minuteur se déclenche quand l’alerte d’un autre
est en route, le bip du deuxième minuteur prend le dessus et remplace
le premier.
4. Quand un minuteur est en mode chronomètre, l’indicateur « FIN DE
COMPTE » s’affiche et clignote.
POUR ARRETER/REDEMARRER UN
MINUTEUR
Il est possible d’arrêter le minuteur à tout moment en appuyant sur le bouton
de minuteur correspondant Appuyer sur DEMARRAGE MEMOIRE/
ARRET arrête tous les minuteurs. Pour reprendre, simplement appuyer
sur le bouton MINUTEUR 1, MINUTEUR 2, MINUTEUR 3 ou
DEMARRAGE MEMOIRE/ARRET encore.
Remarque:
1. 1.Si le minuteur fait un compte à rebours quand il est arrêté, il reprendra
le compte à rebours.
2. 2.Si le minuteur est à zéro quand il est stoppé, il commence un
chronométrage.
3. 3.Si le minuteur fait un chronométrage quand il est arrêté, il reprendra
le chronométrage.
POUR EFFACER UN MINUTEUR
Appuyer sur EFFACER pendant que le(s) minuteur(s) est/sont désactivé(s).
Les minuteurs reviennent à zéro. Le fonctionnement de l’ / des autre(s)
minuteur(s) ne sera pas affecté.
COMMENT RAPPELER LES REGLAGES
PRECEDENTS D’UN MINUTEUR
Rappeler les réglages précédents d’un minuteur est aisé. Il suffit d’appuyer
sur le bouton de minuteur correspondant ou sur ARRET MEMEOIR/
ARRÊT après avoir effacé et remis à zéro.
POUR CHANGER LA PILE
En conditions normales d’utilisation, la pile fournie avec l’appareil peut
durer plus d’un an S’il y a besoin de la remplacer, il suffit d’ouvrir le
compartiment à pile et d’insérer une nouvelle pile LR44 1,5V (avec le pole
positif (+) vers le haut) dans le compartiment. Replacer le couvercle du
compartiment.
Remarque:
L’appareil ne fonctionnera pas si la pile n’est pas insérée correctement.
Essayer de réinsérer la pile.
COMMENT UTILISER LE CLIP, LE PIED DE
SUPPORT PLIANT ET L’AIMANT
Il y a un clip au dos de l’appareil qui peut permettre de l’accrocher à une
poche ou une ceinture. Un pied de support peut aussi être déplié pour former
un support avec le clip. L’appareil peut aussi être fixé à toute surface
métallique en utilisant l’aimant.
ENTRETIEN
Cet appareil est conçu pour donner satisfaction pendant de nombreuses années
s’il est manipulé soigneusement. Voici quelques instructions pour en prendre soin :
1. Ne pas plonger l’appareil dans l’eau. S’il se trouve en contact avec de l’eau,
l’essuyer immédiatement avec un chiffon doux.
2. Ne pas nettoyer l’appareil avec un détergent à l’alcool ou des produits abrasifs
ou corrosifs. Des nettoyants abrasifs pourraient rayer les pièces en plastique
et corroder le circuit électronique.
3. Ne pas faire subir à l’appareil un excès de : forces, chocs, poussière,
température ou humidité. Un tel traitement pourrait avoir pour conséquence
des disfonctionnements, une durée de vie électronique raccourcie, des piles
endommagées, ou des pièces déformées.
4. Ne pas manipuler les composants internes de l’appareil. Ceci annulera la
garantie de l’ppareil et pourrait causer des dégâts. L’appareil ne contient pas
de pièces utilisables par l’utilisateur.
5. Utiliser uniquement le type de piles neuves indiqué dans ce manuel. Ne pas
mélanger les piles neuves et usées car les vieilles piles peuvent fuir.
6. Lire ce manuel soigneusement avant d’utiliser l’appareil.
7. Le contenu de ce livret est susceptible de modifications sans avis préalable.
A PROPOS D'OREGON SCIENTIFIC
En consultant notre site internet (www.oregonscientific.fr), vous pourrez
obtenir des informations sur les produits Oregon Scientific: photo
numérique; lecteurs MP3; produits et jeux électroniques éducatifs; réveils;
sport et bien-être; stations météo; téléphonie. Le site indique également
comment joindre notre service après-vente.
Nous espérons que vous trouverez toutes les informations dont vous avez
besoin sur notre site, néanmoins, si vous souhaitez contacter le service
client Oregon Scientific directement, allez sur le site
www2.oregonscientific.com/service/support ou appelez le 1-800-853-8883
aux US. Pour des demandes internationales, rendez vous sur le site:
www2.oregonscientific.com/about/international/default.asp
DEUTSCH
EINLEITUNG
Wir gratulieren Ihnen zum Erwerb Ihres 3-Kanal-Timers mit Uhr und
großem Display (WB388). Dieses Gerät ist ein handlicher 3-Kanal-Timer
sowie eine Kalender-/Alarmuhr mit folgenden Funktionen:
• Drei separate, große LCD-Anzeigen für Timer 1, Timer 2 und Timer
3 oder für Uhrzeit, Alarm und Datum
• 6-stellige Anzeige zur Darstellung von Timer und Uhrzeit
• Automatische Count-Up-/Count-Down-Funktionen für einzelne Timer
• Speicherabruf-Funktion für voreingestellte Timer-Zeiten
• Verschiedene Signaltöne zur einfachen Erkennung der einzelnen Timer
• Auswählbare Uhranzeigemodi im 12- und 24-Stundenformat
• Auswählbare amerikanische und europäische Datumsanzeige
• Tastenton zur akustischen Rückmeldung eines Tastendrucks
• Automatische Schlummerfunktion (Snooze) für Alarmuhr
• Befestigungsclip für Tasche oder Gürtel
• Ausklappbarer Ständer
• Magnet zur Befestigung auf Metallflächen
ERSTE SCHRITTE
Das Gerät wird mit einer bereits eingesetzten Batterie des Typs G-13,1,5V
betrieben. Die Batterie ist mit einem roten Band isoliert, um eine Entladung
vor Inbetriebnahme zu reduzieren. Vergessen Sie daher vor Inbetriebnahme
nicht, das Isolierband zu entfernen, indem Sie es vorsichtig von der
Innenseite des Batteriefachs lösen. Sobald dies erfolgt ist, wird die
Bildschirmanzeige auf den normalen UHR-Modus zurückgesetzt.
Das Gerät verfügt über zwei Betriebsmodi: UHR und TIMER. Der UHR-
Modus ermöglicht die Anzeige und Einstellung von Uhr, Alarm und Datum;
der TIMER-Modus dient hingegen zum Start und zur Einstellung des
Timers. Um von einem Modus auf den anderen zu wechseln, drücken Sie
einfach auf CLOCK, wenn Sie sich im normalen Modus befinden.
Die LCD-Anzeige für den jeweiligen Betriebsmodus ist wie folgt:
SO WÄHLEN SIE DIE UHRANZEIGE IM 12- UND
24-STUNDENFORMAT AUS
Die Uhranzeige kann vom 12-Stundenformat auf das 24-Stundenformat
und umgekehrt geändert werden, indem Sie im normalen UHR-
Betriebsmodus zu einem beliebigen Zeitpunkt auf H drücken. Die Anzeige
AM oder PM wird eingeblendet und gibt die Stunde des jeweiligen Tages
an, wenn der Uhranzeigemodus für 12-Stunden ausgewählt wird.
Hinweis: Wird keine Auswahl getroffen, wird automatisch das 12-
Stundenformat ausgewählt.
SO WÄHLEN SIE DIE AMERIKANISCHE UND
EUROPÄISCHE DATUMSANZEIGE AUS
Die amerikanischen und europäischen Datumsanzeige-Formate können
untereinander gewechselt werden, indem Sie bei der Datumseinstellung
auf START MEMORY/STOP drücken.
Beim amerikanischen Format wird der Monat vor dem Tag angezeigt; beim
europäischen Format ist es genau umgekehrt.
Hinweis: Wird keine Auswahl getroffen, wird automatisch das
amerikanische Format angezeigt.
SO STELLEN SIE UHRZEIT UND DATUM EIN
1. Halten Sie CLOCK 2 Sekunden lang gedrückt, um den
Einstellungsmodus aufzurufen. Daraufhin erfolgt ein Signalton, und
alle Ziffern der Uhr beginnen zu blinken.
2. Drücken Sie auf H und M, um die Einstellung für Stunde und Minute
zu ändern. Die jeweilige Zeitanzeige hängt davon ab, welches
Anzeigeformat vor der Einstellung der Uhr ausgewählt wurde.
3. Drücken Sie auf S, um die Sekunden einzustellen; diese werden auf
Null zurückgesetzt, wenn der vorherige Einstellungswert 29 oder
niedriger war. Wenn der vorherige Einstellungswert 30 oder mehr
betrug, wird der Minutenwert automatisch erhöht.
4. Drücken Sie nach Beendigung auf CLOCK, um die Einstellung zu
bestätigen. Die Ziffern der Uhr hören auf zu blinken, während die
Ziffern der Alarmuhr zu blinken beginnen.
5. Drücken Sie auf H und M, um die Stunden- und Minuteneinstellung
der Alarmuhr zu ändern.
6. Drücken Sie auf START MEMORY/STOP, um die Alarmuhr zu
aktivieren oder zu deaktivieren. Wenn die Alarmuhr aktiviert ist, wird
das Symbol
auf dem Bildschirm eingeblendet.
7. Drücken Sie nach Beendigung auf CLOCK, um die Einstellung zu
bestätigen. Die Ziffern der Alarmuhr hören auf zu blinken, während
die Datumsziffern zu blinken beginnen.
8. Drücken Sie auf H und M, um die Einstellung von Monat und Tag des
Kalenders zu ändern.
9. Drücken Sie auf START MEMORY/STOP, um von der amerikanischen
Datumsanzeige zur europäischen Datumsanzeige, und umgekehrt, zu
wechseln.
10. Drücken Sie nach Beendigung auf CLOCK, um die Einstellung zu
bestätigen. Alle Ziffern hören auf zu blinken.
Hinweis:
1. Wenn Sie die Einstellung nicht bestätigen, indem Sie nach Änderung
der Werte für Uhrzeit, Alarm oder Datum auf CLOCK drücken, wird
der Einstellungsmodus automatisch nach 2 Minuten mit den zuletzt
eingegebenen Werten beendet.
2. Wenn Sie von einem Einstellungsvorgang zu einer anderen Einstellung
übergehen möchten, wie z.B. von der Uhrzeit zum Alarm, oder vom
Alarm zum Datum, drücken Sie im Einstellungsmodus einfach auf
CLOCK.
3. Wenn Sie im Einstellungsmodus H oder M gedrückt halten, werden
die Ziffern in schneller Folge erhöht.
SO VERWENDEN SIE DIE ALARMUHR UND DIE
SNOOZE-FUNKTION
Der Weckalarm wird genau zur voreingestellten Zeit ausgelöst. Das
Alarmsignal ertönt 1 Minute lang, wenn es nicht unterbrochen wird.
Um den Alarm zu deaktivieren, drücken Sie einfach eine beliebige Taste
oder warten Sie, bis er nach 1 Minute von selbst beendet wird. Wird
zwischenzeitig die Taste CLEAR gedrückt, wird die Snooze-Funktion
ausgelöst.
Die Snooze-Funktion aktiviert den Alarm nach Ablauf von 8 Minuten
erneut.
Der Alarm kann anschließend auf dieselbe Weise deaktiviert werden. Wenn
Sie jedoch erneut auf CLEAR drücken, wird die Snooze-Funktion
wiederum ausgelöst.
Die Snooze-Funktion wird wiederholt, wenn der Alarm durch weiteres
Drücken der Taste CLEAR deaktiviert wird.
SO STELLEN SIE EINEN TIMER EIN
1. Wählen Sie den TIMER-Modus, indem Sie im normalen UHR-Modus
einmal auf CLOCK drücken.
2. Die LCD-Anzeige wird umgeschaltet und zeigt die aktuellen
Einstellungen aller drei Timer an.
3. Wählen Sie den Timer aus, indem Sie TIMER 1, TIMER 2 oder
TIMER 3 zwei Sekunden lang gedrückt halten. Die Anzeige des
gewählten Timers beginnt zu blinken.
4. Drücken Sie auf CLEAR, um die Einstellung auf Null zurückzusetzen,
oder auf H, M und S, um die jeweilige Einstellung für Stunde, Minute
und Sekunde zu ändern. Wenn Sie die Tasten gedrückt halten, werden
die entsprechenden Ziffern in schneller Folge erhöht. Sie können einen
Timer auf bis zu 99 Stunden, 59 Minuten und 59 Sekunden einstellen.
5. Drücken Sie nach Beendigung erneut auf die entsprechende Timer-
Taste, um die Einstellung zu bestätigen. Alle Ziffern dieses Timers
hören auf zu blinken.
SO STARTEN SIE EINEN TIMER
Drücken Sie einmal auf die entsprechende Timer-Taste. Wenn Sie z.B. Timer
1 starten möchten, drücken Sie einmal auf TIMER 1. Um Timer 2 zu
starten, drücken Sie hingegen auf TIMER 2. Um alle Timer zu starten,
drücken Sie auf START MEMORY/ STOP.
Hinweis:
1. Wenn ein Timer mit einem voreingestellten Wert aktiviert wird, der
höher als Null ist, startet er die Rückwärtszählung (Count-Down). Falls
diese nicht unterbrochen wird, ertönt nach Erreichen des Wertes Null
1 Minute lang ein Alarmsignal, und die Vorwärtszählung (Count-Up)
wird erneut durchgeführt.
2. Wenn ein Timer mit einem voreingestellten Wert von Null aktiviert
wird, startet er sofort den Count-Up-Vorgang.
3. Jeder Timer verfügt über ein anderes Alarmsignal, um eine mühelose
Erkennung zu ermöglichen. Wenn ein zweiter Timer abgelaufen und
ein anderer Alarm ausgelöst wurde, wird das erste Alarmsignal vom
zweiten abgelöst.
Mode MINUTEUR
Affichage
du réveil
Affichage de
l'Heure
Affichage Mois-
Date
Affichage
Minuteur 2
Affichage
Minuteur 1
Affichage
Minuteur 3
Mode Heure
Battery
Compartment Cover
Clip
Foldaway
Stand Leg
Clip
Magnet
Timer 1
Timer 2
Timer 3
LCD
Display
Clock
Clear
Start Memory/Stop
H M S
Batteriefachdeckel
Clip
Ausklappbarer
Ständer
Clip
Magnet
Timer 1
Timer 2
Timer 3
LCD
Anzeige
Clock (UHR)
Clear (Löschen)
Start Memory/Stop
(Speicher Start/Stop)
H M S
(Std.) (Min.) (Sek.)
Alarmanzeige
Zeitanzeige
Monat-
Datumsanzeige
Anzeige
Timer 2
Anzeige
Timer 1
Anzeige
Timer 3
TIMER Modus
UHR-Modus