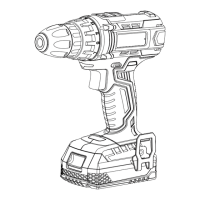
This document provides an instruction manual for the ORFELD Cordless Driver Drill, models DX025A, DX025B, and DX025C.
Function Description
The ORFELD Cordless Driver Drill is a versatile power tool designed for both screwdriving and drilling operations. It features a switch trigger for controlling the tool's speed, which increases with pressure on the trigger. The tool is equipped with an electric brake that stops the rotation quickly when the switch trigger is released.
A front lamp illuminates the work area, and it stays on as long as the switch trigger is pressed. The drill also has a reversing switch lever to change the direction of rotation (clockwise or counter-clockwise). When the lever is in the neutral position, the switch trigger cannot be pressed, preventing unintentional starting.
The tool offers a two-speed mechanical gear change:
- Speed 1 (Low): Provides low speed but high torque, suitable for heavy-loading operations.
- Speed 2 (High): Provides high speed but lower torque, suitable for light-loading operations.
The fastening torque can be adjusted through an adjusting ring with 19 levels, from minimum torque at level 1 to maximum torque at the drill marking. The clutch will slip at various torque levels when set between 1 and 19, but it does not function at the drill marking.
The drill chuck allows for easy installation and removal of driver bits and drill bits by rotating the sleeve counter-clockwise to open the jaws and clockwise to tighten them. A hook can be installed on either side of the tool for temporary hanging.
Important Technical Specifications
The specifications for models DX025A, DX025B, and DX025C are largely identical, with the primary difference being the model designation.
General Specifications:
- Model: DX025A, DX025B, DX025C
- Drilling capacities:
- Steel: 8 mm (5/16")
- Wood: 22 mm (7/8")
- No load speed (RPM):
- High (2): 0 - 1,100 /min
- Low (1): 0 - 400 /min
- Chuck Capacity: 10 mm (3/8")
- Battery pack Voltage: DC 18V (20V max.)
- Battery cell: Li-ion 2.0 Ah
- Charger:
- Rated Voltage: 100-240V AC, 50-60Hz
- Output Voltage: DC 18V (20V max.)
- Rated output current: 500mA
- Charging Time: 3-5H
- Sound and Vibration Data:
- Sound pressure L_PA: 73dB(A)
- Sound power L_WA: 84dB(A)
- Uncertainty K (sound): 3dB(A)
- Vibration (Drilling): 3.866m/s²
- Uncertainty K (vibration): 1.5m/s²
- Safety class: Square symbol (double insulated)
Applicable Battery Cartridge and Charger:
- Battery cartridge: BA-1820B/BA-1840B
- Charger: CH-1802A/CH-1802B/CH-1802C
Torque Adjustment Guide (Screw Size vs. Graduation):
- Machine screw:
- M4: 1-19 (all levels)
- M5: Ø3.5 x 22 (levels 11-19)
- M6: Ø4.1 x 38 (levels 17-19)
- Wood screw:
- Soft wood (e.g., pine): Ø3.5 x 22 (levels 11-19)
- Hard wood (e.g., lauan): Ø4.1 x 38 (levels 17-19)
Usage Features
Battery Installation and Removal:
- Always ensure the tool is switched off before installing or removing the battery cartridge.
- Hold both the tool and battery cartridge firmly to prevent slipping and damage.
- To remove, slide the button on the front of the cartridge and slide the cartridge out.
- To install, align the tongue of the cartridge with the groove in the housing and push until it locks with a click.
- Ensure the battery cartridge is fully installed; a partially installed cartridge may fall out and cause injury. Do not force the cartridge if it doesn't slide in easily.
Battery Protection System:
- The tool has a battery protection system that automatically cuts off power to extend battery life.
- Overloaded: If the tool draws abnormally high current, it will stop. Turn off the tool, remove the cause of overload, then restart. If it doesn't start, the battery may be overheated; let it cool before restarting.
- Low battery voltage: If the remaining battery capacity is too low, the tool will not operate or will stop soon after starting. Remove and recharge the battery.
Indicating Remaining Battery Capacity:
- For battery cartridges with an indicator, press the check button to illuminate indicator lamps for a few seconds, showing remaining capacity:
- 3 lamps lit: 66% to 100%
- 2 lamps lit: 33% to 66%
- 1 lamp lit: 0% to 33%
- Note that actual capacity may vary slightly depending on usage conditions and ambient temperature.
Switch Action:
- Before installing the battery, ensure the switch trigger actuates properly and returns to the "OFF" position.
- Pull the switch trigger to start the tool; speed increases with pressure. Release to stop.
Electric Brake:
- The tool is equipped with an electric brake. If it consistently fails to stop quickly after releasing the trigger, have it serviced.
Front Lamp:
- Pull the switch trigger to light the lamp. It stays on while the trigger is pulled.
- Caution: Do not look directly into the light source.
- Clean the lamp lens with a dry cloth to avoid scratches that could impair illumination.
Reversing Switch Action:
- The tool has a reversing switch lever (A for clockwise, B for counter-clockwise).
- Caution: Always check the direction of rotation before operation.
- Caution: Use the reversing switch only when the tool has come to a complete stop to avoid damaging the tool.
- Caution: When not operating the tool, set the reversing switch to the neutral position to prevent accidental starting.
Speed Change:
- To change speed, switch off the tool first.
- Slide the speed change lever to "2" for high speed/low torque or "1" for low speed/high torque.
- Ensure the lever is in the correct position before operation.
- If the tool speed drops significantly during "2" operation, slide the lever to "1" and restart.
- Caution: Always set the speed change lever fully to the correct position to avoid tool damage.
- Caution: Do not use the speed change lever while the tool is running.
Adjusting Fastening Torque:
- Turn the adjusting ring to set the torque level (1-19). Align the graduation with the arrow on the tool body.
- The clutch slips at set torque levels (1-19) but does not work at the drill marking.
- Before actual work, perform a trial screw drive into your material to determine the required torque level.
Installing/Removing Driver Bit/Drill Bit:
- Turn the sleeve counter-clockwise to open the chuck jaws.
- Insert the bit as far as it will go.
- Turn the sleeve clockwise to tighten the chuck.
- To remove, turn the sleeve counter-clockwise.
Installing Hook:
- The hook can be installed on either side of the tool by inserting it into a groove and securing it with a screw.
- Caution: Always secure the hook firmly with the screw to prevent it from detaching and causing injury.
Screwdriving Operation:
- Caution: Adjust the adjusting ring to the proper torque level.
- Caution: Ensure the driver bit is inserted straight into the screw head to prevent damage to the screw and/or bit.
- Place the bit in the screw head, apply pressure, start slowly, and gradually increase speed. Release the trigger when the clutch cuts in.
- Note: When driving wood screws, pre-drill a pilot hole (2/3 diameter of the screw) to ease driving and prevent splitting.
Drilling Operation:
- Turn the adjusting ring to the drill marking.
- Drilling in wood: Use wood drills with a guide screw for best results.
- Drilling in metal: Make an indentation with a center-punch and hammer before drilling to prevent slipping. Use cutting lubricant for metals, except iron and brass which should be drilled dry.
- Caution: Excessive pressure will not speed up drilling; it will damage the bit, decrease performance, and shorten tool life.
- Caution: Hold the tool firmly when the drill bit breaks through the workpiece, as tremendous force is exerted.
- Caution: A stuck drill bit can be removed by setting the reversing switch to reverse rotation, but hold the tool firmly to prevent abrupt kickback.
- Caution: Always secure workpieces in a vise or similar hold-down device.
- Caution: If operating continuously until the battery is discharged, allow the tool to rest for 15 minutes before using a fresh battery.
Using as a Hand Screwdriver:
- Switch off the tool.
- Move the reversing switch lever to the neutral position.
- Turn the adjusting ring to the drill marking.
- Turn the tool.
- Note: This is convenient for checking screwdriving. Do not use for work requiring excessive force (e.g., tightening bolts, removing rusted screws).
Charging the Battery:
- Open the dust cover and insert the charger plug into the battery charge port.
- The red LED will turn on during charging.
- When fully charged, the red LED will turn off, and the green LED will turn on.
- Note: Ensure the battery and charger are aligned correctly. Do not force the battery onto the charger. Check for clean and undamaged contacts.
Maintenance Features
General Maintenance:
- Keep cutting tools sharp and clean. Properly maintained tools are less likely to bind and are easier to control.
- Keep handles and grasping surfaces dry, clean, and free from oil and grease.
- Maintain power tools and accessories. Check for misalignment, binding, breakage, or any other condition that may affect operation. Have damaged tools repaired before use.
Battery Life Maintenance:
- Charge the battery cartridge before it is completely discharged. Stop operation and charge when you notice less tool power.
- Never recharge a fully charged battery cartridge; overcharging shortens its service life.
- Charge the battery cartridge at room temperature (10 °C - 40 °C / 50 °F - 104 °F). Allow a hot battery cartridge to cool before charging.
Safety Warnings (General):
- Read all safety warnings, instructions, illustrations, and specifications provided with the power tool. Failure to follow instructions may result in electric shock, fire, or serious injury.
- Save all warnings and instructions for future reference.
- Work area safety: Keep the work area clean, well-lit, and free from flammable liquids, gases, or dust. Keep children and bystanders away.
- Electrical safety: Power tool plugs must match the outlet. Avoid body contact with earthed surfaces. Do not expose power tools to rain or wet conditions. Do not abuse the cord. Use an extension cord suitable for outdoor use when operating outdoors. Use a GFCI-protected supply in damp locations.
- Personal safety: Stay alert, use common sense, and do not operate the tool when tired or under the influence of drugs, alcohol, or medication. Use personal protective equipment, including eye protection. Prevent unintentional starting. Remove adjusting keys or wrenches before turning on the tool. Do not overreach. Dress properly, keeping hair, clothing, and gloves away from moving parts. Use dust extraction/collection facilities if provided. Do not let familiarity lead to complacency. Always wear protective goggles.
Safety Warnings (Cordless Driver Drill Specific):
- Use auxiliary handle(s) if supplied.
- Hold the power tool by insulated gripping surfaces when performing operations where the cutting accessory or fastener may contact hidden wiring.
- Always ensure firm footing and that no one is below when working in high locations.
- Keep hands away from rotating parts.
- Hold the tool firmly.
- Do not leave the tool running when unattended. Operate only when hand-held.
- Do not touch the drill bit or workpiece immediately after operation; they may be extremely hot.
- Some materials contain toxic chemicals; take caution to prevent dust inhalation and skin contact.
- If a drill bit cannot be loosened, use pliers to pull it out to avoid injury from its sharp edge.
Safety Warnings (Battery Cartridge Specific):
- Read all instructions and cautionary markings on the battery charger, battery, and product using the battery before use.
- Do not disassemble the battery cartridge.
- If operating time becomes excessively shorter, stop operating immediately to avoid overheating, burns, or explosion.
- If electrolyte gets into eyes, rinse with clear water and seek medical attention immediately to prevent eyesight loss.
- Do not short the battery cartridge (do not touch terminals with conductive material, avoid storing with other metal objects, and do not expose to water or rain).
- Do not store the tool and battery cartridge in locations where the temperature may reach or exceed 50 °C (122 °F).
- Do not incinerate the battery cartridge, even if damaged or worn out, as it may explode.
- Be careful not to drop or strike the battery.
- Do not use a damaged battery.
- Lithium-ion batteries are subject to Dangerous Goods Legislation requirements for commercial transport. Observe special packaging and labeling requirements. Tape or mask off open contacts and pack the battery to prevent movement in packaging.
- Follow local regulations for battery disposal.
- Use batteries only with ORFELD specified products; using non-compliant products may cause fire, excessive heat, explosion, or electrolyte leakage.