EasyManua.ls Logo

OSHIMA OP-1200 - User Manual

OSHIMA OP-1200
49 pages
Print Icon
To Next Page IconTo Next Page
Loading...
- 0 -
歡迎使用“歐西瑪”壓襯機
WELCOME YOU USE OSHIMA LOW TEMPERATURE
CONTINUOUS FUSING PRESS MACHINE
使用前,請詳閱
BEFORE YOU BEGINPLEASE READ CAREFULLY
OP-1200
OP-1400
OP-1600
使用說明書
OPERATING MANUAL
Question and Answer IconNeed help?

Do you have a question about the OSHIMA OP-1200 and is the answer not in the manual?

Overview

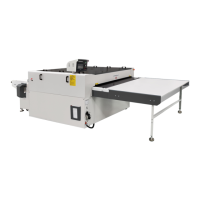
This document describes the OSHIMA Continuous Fusing Press Machine, a low-temperature continuous fusing press machine designed for bonding fabrics.

Function Description

The OSHIMA Continuous Fusing Press Machine is used for continuously bonding interlining to fabric at low temperatures. It features a cooling system to ensure optimal bonding effects and prevent damage from high heat. The machine is equipped with a control panel that allows users to adjust various parameters such as temperature, speed, and pressure. It also includes safety features like a main power switch and a belt warping prevention system.

Important Technical Specifications

The machine comes in three models: OP-1200/L, OP-1400/L, and OP-1600/L, with varying fusing widths.

Specification OP-1200/L OP-1400/L OP-1600/L
Power supply 3P 220V/380V 3P 220V/380V 3P 220V/380V
Heater 21.6 kW/24kW 26.4 kW/28.8kW 28.8kW/33.6kW
Main motor 0.4 kW 0.4 kW 0.4kW
Max temperature 230°C 230°C 230°C
Max pressure 0.5M pa 0.5M pa 0.5M pa
Fusing time 7-34sec 7-34sec 7-34sec
Fusing width 1200mm 1400mm 1600mm

The electrical circuit includes a power circuit with specifications of 310mm+16mm and a control circuit with 2.5mm² wiring. It utilizes various electrical components such as circuit boards, inverters, magnetic contactors, time relays, solid relays, micro switches, and a speed controller. The machine also incorporates a cylinder for pressure application and an air released valve.

Usage Features

Before operation, users are instructed to read the manual carefully.

  1. Starting the machine:

    • Turn the main power switch to "ON" and press the start button on the control box. The red light on the switch will illuminate, and the motor will start.
    • Rotate the speed adjustment knob to its maximum value.
    • Check the belt surface for any foreign objects before pressing the start button.
    • Adjust the speed adjustment knob to allow the belt to run slowly for approximately 12-20 seconds for one cycle. After confirming no abnormalities, set the desired operating speed.
  2. Temperature setting:

    • Set the front and rear heater temperatures according to the product requirements using the temperature control system. The temperature controller allows setting the SV (set value) and alarm limits (ALI, SLH).
  3. Speed and pressure adjustment:

    • Rotate the speed control knob to set the appropriate speed.
    • Adjust the pressure valve to the required pressure (operating range: 1-4 kg/cm²).
  4. Cooling system:

    • Turn on the cooling system during operation to ensure better bonding effects.
  5. Shutting down:

    • After completing work, adjust the pressure to 0 kg/cm².
    • Turn off the cooling system.
    • Activate the cooling timer. The motor will continue to run for approximately 60 minutes before automatically stopping.
    • Finally, turn off the main power switch.

Maintenance Features

Proper maintenance is crucial for the longevity and optimal performance of the machine.

  1. Leveling: Ensure the machine is level before operation, especially after initial installation or relocation, to prevent belt deviation or uneven pressure.

  2. Cleaning:

    • Keep the machine clean. Before starting daily operations, use a compressed air gun to remove dust and threads from inside the machine. Pay special attention to the tension rollers to ensure no interlining is attached.
    • Do not place hard objects (scissors, pens, rulers, metal or plastic items) on the work table or cover plates to avoid damaging the belt.
    • If operating at high temperatures, avoid sudden stops. In such cases, use the manual device to slowly rotate the belt to prevent heat damage.
    • Regularly replace the cleaning rod fabric (must be pure cotton) based on operating time and workload.
    • Clean the Teflon belt regularly after work and replace the cleaning rod cover. Use a specific belt cleaning solution to ensure belt durability.
      • If excessive glue from the interlining remains on the belt, clean it every 4 working hours.
      • If no glue remains, clean it every 16 working hours.
      • When cleaning the belt, rub the Teflon belt above the rollers or at the machine's exit.
      • If the belt guiding is controlled by a microswitch, keep away from these electronic components to avoid malfunction.
    • Clean the belt periodically using a specialized belt cleaning agent to ensure its lifespan. When cleaning, set the machine temperature to approximately 100°C.
    • When cleaning the belt, wipe it from underneath where there is support or at the exit roller.
    • For machines with automatic belt deviation correction systems, be careful not to touch switches or the belt during cleaning to avoid system malfunction.
  3. Lubrication:

    • Periodically lubricate all transmission parts, bearings, and chains every month to ensure their durability.
    • For machines with pneumatic pressure, ensure the oil gauge is not empty. Always keep sufficient oil. Release any accumulated oil and water from the filter cup daily after work (press the bottom of the filter cup until air is discharged).
    • Lubricate and grease the driving section to prevent mechanical trouble.
  4. Interlining placement: When fusing, ensure the interlining is slightly smaller than the fabric, and the entire interlining width does not exceed the belt width. Otherwise, it may affect bonding, cause belt deviation, or stop the machine.

Troubleshooting

The manual provides a detailed troubleshooting guide for various issues:

  • Power and Motor Issues:

    • If the power switch lamp does not light up: Check the non-breaker, power supply, fuse, and main switch.
    • If the driving motor does not run: Check if the belt is warped, if fabric or interlining is touching the belt warping stop switch. If so, remove them. If the issue persists after replacing the fuse, the potentiometer, motor, or capacitor may be defective, or there might be mechanical issues like V-belt slippage or burnt intermediate gears.
  • Temperature Control Issues:

    • If the thermo-lamp does not light up when the thermostat is set to 300°C: The thermostat or sensor is defective.
    • If the thermo-lamp does not light up, and the SSR lamp does not turn off: The thermo-sensor is defective.
    • If the thermo-lamp and SSR lamp do not light up: The SSR is defective (temperature does not fall).
    • If the thermo-lamp does not turn off, and the temperature does not fall: The thermostat is defective.
    • If the temperature lamp does not light up when the thermostat is set to 150°C for 30 minutes: Check the voltage between SSR terminals 3 and 4 (should be DC 2.5V-7V). If not, the thermostat is defective. If the SSR lamp does not light up and the temperature does not rise, the heater is defective. If the SSR lamp does not turn off and the temperature does not rise, the SSR is defective.
    • If the temperature lamp lights up, but the SSR lamp does not blink when the thermostat knob is turned on and off: The SSR lamp goes out when the thermolamp is lighting.
  • Belt Issues:

    • If the belt warps and does not stop running: The belt warping stop switch is defective.
    • If the belt is warped to the right or left: Set pressure to "0", loosen tension rollers, and return the belt to the center. The P.C. board or belt warping prevention limit switch may be causing the warp.
    • If the return conveyor does not run: Tension the return conveyor or check for V-belt slippage.
  • Temperature Controller Abnormality:

    • If the temperature controller does not work and shows "SV value is 0000": Set the SV temperature value higher than the normal operating value.
    • If the temperature controller does not work and shows "FFFF": The temperature sensing line is broken. Replace or reconnect the temperature sensing line.
    • If the temperature controller does not work and shows ",,,,": The temperature sensing line is connected incorrectly. Check and correct the connection.
    • If the temperature controller does not work and the AL1 alert light is bright: The AL1 alert value is not set up. Set up the AL1 value.
    • If the temperature contains an error margin: The discrepancy is not corrected or set up. Set up the SHT with the actual difference in temperature number.

Belt Replacement Steps (Illustrated)

The manual provides detailed, numbered steps for replacing the belt, including disassembling and reassembling various components such as cover plates, side shields, main beams, main shafts, tension rollers, and microswitches. It emphasizes the importance of maintaining a 10CM gap when supporting the belt and ensuring the correct rotation direction (counter-clockwise for the upper belt) during installation. It also advises having two to four people for certain steps involving lifting and positioning the belt and support beams. After replacement, it is crucial to check for foreign objects, run the machine slowly to check for belt deviation, and adjust microswitches or front correction rollers if necessary.

OSHIMA OP-1200 Specifications

General IconGeneral
BrandOSHIMA
ModelOP-1200
CategoryIndustrial Equipment
LanguageEnglish