EasyManua.ls Logo

OVE MICAH 6701001 - User Manual

OVE MICAH 6701001
30 pages
Print Icon
To Next Page IconTo Next Page
Loading...
PAGE 1
A general installation guide is provided in the YouTube link below
or through scanning the QR code below.
https://tinyurl.com/5xk4z3ms
MICAH TANKLESS SMART TOILET
INSTALLATION MANUAL
SKU : 6701001
MODEL : MICAH
Flush
1.28 gpf | 4.8 lpf
6”
18 7/8”
ø3 9/16”
ø2 1/16”
27 3/4”
5 15/16”
21 1/4”
18 3/16”
11 7/16”
15 3/8”
15 3/8”
10”
14 15/16”
6 5/16”
10 1/4”
12”
10 13/16”
32”
32”
27 3/8”
27 3/8”
2x ø5/8”
11 5/8”
11 7/16”
Questions, problems, need help?
Before returning to your retailer, call our customer service department at :
1-866-839-2888
8 a.m. - 5 p.m., EST, Monday - Friday
www.ovedecors.com | customerservice@ovedecors.com
17”
Question and Answer IconNeed help?

Do you have a question about the OVE MICAH 6701001 and is the answer not in the manual?

Summary

SAFETY INFORMATION

General Safety Warnings

Covers essential safety precautions for operating and maintaining the toilet, including electrical and usage guidelines.

POWER OUTLET - GFCI

GFCI Power Outlet Requirement

Specifies the need for a GFCI power outlet with a minimum 1800W capacity for safe operation and to prevent surges.

PARTS LIST

Component Identification and Tools Required

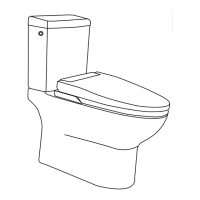
Visual identification of all included toilet components and listing of necessary tools not supplied with the product.

INSTALLATION GUIDE

Initial Setup: Seat Removal and Flange Installation

Instructions for removing the seat, disconnecting cords, and installing the toilet flange, including bolt positioning.

Toilet Placement and Securing

Steps for positioning the toilet on the flange, aligning fixing bolts, and tightening nuts securely for stability.

Reinstalling Toilet Seat

Guidance on carefully re-installing the toilet seat, ensuring no wires are pinched or tangled during the process.

Water Tube and Electrical Connections

Procedure for connecting the water supply tube and reconnecting electrical cords, ensuring proper alignment.

Installing the Internal Tank Shelf

Detailed steps for placing and securing the internal tank shelf at the correct height within the tank.

INSTALLATION OPTION 1: 1;2 WATER OUTLET PIPE

Preparing for 1;2 NPT Threaded Pipe Connection

Details on pre-installing a 1/2" NPT male threaded end water outlet pipe for optimal performance.

Sealing Fittings and Adapter Installation

Guidance on using pipe sealant or Teflon tape for connections and installing the 1/2" NPT to 1/2" G Coupling Adapter.

Check Valve Installation

Instructions for inserting the check valve into the shut-off valve, emphasizing correct arrow orientation for water flow.

Replacing Reducing Valve and Connecting Hose

Steps for replacing the pre-installed hose with a reducing valve and reconnecting the water supply hose to the shut-off valve.

Final Sealing and Drying

Instructions for testing all joints for leaks and applying silicone sealant around the toilet base for drying.

INSTALLATION OPTION 2: 3;8 SHUT-OFF VALVE

Connecting to Existing 3;8 Compression Valve

Instructions for connecting the smart toilet to a standard 3/8" compression shut-off valve using the provided bushing adapter.

Check Valve and O-Ring Replacement

Procedure for replacing the check valve's O-ring and inserting the check valve into the toilet's water inlet, noting arrow direction.

Water Supply Hose Removal

Steps for removing the existing pre-installed water supply hose from the toilet by unscrewing the nut.

Bushing Adapter to Toilet Inlet Connection

Connecting the 7/8" Ballcock to 3/4" G Bushing Adapter to the toilet's rear water inlet port.

Supply Line to Adapter and Shut-off Valve Connection

Connecting the water supply line to the bushing adapter and the shut-off valve, emphasizing leak testing.

Base Sealing and Drying

Final step of applying silicone around the toilet base and allowing 24 hours for drying.

BATTERY INSTALLATION AND GUIDELINES

Remote Control Battery Installation and Safety

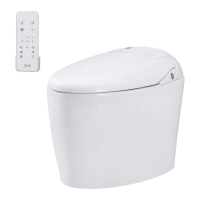
Guidelines for safe battery usage and the procedure for loading two AAA batteries into the remote control.

Toilet Battery Installation for Power Outages

Instructions for installing a 9V PP3 battery in the toilet for backup flushing during power shortages, including cover removal and replacement.

INITIAL OPERATION AND SETUP

First-Time Use: Valve, Power, and Filling

Steps for opening the shut-off valve, plugging in the toilet, and the initial water filling process indicated by lights.

Automatic Power-On and Warming Features

Information on the toilet automatically powering on, seat warming, and bidet water warming after initial setup.

REMOTE CONTROL PAIRING

Pairing Procedure for Remote and Toilet

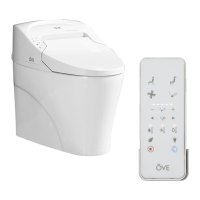
Step-by-step instructions to pair the remote control with the smart toilet for proper communication and functionality.

TOILET SEAT CONTROL PANEL

Seat Keypad Functions: Power, Stop, and Bidet

Description of the functions controlled by the toilet seat keypad, including power, stopping operations, and bidet modes.

Power Indicator Light Status

Explanation of the color-coded indicator light on the toilet, signifying power status and ECO mode.

REMOTE CONTROL FUNCTIONS

Bidet, Drying, and Air Pressure Controls

Details on using the remote for bidet cleaning (rear/lady), air drying, and the air pump function for enhanced water pressure.

Water Pressure and Nozzle Position Adjustment

How to adjust water jet pressure, move the nozzle forward, and move it backward using the remote control.

Temperature Settings and ECO Mode

Explanation of controls for water, air, and seat temperature, plus activation/deactivation of the ECO mode.

User Presets, Light, Stop, and Flush Functions

Instructions for configuring and using user presets, controlling the bowl light, stopping functions, and flushing the toilet.

AUDIO FEEDBACK AND MUTE MODE

Understanding Beeping Sound Signals

Explanation of the audio signals (1x beep, 2x beep) and their meaning regarding command reception and execution.

Activating and Deactivating Mute Mode

Procedure for enabling or disabling mute mode for all smart toilet sounds via the side panel button.

TOILET FEATURES OVERVIEW

Bidet, Air Drying, and Stop Functionality

Description of the bidet cleaning (rear/lady), air drying, and stop functions, including user sensors and auto-stop timers.

Flushing, Lighting, and Energy Saving

Details on the flushing mechanism, the bowl light operation, and the benefits of the ECO mode for energy saving.

CLEANING THE SHUT-OFF VALVE WATER FILTER

Water Filter Cleaning Procedure

Step-by-step guide for safely closing the valve, removing, cleaning the filter, and reassembling the shut-off valve.

CLEANING THE BUSHING FILTER

Bushing Filter Removal and Cleaning Process

Instructions for closing the valve, removing the bushing adapter, cleaning the filter, and reassembling the components.

LONG TERM STORAGE AND BATTERY CARE

Draining Toilet for Long Term Storage

Procedure for draining all water from the toilet before extended periods of non-use, including valve and drain plug operations.

Battery Maintenance and Replacement

Recommendations for annual battery replacement and maintenance for the toilet's backup power system.

TECHNICAL SPECIFICATIONS

Detailed Product Specifications

Comprehensive list of technical details including electrical load, dimensions, capacities, and operational parameters.

FCC COMPLIANCE STATEMENT

Regulatory Compliance and Interference Guidelines

Information regarding FCC compliance for Class B digital devices, potential interference, and user guidance for correction.

MAINTENANCE, CARE, AND WARRANTY

Cleaning Procedures and Product Warranty

Guidelines for general cleaning of the ceramic finish and details on the limited product warranty terms and claim process.

Overview

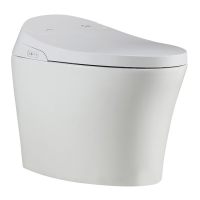
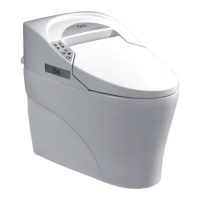
The OVE Micah Tankless Smart Toilet (SKU: 6701001, Model: MICAH) is an advanced, feature-rich toilet designed for enhanced hygiene, comfort, and water efficiency. This installation manual provides comprehensive instructions for setup, operation, and maintenance.

Function Description

The Micah Smart Toilet integrates various smart features for a complete and personalized bathroom experience. Its primary functions include:

  • Cleaning System: Offers both Rear Bidet (1 water jet) and Lady Bidet (5 water jets) cleaning functions with adjustable pressure. The cleaning functions initiate when the user is seated and automatically transition to air drying after 30 seconds of use. The nozzle self-washes before and after each use, and the bidet function automatically stops after 2 minutes of continuous use.
  • Air Drying System: Provides warm air drying with 4 adjustable levels of air temperature and 1 level of air speed. This function also activates when the user is seated.
  • Heating Seat: Features a heated seat with 4 adjustable temperature levels (Room temp, Low, Medium, High) for comfort.
  • Deodorization System: Eliminates odors using an odor-fighting catalyzer, ensuring a fresh bathroom environment.
  • Flushing: Automatically flushes the toilet bowl with water.
  • ECO Mode: An energy-saving mode that reduces electricity usage during periods of non-use. In ECO mode, the cleaning water tank heats water only when the user is seated, as opposed to normal mode where water is kept at preferred temperatures for instant use.
  • Night Light: An integrated light for the toilet bowl that can be turned ON/OFF.
  • User Presets: Two customizable user preset settings allow users to save their preferred water temperature, seat temperature, nozzle position, water pressure, and air dryer temperature for quick recall.

Important Technical Specifications

  • Electric Load: AC 120V / 1300W / 60HZ
  • Electric Cord: 1.5 m insulated power cord
  • Flush Volume: 1.28 gpf (gallons per flush) | 4.8 lpf (liters per flush)
  • Water Temperature: 4 adjustable levels (AC 120V / 1200W / 60HZ heater capacity)
  • Bidet Tank Capacity: 0.3 L
  • Air Drying Temperature: 4 adjustable levels (AC 120V / 250W / 60HZ heater capacity)
  • Seat Temperature: 4 adjustable levels (AC 120V / 45W / 60HZ heater capacity)
  • Overheating Safety: Integrated temperature safety reset protector for cleaning water, temperature fuse for air drying, and by design for seat heating.
  • Anti-Reflux: Check valve integrated into the shut-off valve.
  • Water Supply Pressure: Lowest 207 kPa (30psi), highest 552 kPa (80psi)
  • Water Supply Temperature: 15-35°C
  • Ambient Temperature: 15-40°C
  • Power Outlet Requirement: Must be plugged into a working GFCI power outlet with a dedicated minimum 1800W capacity to prevent damage from electrical surges.
  • Battery Backup: Requires a 9V PP3 battery for flushing functionality during power outages and two 1.5V AAA batteries for the remote control.

Usage Features

  • Remote Control: A comprehensive remote control (Item O) allows for easy access and adjustment of all smart toilet functions. It includes buttons for Rear Bidet/Move, Lady Bidet/Move, Drying, Air Pump, Water Pressure Up/Down, Nozzle Forward/Backward, Water Temperature, Air Temperature, Seat Temperature, ECO Mode, User Presets (1 & 2), Light, Stop, and Flush.
  • Side Keypad: A keypad on the toilet seat provides basic controls for Power, Stop, Lady Bidet/Move, Rear Bidet/Move & Manual Nozzle Wash, and a Power Indicator light (RED for ON, OFF for OFF, YELLOW for ECO MODE).
  • Remote Control Pairing: The remote control must be paired with the toilet after initial startup. This involves powering off the toilet, pressing the STOP button on the side keypad for 3 seconds until a beep, then pressing any button on the remote until another beep confirms pairing.
  • Audio Signals: The toilet provides audio feedback: 1 beep for successful command reception, and 2 beeps if a command cannot be executed (e.g., function unavailable, or maximum/minimum setting reached). A mute mode can be activated via the Lady Bidet side panel button.
  • First Time Use Guidelines: After installation, open the shut-off valve, plug into a GFCI socket, and allow the bidet tank to fill (indicated by a blinking blue light for approximately 1 minute). The toilet will then turn on automatically and be ready for use after beeping sounds and flashing lights stop. Warming up the toilet seat and bidet cleaning water each takes about 3 minutes. Continuous power is recommended for instant readiness.
  • Water Pressure Boost: The "Air Pump" button on the remote can boost water pressure beyond the maximum attainable with the "Water Pressure Up" button.
  • Manual Nozzle Wash: While not seated, pressing the "Rear Bidet/Move & Manual Nozzle Wash" button on the side keypad for 3 seconds will extend the nozzle for manual cleaning. Pressing it again will extend the Lady Bidet nozzle. Pressing for 3 seconds again retracts the nozzle.

Maintenance Features

  • General Cleaning: Use mild, nonabrasive soap and warm water for cleaning. Avoid abrasive cleaners that can scratch the ceramic finish. Common bowl cleaners are safe for the ceramic surface. Do not use "in-tank" bowl cleaners due to corrosive chemicals that can damage tank components.
  • Shut-off Valve Water Filter Cleaning: To clean, close the shut-off valve, unscrew the cap, remove the filter, and brush off dirt with a toothbrush. Clean the valve with water. Reinstall the filter and cap, then open the shut-off valve, ensuring no leaks.
  • Bushing Filter Cleaning: The Bushing Filter (V) is located inside the 7/8" Ballcock to 3/4" G Bushing Adapter (U). Close the shut-off valve, remove the water supply line and bushing adapter. Gently remove the filter and brush off residue. Reinstall the filter, bushing adapter, and water inlet hose, then open the shut-off valve.
  • Long Term Storage: If not using the toilet for an extended period, close the shut-off valve, unscrew the water drain plug to drain all water, then tightly screw the plug back in.
  • Battery Maintenance: The 9V PP3 battery for flushing backup should be replaced once a year. Remove the battery if the toilet is not in use for a long time. The remote control's AAA batteries should also be removed if not used for extended periods.

Installation Options

The manual provides two installation options for connecting to the water supply:

  • Option #1 (1/2" NPT Threaded Water Outlet Pipe): Recommended for best performance at low water pressure. Requires a pre-installed 1/2" NPT Male threaded water outlet pipe (not supplied). Involves using the provided 1/2" NPT to 1/2" G Coupling Adapter (Q), Shut-off Valve (H), Reducing Valve (R), and Check Valve (S). Pipe thread sealant or Teflon tape is crucial for sealing connections.
  • Option #2 (Pre-existing 3/8" Compression Shut-off Valve): Allows connection to an existing standard 3/8" compression valve. Involves changing the O-ring on the Check Valve (S) to a Large Size O-ring (T), inserting the Check Valve (S) into the toilet water inlet, and using the provided 7/8" Ballcock to 3/4" G Bushing Adapter (U). A 3/8" Comp shut-off valve and 7/8" Ballcock supply line are not supplied and must be acquired separately.

Both installation options emphasize testing for leaks and applying silicone around the base of the toilet, allowing 24 hours for drying.

OVE MICAH 6701001 Specifications

General IconGeneral
BrandOVE
ModelMICAH 6701001
CategoryToilets
LanguageEnglish

Related product manuals